Use Docker and docker-compose to create and run multi-container applications.
You will create, set up, package, and run a microservice-based, multi-container applications written in Java, Node.js and Python. You will learn how to break a large monolithic application into a collection of small units, where each unit runs in its own container. This technique is known as Microservices.
Microservices
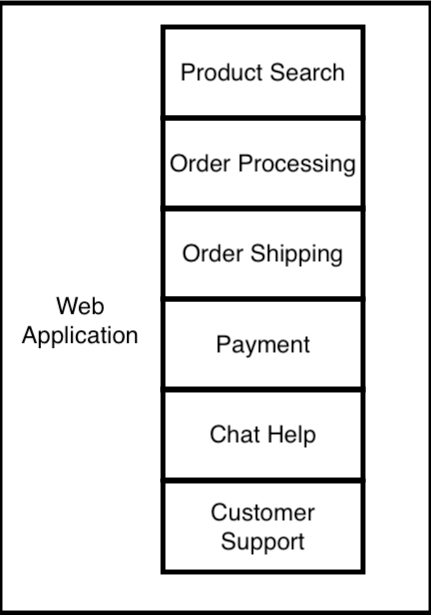
Historically, large web applications used to be built as a large single-unit monolithic application. A monolithic application is a software architecture style where all the application’s functionality is tightly coupled and managed as a single unit or codebase. The issue with this category of software architecture is that it becomes challenging to manage and scale when working with larger teams. More often, a change in one component of the app may result in unexpected side effects that break other components that used to work normally. Below is an example of a monolithic online store website that has the product catalog search, order processing, shipping, payment, and other components developed as a single unit or codebase.

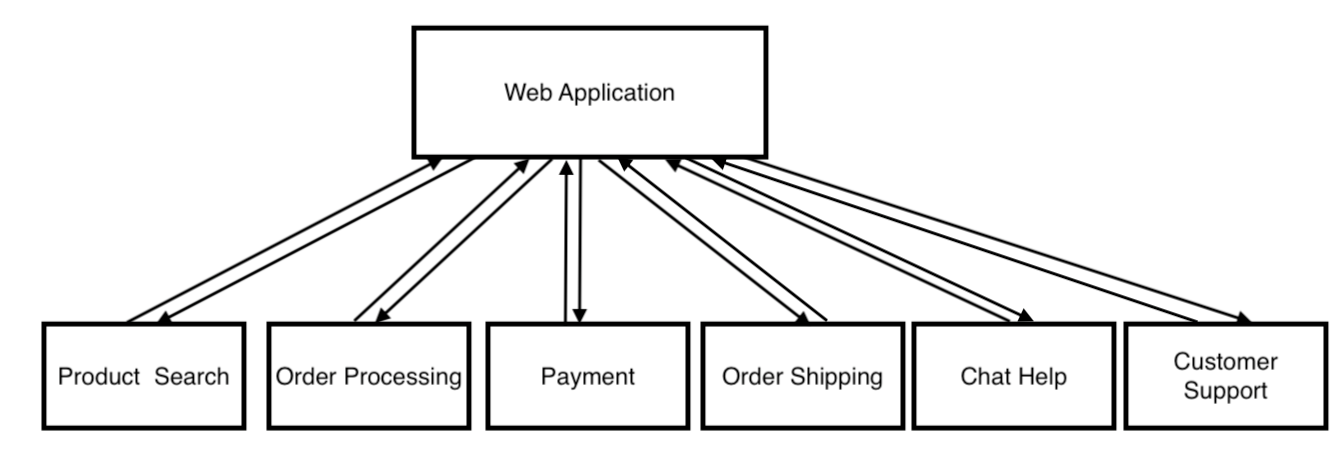
Modern applications are now built in a more modular software architecture called Microservices. This architecture breaks the app into a collection of small services, where each service runs in its own container. A container is a self-contained, lightweight package that includes everything necessary to execute an application. Docker provides the ability to package and run an application in this loosely isolated environment called container. The website then makes calls (HTTP requests) to these services. Below is an example of a modular online store website using Microservices.

In this lab, we will build an online store that consists of the following 7 microservices. These microservices are written in a diverse set of programming languages including: Java, Python, Node.js, as well as HTML and JavaScript. The concepts demonstrated in this lab should be understandable even if you’re not familiar the programming languages that these services are developed using.
In this lab, you will learn how to use docker and docker-compose to create and run microservices (multi-container applications). The host operating system, which is often is your local machine, must have Docker installed on your local machine. Each of these containers is running in an isolated environment.
Setup/Prerequisites
- Install Docker on your local machine. To install Docker, follow the installation instructions at https://www.docker.com/products/docker-desktop/.
- On Windows, you will need to restart Windows because changes related to the Windows Subsystem for Linux (WSL) can’t take effect while the OS is running.
- Start Docker Desktop as an administrator (right-click and select ‘Run as administrator’), and make sure the Docker engine is running. This will be shown on the Docker Desktop welcome screen.
- An account on Ducker Hub is not needed for this lab activity.
- Node.js: This is needed because we want to develop an express API locally on the host and executes it inside the container. We will use a node package called nodemon to automatically restart the node application running inside the container when file changes are detected on the host.
Step 1: Start the Docker engine and clone the project
- Start Docker Desktop and be sure that the Docker engine is running.
- On Windows, you will need to run Docker Desktop as an administrator.
- Open your terminal or Windows Powershell
- Clone the project using git:
git clone https://gitlab.com/cpit490/docker-compose-microservices.git
cd  docker-compose-microservices/
- Install nodejs
- Go to the
product-reviews-api, runnpm install, and return back to the project root directory
cd product-reviews-api
npm install
cd ..
- Open the project in your text editor (e.g., Visual Studio Code). If you have the code command in your PATH, then you can run:
code .. Otherwise, open it in VS code using the file menu.
Step 2: Create multi-container applications with docker-compose
Docker Compose is a tool for creating and running multi-container applications or microservices. It uses a YAML file (usually named docker-compose.yml) to specify the services that make up your application, and the configurations for those services.
In the project you clone, the docker-compose.yml file, which is listed below, declares seven services that make up a microservices architecture:
version: "3"
services:

  product-search-service:
    build: ./product-search-app
    image: product-search-app-image:1.0.0
    container_name: product-search-service
    ports:
      - "8000:5000"

  product-shipping-service:
    build: ./product-shipping-app
    image: product-shipping-app-image:1.0.0
    container_name: product-shipping-service
    ports:
      - "9000:5000"

  best-sellers-api:
    build: ./best-sellers-api
    image: best-sellers-api-image:1.0.0
    container_name: best-sellers-api
    ports:
      - "10000:3000"

  reviews-api:
    build: ./product-reviews-api
    image: reviews-api-iamge:1.0.0
    container_name: reviews-api
    ports:
      - ${REVIEWS_API_SERVER_PORT}:45000
    environment:
      - MARIADB_USER=${MARIADB_USER}
      - MARIADB_PASSWORD=${MARIADB_ROOT_PASSWORD}
      - MARIADB_HOST=${MARIADB_HOST}
      - MARIADB_DB=${MARIADB_DB}
      - MARIADB_PORT=${MARIADB_PORT}
    depends_on:
      - db
    networks:
      - app_network
    volumes:
      - ./product-reviews-api/:/app

  website-app:
    build: ./web-app
    image: website-app-image:1.0.0
    container_name: website-app
    ports:
      - "4000:80"
    volumes:
      - ./web-app/public-html:/usr/local/apache2/htdocs/
    depends_on:
      - db
    networks:
      - app_network

  db:
    image: mariadb:11.3.2
    container_name: mariadb
    env_file:
      - .env
    environment:
      - MARIADB_USER=${MARIADB_USER}
      - MARIADB_ROOT_PASSWORD=${MARIADB_ROOT_PASSWORD}
      - MARIADB_DB=${MARIADB_DB}
      - MARIADB_PORT=${MARIADB_PORT}
    volumes:
      - ./db_data:/var/lib/mysql
      - ./sql_scripts:/docker-entrypoint-initdb.d
    ports:
      - ${MARIADB_PORT}:${MARIADB_PORT}
    networks:
      - app_network

  adminer:
    image: adminer:4.8.1
    container_name: adminer
    networks:
      - app_network
    ports:
      - 8080:8080
    depends_on:
      - db
    environment:
      - ADMINER_DEFAULT_SERVER=app_network
      - ADMINER_DEFAULT_DB=${MARIADB_DB}
      - ADMINER_DEFAULT_USER=${ADMINER_DEFAULT_USER}
      - ADMINER_DEFAULT_PASSWORD=${ADMINER_DEFAULT_PASSWORD}
      - MARIADB_ROOT_PASSWORD=${MARIADB_ROOT_PASSWORD}

networks:
  app_network:
    driver: bridge

volumes:
  db_data:
  sql_scripts:
In a Docker Compose file, the ports directive is used to map a port inside the Docker container to a port on the host machine. The syntax is “hostPort:containerPort”. Thus, the port to the left is the one you can access on your host. Below is a description of the microservices used in this docker-compose:
- product-search-service: This service is responsible for product search functionality. It handles searching for products by a given keyword or search term. It’s written in Java using the Spring framework and built from the Dockerfile in the
./product-search-appdirectory and exposes port 8000 on the host, mapping to port 5000 in the container. The Dockerfile for this service is located atproduct-search-app/Dockerfile:
FROM maven:3.8.5-openjdk-17
RUN mkdir /app
COPY . /app
WORKDIR /app
RUN ["mvn", "package"]
EXPOSE 5000
CMD ["java", "-jar", "target/product-search-api-0.0.1-SNAPSHOT.jar"]
- product-shipping-app: This service handles requests to find the shipping status of a given order. It is written in Java using the Spring framework, and built from the Dockerfile in the
./product-shipping-appdirectory and exposes port 9000 on the host, mapping to port 5000 in the container. The Dockerfile for this service is located atproduct-shipping-app/Dockerfile:
FROM maven:3.8.5-openjdk-17
RUN mkdir /app
COPY . /app
WORKDIR /app
RUN ["mvn", "package"]
EXPOSE 5000
CMD ["java", "-jar", "target/product-shipping-api-0.0.1-SNAPSHOT.jar"]
- best-sellers-api: This service provides an API for retrieving best-selling products or the most popular items. It’s written in Python and built from the Dockerfile in the
./best-sellers-apidirectory and exposes port 10000 on the host, mapping to port 3000 in the container. The Dockerfile for this service is located atbest-sellers-api/Dockerfile:
FROM python:3-alpine
RUN mkdir /app
COPY ["./requirements.txt", "./best-sellers.py", "/app/"]
WORKDIR /app
RUN pip install -r requirements.txt
EXPOSE 3000
ENTRYPOINT ["python"]
CMD ["best-sellers.py"]
- product-reviews-api: This service provides an API for product reviews. It’s written in Nodejs and built from the Dockerfile in the
./product-reviews-apidirectory. The port it exposes on the host is determined by theREVIEWS_API_SERVER_PORTenvironment variable, which is mapped to port 8548 in the container. It connects to thedbservice using environment variables for the MariaDB user, password, database, and port. The Dockerfile for this service is located atproduct-reviews-api/Dockerfile:
FROM node:21-alpine3.19
WORKDIR /app
COPY package*.json ./
RUN npm clean-install
EXPOSE 45000
CMD ["npm", "run", "dev"]
- website-app: This service serves the website application. It’s written in JavaScript and HTML, and is built from the Dockerfile in the
./web-appdirectory and exposes port 4000 on the host, mapping to port 80 in the container. It mounts the./web-app/public-htmllocal directory to/usr/local/apache2/htdocs/in the container. This allows us to edit the code on the host machine and see the changes reflected in the container. This service depends on thedbservice and is part of theapp_networknetwork. The Dockerfile for this service is located at ``
FROM httpd:2-alpine
- db: This is the MariaDB database service. It uses the
mariadb:11.3.2image and reads environment variables from a.envfile and thedocker-compose.ymlfile. It mounts thedb_datavolume to/var/lib/mysqlin the container and the./sql_scriptsdirectory to/docker-entrypoint-initdb.din the container. The port it exposes on the host is determined by theMARIADB_PORTenvironment variable, and it maps to the same port in the container. It’s part of theapp_networknetwork. This database service is defined in thedocker-compose.ymlfile:
  db:
    image: mariadb:11.3.2
    container_name: mariadb
    env_file:
      - .env
    environment:
      - MARIADB_USER=${MARIADB_USER}
      - MARIADB_ROOT_PASSWORD=${MARIADB_ROOT_PASSWORD}
      - MARIADB_DB=${MARIADB_DB}
      - MARIADB_PORT=${MARIADB_PORT}
    volumes:
      - ./db_data:/var/lib/mysql
      - ./sql_scripts:/docker-entrypoint-initdb.d
    ports:
      - ${MARIADB_PORT}:${MARIADB_PORT}
    networks:
      - app_network
- adminer: This service provides a web interface for managing the database. It uses the
adminer:4.8.1image and exposes port 8080 on the host, mapping to port 8080 in the container. It depends on thedbservice and is part of theapp_networknetwork. It uses environment variables for the default server, database, user, and password. This database client web interface is defined in thedocker-compose.ymlfile:
  adminer:
    image: adminer:4.8.1
    container_name: adminer
    networks:
      - app_network
    ports:
      - 8080:8080
    depends_on:
      - db
    environment:
      - ADMINER_DEFAULT_SERVER=app_network
      - ADMINER_DEFAULT_DB=${MARIADB_DB}
      - ADMINER_DEFAULT_USER=${ADMINER_DEFAULT_USER}
      - ADMINER_DEFAULT_PASSWORD=${ADMINER_DEFAULT_PASSWORD}
      - MARIADB_ROOT_PASSWORD=${MARIADB_ROOT_PASSWORD}
The app_network network allows the services to communicate with each other, and the db_data and sql_scripts volumes persist the database data and SQL scripts, respectively.
The website-app service communicates with the API microservices: product-search-service, product-shipping-service, best-sellers-api, and reviews-api. The db service is used for data storage and retrieval. It’s used by the reviews-api service. The adminer service provides a user interface for managing the db service.
Step 3: Building and running the microservices
- Create a
.envfile in the same directory as thedocker-compose.ymlfile with the content below. Fill it up with the content below. And please, don’t just leave the password as “changeme”. That’s like leaving your car key on the hood! 😆
MARIADB_USER=root
MARIADB_ROOT_PASSWORD=changeme
MARIADB_HOST=db
MARIADB_DB=demo_db
MARIADB_PORT=3306
REVIEWS_API_SERVER_PORT=45000
ADMINER_DEFAULT_USER=adminer
ADMINER_DEFAULT_PASSWORD=changeme
- Build and run all microservices
docker compose up
- Open Docker Desktop and make sure that all 7 containers are running. You can also open up a new tab in your terminal and use the command
docker ps- If a container is not running, then try to rebuild and start it up again using
docker compose up --build service_name, where service name is defined in the docker-compose file as: product-search-service, product-shipping-service, best-sellers-api, reviews-api, website-app, db, and adminer.
- If a container is not running, then try to rebuild and start it up again using
Step 4: Configure the database
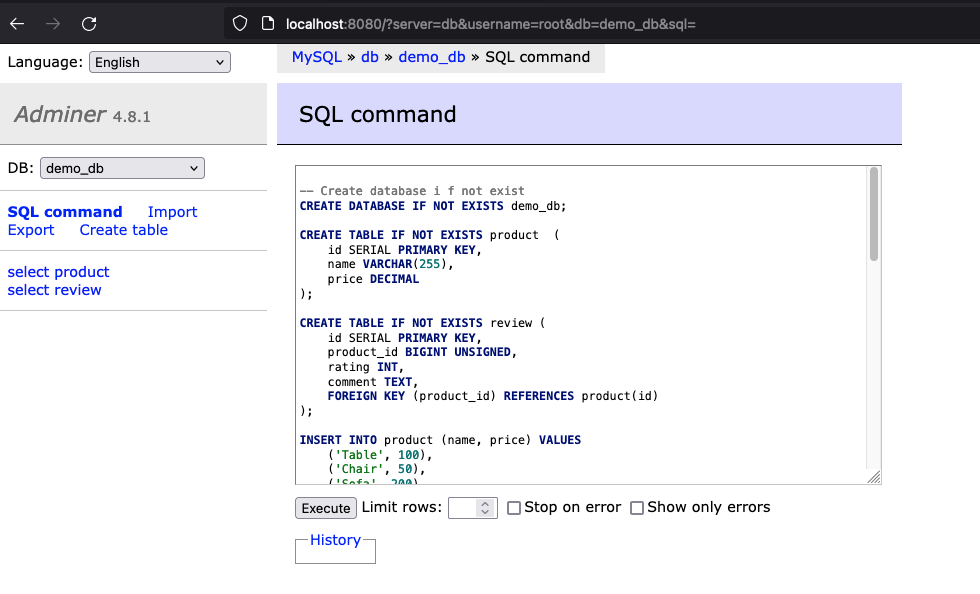
Go to the Adminer interface at http://localhost:8080
Enter the following credentials:
- System: MySQL
- Server: db
- Username:root
- Password:changeme
- Leave the Database field blank
If you have encountered an error, then be sure that the db service is running with no errors. You can check that on your Docker Desktop app or the command line
docker psand thendocker logs container_id.Create a database named
demo_db.After creating the database, click on SQL command and copy and paste the content of the sql file located at
sql_scripts/init.sqland listed below:
-- Create database i f not exist
CREATE DATABASE IF NOT EXISTS demo_db;

CREATE TABLE IF NOT EXISTS product  (
    id SERIAL PRIMARY KEY,
    name VARCHAR(255),
    price DECIMAL
);

CREATE TABLE IF NOT EXISTS review (
    id SERIAL PRIMARY KEY,
    product_id BIGINT UNSIGNED,
    rating INT,
    comment TEXT,
    FOREIGN KEY (product_id) REFERENCES product(id)
);

INSERT INTO product (name, price) VALUES
    ('Table', 100),
    ('Chair', 50),
    ('Sofa', 200),
    ('Bed', 150),
    ('Wardrobe', 300),
    ('Bookshelf', 80),
    ('Dresser', 120),
    ('Desk', 90),
    ('Cabinet', 70),
    ('Bench', 40);


INSERT INTO review (product_id, rating, comment) VALUES
    (1, 5, 'Great table!'),
    (1, 4, 'Good quality'),
    (1, 5, 'Would buy again'),
    (2, 3, 'Average chair'),
    (2, 4, 'Comfortable'),
    (2, 3, 'Could be better'),
    (3, 5, 'Excellent sofa'),
    (3, 5, 'Very comfortable'),
    (3, 4, 'Good value for money'),
    (4, 5, 'Best sleep ever'),
    (4, 4, 'Good quality'),
    (4, 5, 'Highly recommended'),
    (5, 4, 'Spacious wardrobe'),
    (5, 3, 'Difficult assembly'),
    (5, 4, 'Good value'),
    (6, 5, 'Perfect for books'),
    (6, 4, 'Good quality'),
    (6, 5, 'Would buy again'),
    (7, 3, 'Average dresser'),
    (7, 4, 'Good storage space'),
    (7, 3, 'Could be better'),
    (8, 5, 'Great for working'),
    (8, 5, 'Very comfortable'),
    (8, 4, 'Good value for money'),
    (9, 4, 'Useful cabinet'),
    (9, 3, 'Average quality'),
    (9, 4, 'Good for storage'),
    (10, 5, 'Sturdy bench'),
    (10, 4, 'Good quality'),
    (10, 5, 'Highly recommended');

Step 5: Browse the web app and change the content
- Go to web app at http://localhost:4000 and shop for furniture 🪑 🛏️ 🛋️
- Click on the tabs to make sure that all HTTP requests to the microservices are running and working as expected.

- The web_app microservice runs in a container and mounts a volume on the host (your machine) to the running container. This means any changes to the files at the
web_app/directory, will be reflected in the running container.- Edit the
index.htmlpage atweb-app/public-html/index.html. For example, add your name and save the file. - Reload the index page to see the changes.
- Edit the
Step 6: Stop and remove containers
- Stop and remove containers, networks
docker compose down
- If you want to clear all containers and images:
docker compose rm
docker rmi $(docker images -aq)
Submission
Submit screenshots as a PDF file by the due date. The following three screenshots are expected:
- Your name on the home page as described in step 5
- The “latest reviews” web page
- The list of running containers either in Docker Desktop or
docker ps