⚠️ WORK IN PROGRESS - EXTRA CREDIT ACTIVITY
This lab is currently under development and is provided as an optional extra credit activity. While the content has been carefully designed, some sections may require additional refinement or testing. Students who choose to complete this lab may receive extra credit points, but it is not required for the course.
Please report any issues or inconsistencies you encounter to help improve the lab for future students.
Introduction
High availability and fault tolerance are critical requirements for modern web applications. In this lab, we will build a highly available, fault-tolerant multi-region web application that can continue operating even when an entire region becomes unavailable. We’ll use Virtual Networks (VNet), VNet peering, HAProxy load balancers, and PostgreSQL database replication across two different Azure regions.
⚠️ Note: Before attempting this lab, please make sure that you have reviewed the lecture slides on Networking and fully understand the following topics: High Availability, fault tolerance, failover, Virtual Networks (VNets), subnets, VNet Peering, routing, and Network Security Groups (NSGs). A solid grasp of these concepts is essential for successfully completing the lab. Below is a brief description of each topic:
High Availability (HA) refers to the design and implementation of systems that ensure continuous operation and minimal downtime, typically measured by the number of “9s” in uptime percentages ranging from 99.9% (three 9s) to 99.999% (five 9s). This level of availability is achieved through redundancy, failover mechanisms, and the elimination of single points of failure (SPoF).
Fault Tolerance is the ability of a system to continue operating correctly without any interruption or downtime even when one or more of its components fail. This goes beyond high availability by ensuring zero downtime during failures.
Failover is the process of redirecting traffic from a primary system to a redundant or standby secondary system when the primary fails or becomes unavailable. For example, if a primary web server crashes, a failover system automatically routes traffic to a secondary server to keep the website online with minimal or no disruption. Similarly, if an entire region becomes unavailable, workloads can fail over to a secondary region to maintain service continuity.
Virtual Network (VNet) or Virtual Private Cloud (VPC) is the fundamental building block for private networks in the cloud. It’s also known as Virtual Private Cloud (VPC) in other cloud providers such as AWS and Google. VNets are region-scoped and must contain at least one subnet, which is an AZ-scoped segment of the subnet. A VNet may contain one or more subnet in which resources are deployed and can securely communicate with each other, the internet, or on-premises networks. VNets are similar in concept to how the Internet works as a global, decentralized “network of networks.” However, a VNet is an isolated network that you can fully control in the cloud and can securely interconnect with other networks.
VNet/VPC Peering allows us to connect exactly two VNet networks together. That’s it, VNet/VPC peering refer to setting up peering between each pair of VNets or VPCs. Once peered, the two virtual networks appear as one network. The traffic between virtual machines in peered virtual networks uses the cloud provider’s backbone infrastructure and is routed through private IP addresses only. When we configure VNet/VPC peering, then the cloud provider will route traffic through its private backbone network infrastructure, not the public internet. VNet peering can be configured within the same region (Regional VNet peering) or across different regions (Global VNet peering).
Subnet is a segment of the VNet’s/VPC’s IP address range. It’s where compute and storage resources are created. Each subnet must reside entirely within one Availability Zone (AZ) and cannot span AZs. A subnet is assigned a specific range of IP addresses withdrawn from the VNet’s address space using RFC 1918 CIDR notation. Subnets enable us to divide our VNet into smaller, manageable sections for different purposes such as public-facing load balancers, private web servers, isolated application servers, and secure database servers. Resources within the same subnet or across subnets in the same VNet can communicate directly over a private network rather than the public Internet, which helps avoid egress charges. Traffic between different subnets can be controlled using routing rules and network security groups.
Route Table refers to the set of rules, called routes, that determine how network traffic is directed from subnets to other destinations such as other subnets, the Internet, or on-premises networks. Each subnet can have zero or one route table associated to it, with user-defined routes taking precedence if there’s a conflict. It’s important to note that in AWS and Google Cloud, route tables are used within the VPC and can include a default (main) route table for the entire network, whereas in Azure, route tables are explicitly associated at the subnet level only.
Network Security Groups (NSGs) are used to allow or deny inbound/outbound traffic to network interfaces (NICs) or subnets. NSGs can be associated to subnets or individual network interface cards (NICs) attached to VMs. When an NSG is associated to a subnet, the rules apply to all resources connected to that subnet. For example, if the VM’s NIC allows port 22 but the subnet the VM is in has an associated NSG that denies it, the traffic will be denied because NSG rules act as a network-level firewall and take precedence in controlling inbound and outbound traffic. NSGs are stateful, meaning that once inbound traffic is allowed, the corresponding outbound response traffic is automatically permitted without needing a separate rule, and vice versa. AWS Security Groups and GCP firewall rules are also stateful like NSGs. However, AWS features stateless firewalls called AWS NACLs, which requires explicit rules for both inbound and outbound traffic because they do not automatically allow return traffic.
Database Replication: The process of copying data from one database instance (primary server) to one or more standby servers to improve availability, durability, redundancy, and performance.
In this lab, we will deploy a highly available multi-region web application with full redundancy consisting of:
- Primary Region (East US): Complete application stack
- Global Load Balancer: HAProxy instance with public IP.
- Web Tier: Multiple nginx web servers in a public subnet
- Application Tier: Multiple Node.js application servers in a private subnet
- Database Tier: PostgreSQL primary database server in a private subnet
- Secondary Region (West US 2): Complete application stack for failover
- Regional Load Balancer: HAProxy instance for regional traffic distribution
- Web Tier: Multiple nginx web servers in a public subnet
- Application Tier: Multiple Node.js application servers in a private subnet
- Database Tier: PostgreSQL replica database server in a private subnet
Objective
- Create Virtual Networks (VNets) in two different regions for high availability.
- Configure VNet peering for cross-region connectivity and failover
- Deploy highly available multi-tier architecture across regions
- Configure HAProxy load balancers for traffic distribution and health monitoring
- Set up database replication for high availability
- Implement Network Security Groups for secure subnet and multi-region communication
- Test fault tolerance by simulating region failures
- Verify automatic failover and service continuity during outages
Technologies
In this lab, we make use of the following technologies:
- Azure Virtual Network (VNet): is an isolated and secure region-scoped network for compute and resources to communicate.
- VNet Peering: is needed for connecting two virtual networks across regions for failover.
- HAProxy: High Availability Proxy for load balancing and health monitoring across regions
- Network Security Groups (NSGs): acts as a network-level firewall rules to filter traffic to and from the resources in the subnet.
- Route Tables: are rules that determine how network traffic is directed from subnets to other destinations such as other subnets or or the Internet.
- nginx: is an HTTP server and reverse proxy for the web tier.
- Node.js: is a JavaScript runtime that allows us to run JavaScript code on the server side.
- PostgreSQL: a scalable relational database system with primary-secondary replication.
- PostgreSQL Streaming Replication: Built-in database replication for high availability.

Figure 1: High Availability Multi-Region Architecture showing complete redundancy across two regions. A global HAProxy load balancer distributes traffic between regions, with full application stacks deployed in both regions. PostgreSQL uses primary-replica replication to support automatic failover. We place a DNS load balancer in the front for region-level traffic distribution and failover in case an entire region becomes unavailable.
Prerequisites
Install Azure CLI: If you already have azure CLI installed and signed in, then skip this step.
Install the Azure CLI.
- Windows: Download and run the Azure CLI from here
- macOS: Use Homebrew to install the Core Tools on macOS using
brew update && brew install azure-cli
Linux: use your package manager (e.g., APT) to install it as described here
Sign in into Azure CLI. Close and reopen any active terminal window:
az login
Check Azure vCPU quotas: You should make sure able to create 2 VNets in two different regions with 3 VMs deployed at each. Please note that Azure has vCPU quotas for subscriptions. You can check your Virtual Machines and Total Regional vCPUs quota usage using the Azure CLI
az vm list-usage --location <REGION_NAME> -o table. For example:az vm list-usage --location "East US" -o tableName CurrentValue Limit ---------------------------------------- -------------- ------- Total Regional Low-priority vCPUs 0 3 Total Regional vCPUs 0 10 Virtual Machines 0 25000Generate SSH key pair:
ssh-keygen -t ed25519 -f ./lab11key
Step 1: Create Virtual Networks and Subnets
We will create two Virtual Networks (VNets) in East US and West US, but you may choose any two different regions. The two VNets must have non-overlapping IPv4 address range since we plan to peer the two VNets. Thus, we will use the following private CIDR blocks:
| Region | VNet CIDR |
|---|---|
| East US | 10.0.0.0/16 |
| West US | 10.1.0.0/16 |
1.1: Create Virtual Network (VNet) and Subnets in Primary Region (East US)
We will create a VNet in the East US region with four subnets.
- In the Azure Portal, search for “Virtual networks”, select it, and click "+ Create"
- Select your subscription and resource group.
- Under Basics enter the following
- Name:
lab11-primary-vnet - Region:
East US
- Name:
- Click Next to skip to the IP Addresses tab.
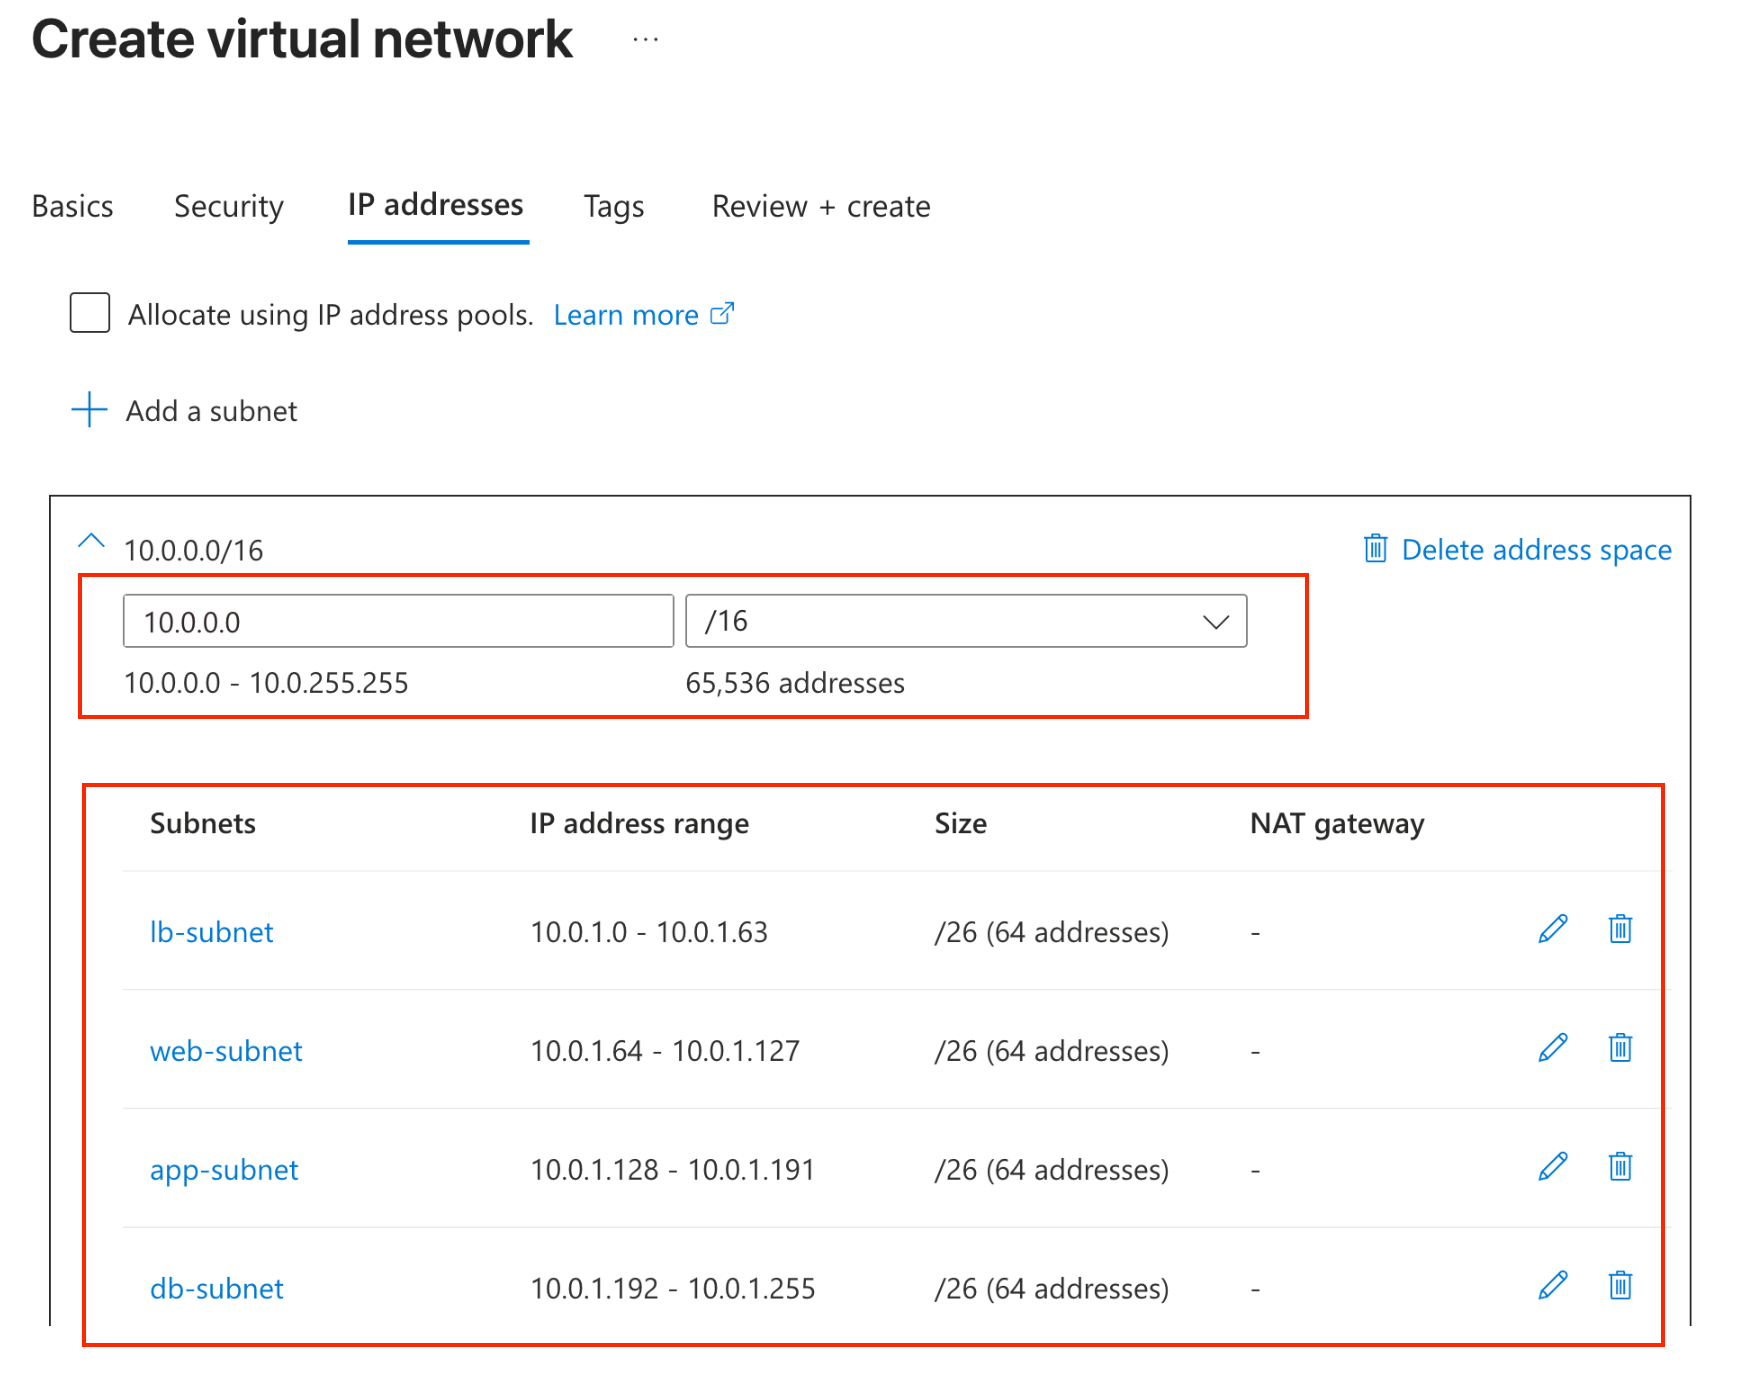
- We will design our VNet using the 10.0.0.0/16 address space with four subnets. Each subnet will have exactly 64 IP addresses (/26), with contiguous, non-overlapping ranges that align sequentially with their starting addresses.
- Select the VNet IPv4 address space:
10.0.0.0/16(65,536 IP addresses) - Click "+ Add subnet" to create 4 subnets as follows:
| Subnet Name | Starting address | Subnet address range | Size (Available IPs) |
|---|---|---|---|
| lb-subnet | 10.0.1.0 | 10.0.1.0 - 10.0.1.63 | 10.0.1.0/26 (64 addresses) |
| web-subnet | 10.0.1.64 | 10.0.1.64 - 10.0.1.127 | 10.0.1.64/26 (64 addresses) |
| app-subnet | 10.0.1.128 | 10.0.1.128 - 10.0.1.191 | 10.0.1.128/26 (64 addresses) |
| db-subnet | 10.0.1.192 | 10.0.1.192 - 10.0.1.255 | 10.0.1.192/26 (64 addresses) |
- Create each subnet by clicking "+ Add subnet", selecting Purpose: Default, and entering the details from the table above. You should have something like:
- Click “Review + create” then “Create”
1.2: Create Virtual Network (VNet) and Subnets in Secondary Region (West US)
Now, since the VNet in East US uses the address space 10.0.0.0/16, then our VNet in West US should use a non-overlapping, private IP range to avoid IP conflicts. This non-overlapping private CIDR blocks is required because we will peer the two VNets. This means anything starting with 10.0 would be considered overlapping, because our East US VNet uses 10.0.0.0/16
⚠️ Overlapping means that the West US VNet must not use 10.0.0.0/16 or any subnet that falls within that range (e.g.,
10.0.1.0/24,10.0.0.128/25, etc.), even if the specific subnets differ. The entire CIDR block of each VNet must be unique and non-overlapping, not just the subnets.
We will create a VNet in the West US region with four subnets.
- In the Azure Portal, search for “Virtual networks”, select it, and click "+ Create"
- Select your subscription and resource group.
- Under Basics enter the following
- Name:
lab11-secondary-vnet - Region:
West US
- Name:
- Click Next to skip to the IP Addresses tab.
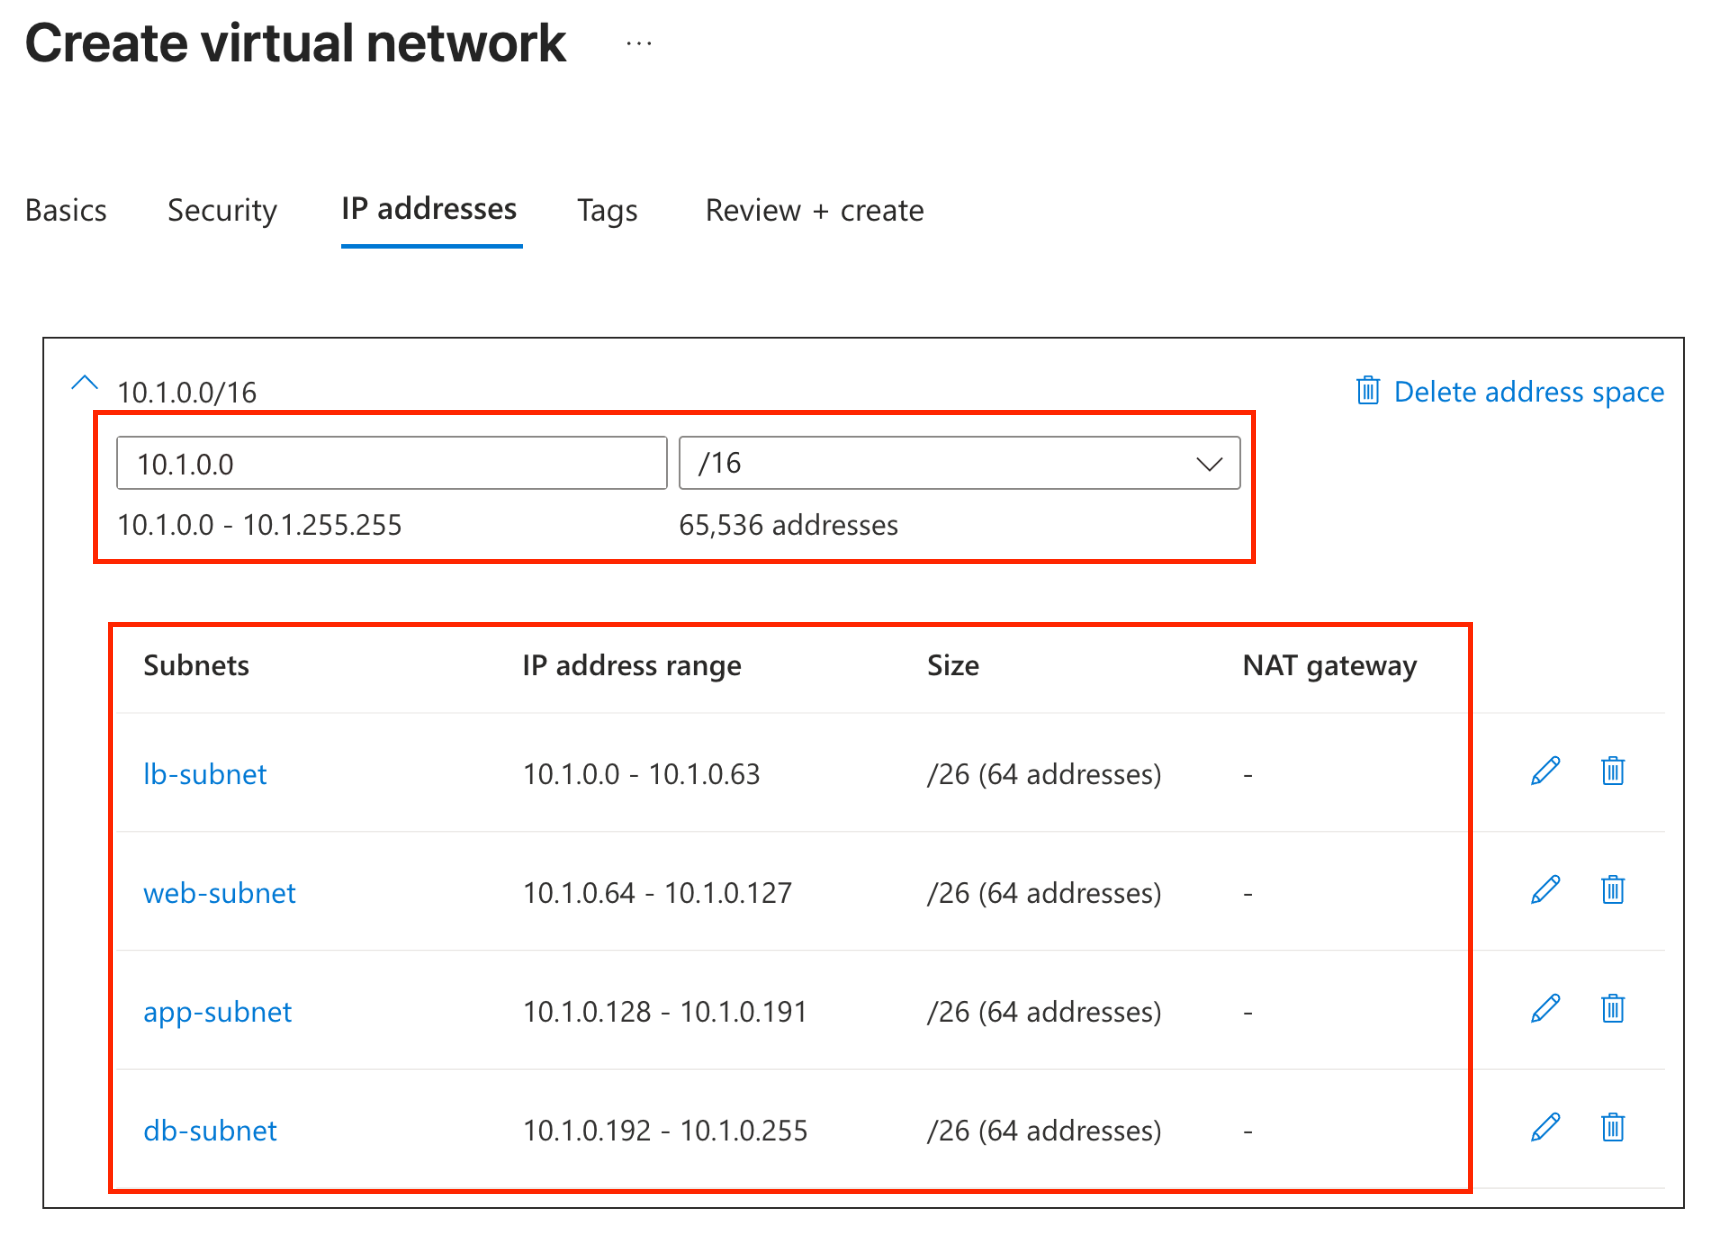
- We will design our VNet using the 10.1.0.0/16 address space with four subnets. Each subnet will have exactly 64 IP addresses (/26), with contiguous, non-overlapping ranges that align sequentially with their starting addresses.
- Select the VNet IPv4 address space:
10.1.0.0/16(65,536 IP addresses) - Click "+ Add subnet" to create 4 subnets as follows:
| Subnet Name | Starting address | Subnet address range | Size (Available IPs) |
|---|---|---|---|
| lb-subnet | 10.1.0.0 | 10.1.0.0 - 10.1.0.63 | 10.1.0.0/26 (64 addresses) |
| web-subnet | 10.1.0.64 | 10.1.0.64 - 10.1.0.127 | 10.1.0.64/26 (64 addresses) |
| app-subnet | 10.1.0.128 | 10.1.0.128 - 10.1.0.191 | 10.1.0.128/26 (64 addresses) |
| db-subnet | 10.1.0.192 | 10.1.0.192 - 10.1.0.255 | 10.1.0.192/26 (64 addresses) |
- Create each subnet by clicking "+ Add subnet", selecting Purpose: Default, and entering the details from the table above. You should have something like:
- Click “Review + create” then “Create”
Step 2: Configure VNet Peering
Azure Virtual Network (VNet) peering is used to connect two or more virtual networks in Azure, making them appear as a single network. Peering keeps all traffic on Microsoft’s private backbone infrastructure, eliminating the need for public internet routing. While creating a Virtual Network (VNet) in Azure is free, VNet peering incurs charges. Ingress (inbound data transfer) and egress (outbound data transfer) are both billed at each end of the peered connection, typically at around $0.035 per GB for Global Peering (not within the same region). For more details, see the Azure Virtual Network pricing.
2.1: Create Peering from Primary to Secondary VNet
- Navigate to Virtual networks → lab11-primary-vnet
- In the left sidebar, click Settings -> “Peerings”
- Click "+ Add"
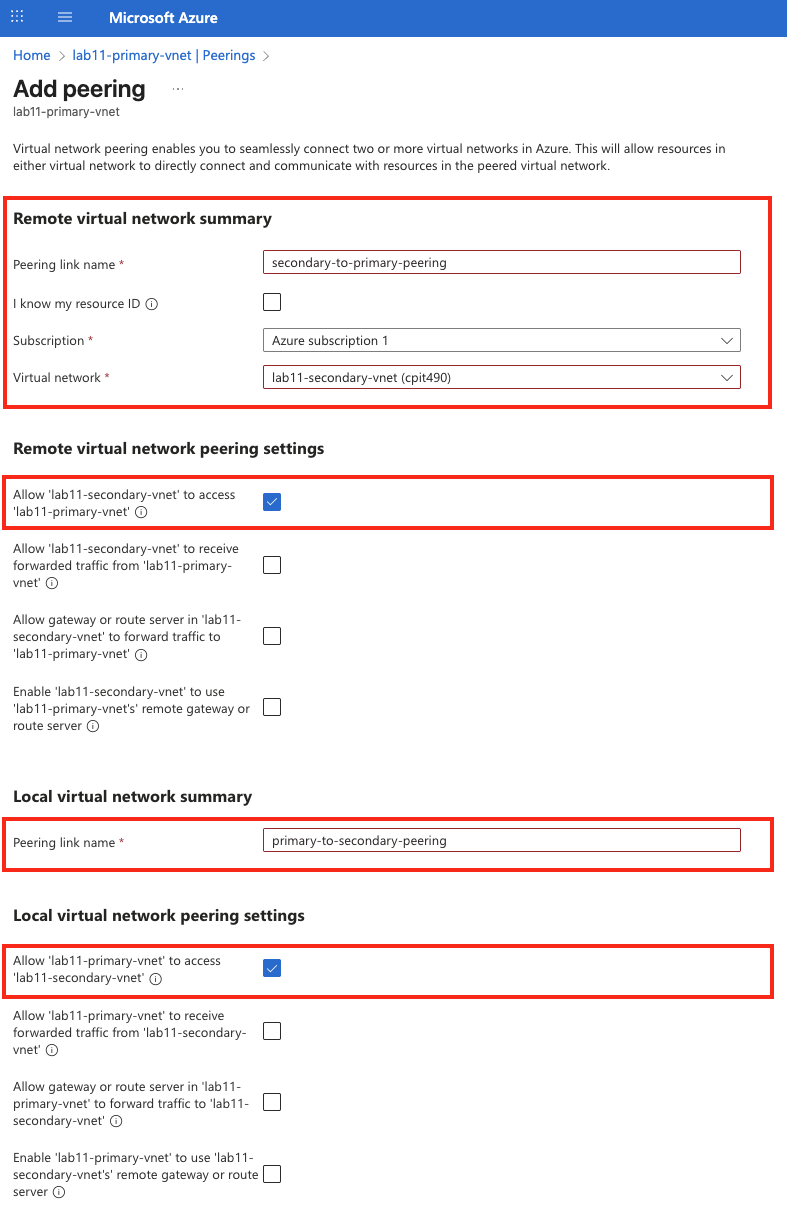
- Configure the peering:
While the setting may seem overwhelming at first, we can somplify it by thinking of “Local” as the current VNet (i.e., “me”), while “remote” refers to the VNet being connected to (i.e., “the other VNet”).
Subscription: Select your subscription from the drop down list.
Virtual network: Select the secondary VNet from the dropdown list (
lab11--secondary-vnet).Remote virtual network summary: These apply to how the remote (secondary) VNet can interact with your local (primary) VNet.
- Peering link name:
secondary-to-primary-peering - Subscription: Select your Azure Subscription.
- Remote virtual network: Select the VNet in West US from the list
lab11-secondary-vnet - Remote Virtual Network Peering Settings: These options apply to how the remote VNet (secondary) can interact with the local VNet (primary).
- Check Allow ’lab11-secondary-vnet’ to access ’lab11-primary-vnet
- Leave the remaining steps unchecked.
- Peering link name:
Local virtual network summary: These apply to how the local (primary) VNet can interact with the remote (secondary) VNet.
- Peering link name:
primary-to-secondary-peering - Local virtual network peering settings: These options apply to how the local VNet (primary) can interact with the remote VNet (secondary).
- Check Allow ’lab11-primary-vnet’ to access ’lab11-secondary-vnet
- Leave the remaining steps unchecked.
- Peering link name:
- Scroll down adn click “Add”
2.2: Verify Peering Status
- Wait a few minutes and refresh the page
- Select The Primary VNet from the list of created Virtual Networks -> Settings -> Peerings
- The peering state should show as “Connected”
- Repeat the same step for the Secondary VNet
- The peering state should show as “Connected”

 ---
---Step 3: Create Network Security Groups (NSGs)
Network Security Groups (NSGs) act as firewalls to control inbound and outbound traffic. NSGs can be associated with a virtual network’s subnet or a virtual machine’s Network Interface (NIC). NSGs are regional in scope, so when you create an NSG, you must specify the region where it will reside. NSGs are stateful, which means that if you create an NSG rule that allows a port for inbound traffic, the return traffic on that same port is automatically for outbound traffic. We’ll create separate NSGs for each tier of our application with the appropriate security rules.
3.1: Create NSGs for Primary Region (East US)
Primary Region (East US) - Network Security Group - Inbound Security Rules
| NSG Name | Rule Name | Protocol | Source | Destination | Dest Port | Purpose |
|---|---|---|---|---|---|---|
| lb-nsg | allow-http | TCP | Any | Any | 80 | Public HTTP access |
| lb-nsg | allow-https | TCP | Any | Any | 443 | Public HTTPS access |
| lb-nsg | allow-ssh | TCP | Any | Any | 22 | SSH access |
| lb-nsg | allow-haproxy-stats | TCP | Any | Any | 8080 | HAProxy statistics |
| web-nsg | allow-http-from-local-lb | TCP | 10.0.1.0/26 | Any | 80 | HTTP from local LB |
| web-nsg | allow-ssh-from-local-lb | TCP | 10.0.1.0/26 | Any | 22 | SSH from local LB |
| web-nsg | allow-http-cross-region-health | TCP | 10.1.0.0/16 | Any | 80 | Cross-region health checks |
| app-nsg | allow-web-to-app | TCP | 10.0.1.64/26 | Any | 3000 | HTTP from web tier |
| app-nsg | allow-ssh-from-lb | TCP | 10.0.1.0/26 | Any | 22 | SSH from LB subnet |
| app-nsg | allow-cross-region-health | TCP | 10.1.0.128/26 | Any | 3000 | Cross-region app health checks |
| db-nsg | allow-local-app-to-db | TCP | 10.0.1.128/26 | Any | 5432 | PostgreSQL from local app |
| db-nsg | allow-ssh-from-lb | TCP | 10.0.1.0/26 | Any | 22 | SSH from LB subnet |
| db-nsg | allow-cross-region-app-to-db | TCP | 10.1.0.128/26 | Any | 5432 | PostgreSQL from cross-region app |
| db-nsg | allow-db-replication | TCP | 10.1.0.192/26 | Any | 5432 | Database replication |
3.1.1: Create NSG for Load Balancer Tier (Primary Region)
Create Load Balancer NSG
- In the Azure Portal, search for “Network security groups” and select it
- Click "+ Create Network Security Group"
- Fill in the details:
- Select your subscription and resource group.
- Name:
lb-nsg - Region: Select the same primary region (e.g.,
East US)
- Click “Review + create” then “Create”
Add Security Rules for Load Balancer
- Click Go to resource to navigate to the newly created network security group, lb-nsg.
- In the left sidebar, click Settings -> “Inbound security rules” and add the following rules:
Allow incoming HTTP 80: Create a network security group rule named
allow-http, which allows inbound TCP traffic on port 80 (HTTP) from any source and any source port to any destination, with a lower priority than the default rules (e.g., use 100).Allow incoming HTTPS 443: Create a network security group rule named
allow-https, which allows inbound TCP traffic on port 443 (HTTPS) from any source and any source port to any destination, with a lower priority than the default rules (e.g., use 110).Allow incoming SSH 22: Create a network security group rule named
allow-ssh, which allows inbound TCP traffic on port 22 (SSH) from any source and any source port to any destination, with a lower priority than the default rules (e.g., use 120).Allow HAProxy Stats 8080: Create a network security group rule named
allow-haproxy-stats, which allows inbound TCP traffic on port 8080 from any source and any source port to any destination, with a lower priority than the default rules (e.g., use 130).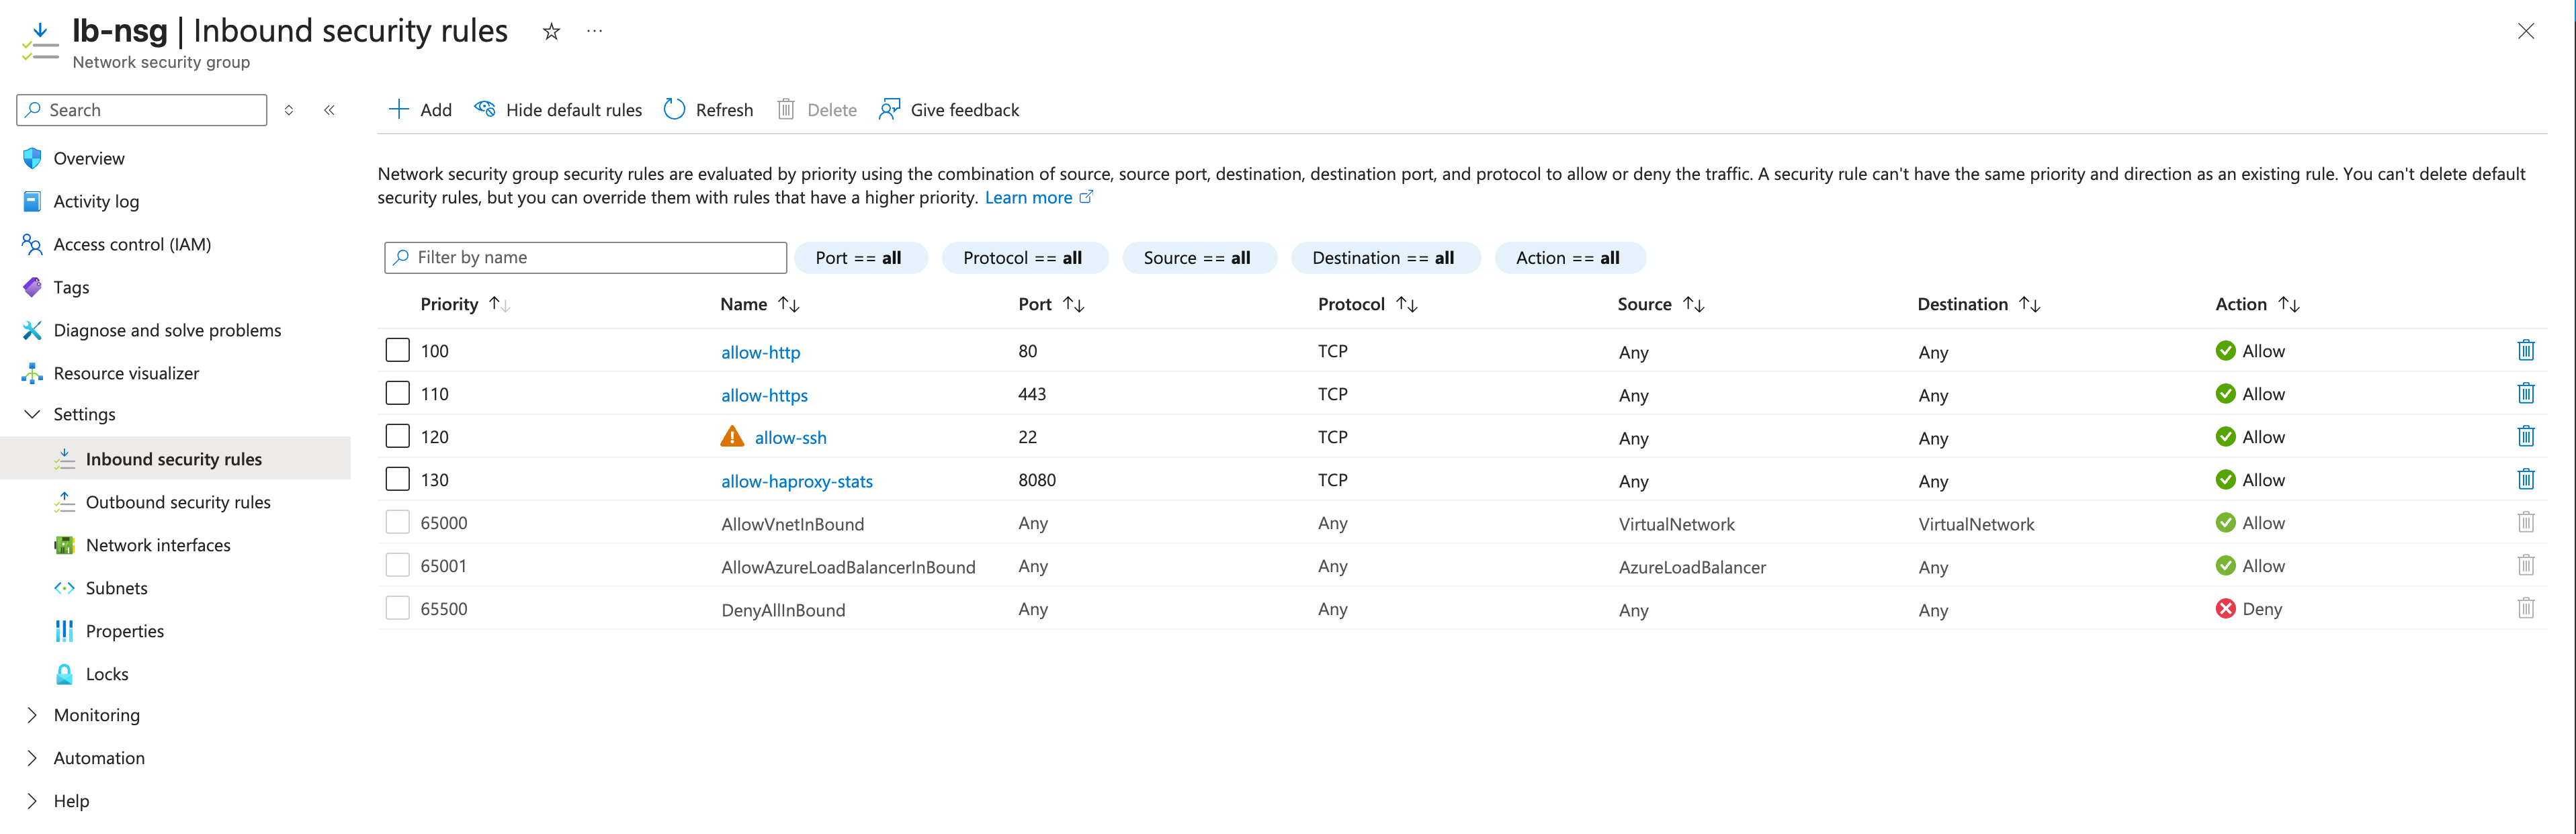
Note: NSGs are stateful. This means when we allow port 80 for inbound traffic, the returned outbound response traffic on the same port 80 is automatically allowed without needing a separate rule.
3.1.2: Create NSG for Web Tier (Primary Region)
We need to add a rule that allows HTTP traffic (port 80) from the internal load balancer (within the 10.1.0.0/24 subnet) to the web servers. We also need a rule that allows SSH access (port 22) from the load balancer subnet to the web servers. We also need a rule that allows HTTP health check traffic from the other region’s subnet (10.2.0.0/16).
Create Web Tier NSG
- Create another network security group.
- Fill in the details:
- Select your subscription and resource group.
- Name:
web-nsg - Region: Select the primary region (e.g.,
East US)
- Click “Review + create” then “Create”
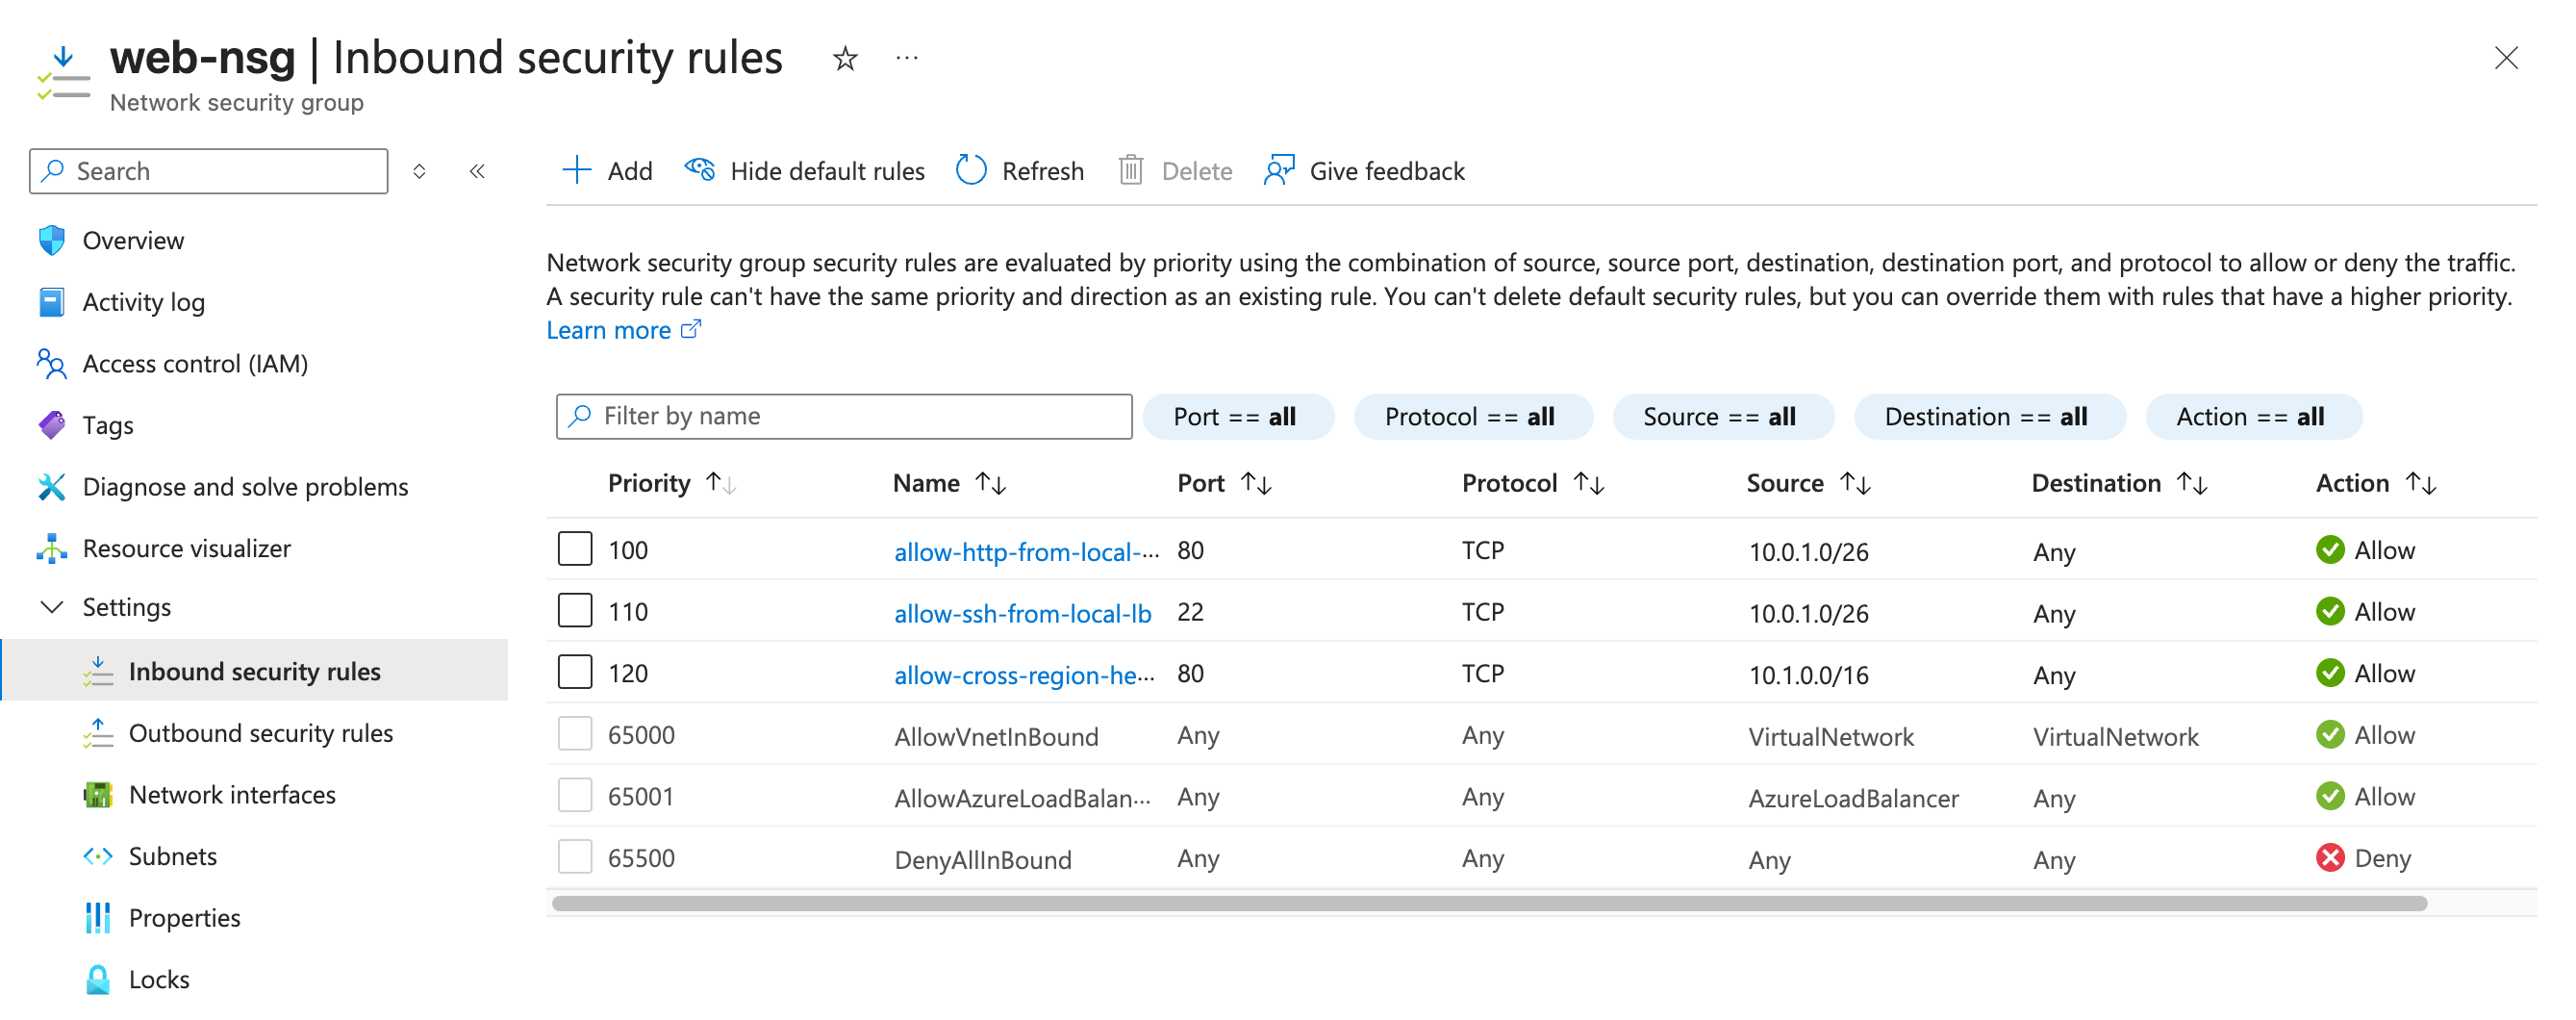
Add Security Rules for Web Tier We need to add rules that:
- Allow HTTP from
10.0.1.0/26(local lb-subnet) - Allow SSH from
10.0.1.0/26(local lb-subnet) - Allow cross-region health checks from
10.1.0.0/16(secondary region VNet)
Below are the steps to create these rules:
- Click Go to resource to navigate to the newly created network security group, lb-nsg.
- In the left sidebar, click Settings -> “Inbound security rules” and add the following rules:
Allow incoming HTTP 80: Create a network security group rule named
allow-http-from-local-lb, which allows inbound TCP traffic on port 80 (HTTP) from the source IP range10.0.1.0/26to any destination, with a priority that allows it to override default rules (e.g., priority 1000).Allow incoming SSH 22: Create a network security group rule named
allow-ssh-from-local-lb, which allows inbound TCP traffic on port 22 (SSH) from the source IP range10.0.1.0/26to any destination, with a priority just below the HTTP rule (e.g., priority 1001).Allow incoming HTTP 80 health checks: Create a network security group rule named
allow-cross-region-health, which allows inbound TCP traffic on port 80 (HTTP) from the source IP range of the other VNet’s subnet10.1.0.0/16to any destination, with a slightly lower priority (e.g., priority 1002).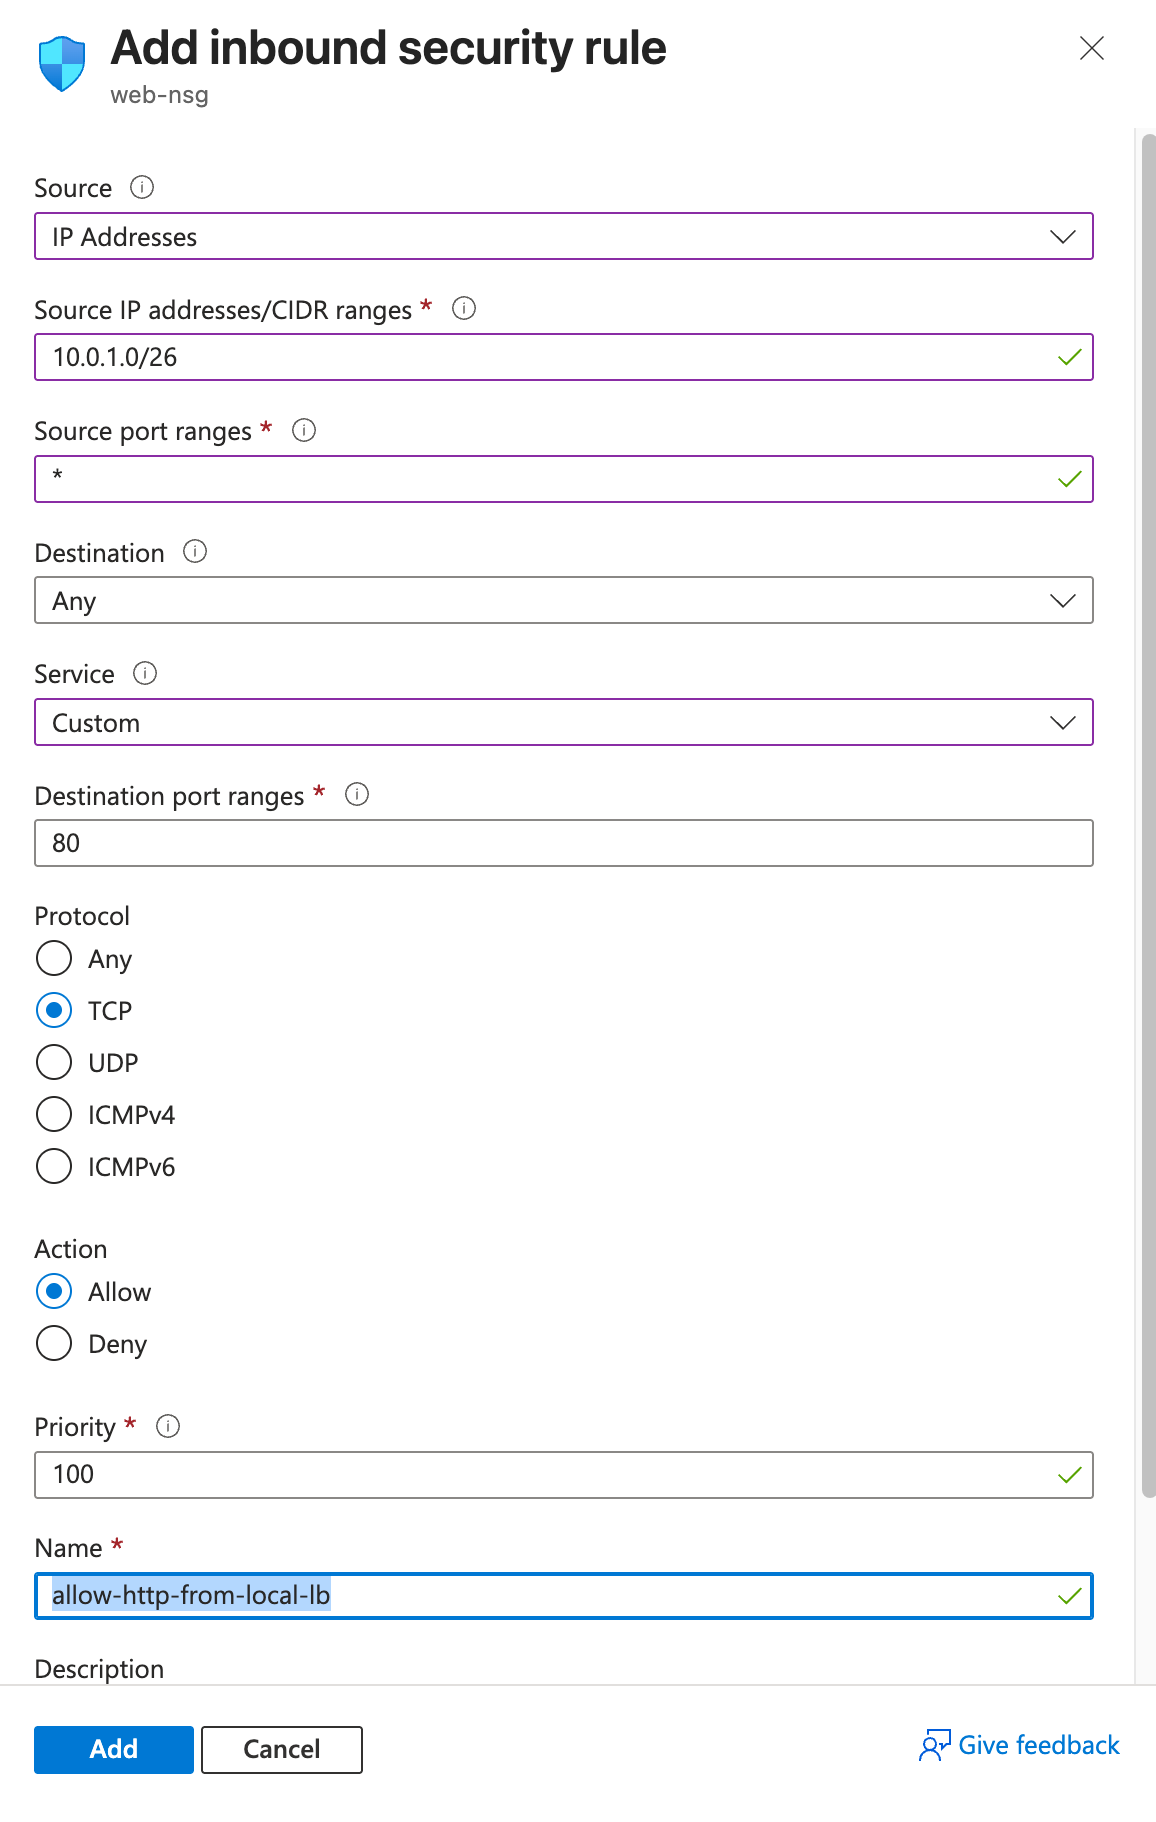
3.1.3: Create NSG for Application Tier (Primary Region)
We need to add rules that allow HTTP traffic (port 3000) from the web tier subnet (10.0.1.64/26) to the application servers. We also need a rule that allows SSH access (port 22) from the load balancer subnet to the application servers. We also need a rule that allows HTTP traffic from the other region’s application subnet (10.1.0.128/26) for cross-region health checks.
Create Application Tier NSG
- Create another network security group.
- Fill in the details:
- Select your subscription and resource group.
- Name:
app-nsg - Region: Select the primary region (e.g.,
East US)
- Click “Review + create” then “Create”
Add Security Rules for Application Tier We need to add rules that:
Allow HTTP (port 3000) from
10.0.1.64/26to application servers.Allow SSH (port 22) from
10.0.1.0/26to application servers.Allow HTTP (port 3000) health checks from the other region’s application subnet
10.1.0.128/26. Below are the steps to create these rules:- Click Go to resource to navigate to the newly created network security group, app-nsg.
- In the left sidebar, click Settings -> “Inbound security rules” and add the following rules:
Allow incoming HTTP 3000: Create a network security group rule named
allow-web-to-app, which allows inbound TCP traffic on port 3000 from the source IP range10.0.1.64/26to any destination, with a priority that allows it to override default rules (e.g., priority 1000).Allow incoming SSH 22: Create a network security group rule named
allow-ssh-from-lb, which allows inbound TCP traffic on port 22 (SSH) from the source IP range10.0.1.0/26to any destination, with a priority just below the HTTP rule (e.g., priority 1001).Allow incoming cross-region HTTP 3000 health checks: Create a network security group rule named
allow-cross-region-health, which allows inbound TCP traffic on port 3000 from the source IP range of the other VNet’s application subnet10.1.0.128/26to any destination, with a slightly lower priority (e.g., priority 1002).
3.1.4: Create NSG for Database Tier (Primary Region)
We need to add rules that allow PostgreSQL traffic (port 5432) from the application tier subnet (10.0.1.128/26) to the database servers. We also need a rule that allows SSH access (port 22) from the load balancer subnet to the database servers. We also need rules that allow PostgreSQL traffic from the other region’s application subnet (10.1.0.128/26) for cross-region database access and from the other region’s database subnet (10.1.0.192/26) for database replication.
Create Database Tier NSG
- Create another network security group.
- Fill in the details:
- Select your subscription and resource group.
- Name:
db-nsg - Region: Select the primary region (e.g.,
East US)
- Click “Review + create” then “Create”
Add Security Rules for Database Tier We need to add rules that:
Allow PostgreSQL (port 5432) from
10.0.1.128/26to database servers.Allow SSH (port 22) from
10.0.1.0/26to database servers.Allow PostgreSQL (port 5432) from the other region’s application subnet
10.1.0.128/26for cross-region database access.Allow PostgreSQL (port 5432) from the other region’s database subnet
10.1.0.192/26for database replication. Below are the steps to create these rules:- Click Go to resource to navigate to the newly created network security group, db-nsg.
- In the left sidebar, click Settings -> “Inbound security rules” and add the following rules:
Allow incoming PostgreSQL 5432: Create a network security group rule named
allow-local-app-to-db, which allows inbound TCP traffic on port 5432 from the source IP range10.0.1.128/26to any destination, with a priority that allows it to override default rules (e.g., priority 1000).Allow incoming SSH 22: Create a network security group rule named
allow-ssh-from-lb, which allows inbound TCP traffic on port 22 (SSH) from the source IP range10.0.1.0/26to any destination, with a priority just below the PostgreSQL rule (e.g., priority 1001).Allow incoming PostgreSQL 5432 cross-region app: Create a network security group rule named
allow-cross-region-app-to-db, which allows inbound TCP traffic on port 5432 from the source IP range of the other VNet’s application subnet10.1.0.128/26to any destination, with a slightly lower priority (e.g., priority 1002).Allow incoming PostgreSQL 5432 replication: Create a network security group rule named
allow-db-replication, which allows inbound TCP traffic on port 5432 from the source IP range of the other VNet’s database subnet10.1.0.192/26to any destination, with a slightly lower priority (e.g., priority 1003).
3.2: Create NSGs for Secondary Region (West US)
Secondary Region (West US) - Network Security Group - Inbound Security Rules
Now we need to create similar NSGs for the secondary region to maintain the same security configurations.
| NSG Name | Rule Name | Protocol | Source | Destination | Dest Port | Purpose |
|---|---|---|---|---|---|---|
| lb-secondary-nsg | allow-http | TCP | Any | Any | 80 | Public HTTP access |
| lb-secondary-nsg | allow-https | TCP | Any | Any | 443 | Public HTTPS access |
| lb-secondary-nsg | allow-ssh | TCP | Any | Any | 22 | SSH access |
| lb-secondary-nsg | allow-haproxy-stats | TCP | Any | Any | 8080 | HAProxy statistics |
| web-secondary-nsg | allow-http-from-local-lb | TCP | 10.1.0.0/26 | Any | 80 | HTTP from local LB |
| web-secondary-nsg | allow-ssh-from-local-lb | TCP | 10.1.0.0/26 | Any | 22 | SSH from local LB |
| web-secondary-nsg | allow-http-cross-region-health | TCP | 10.0.0.0/16 | Any | 80 | Cross-region health checks |
| app-secondary-nsg | allow-web-to-app | TCP | 10.1.0.64/26 | Any | 3000 | HTTP from web tier |
| app-secondary-nsg | allow-ssh-from-lb | TCP | 10.1.0.0/26 | Any | 22 | SSH from LB subnet |
| app-secondary-nsg | allow-cross-region-health | TCP | 10.0.1.128/26 | Any | 3000 | Cross-region app health checks |
| db-secondary-nsg | allow-local-app-to-db | TCP | 10.1.0.128/26 | Any | 5432 | PostgreSQL from local app |
| db-secondary-nsg | allow-ssh-from-lb | TCP | 10.1.0.0/26 | Any | 22 | SSH from LB subnet |
| db-secondary-nsg | allow-cross-region-app-to-db | TCP | 10.0.1.128/26 | Any | 5432 | PostgreSQL from cross-region app |
| db-secondary-nsg | allow-db-replication | TCP | 10.0.1.192/26 | Any | 5432 | Database replication |
Create Load Balancer NSG (Secondary)
- Similarly, create a network security group.
- Fill in the details:
- Select your subscription and resource group.
- Name:
lb-secondary-nsg - Region: Select the secondary region (e.g.,
West US).
- Click “Review + create” then “Create”
- Add the same security rules as the primary load balancer NSG (HTTP, HTTPS, SSH, HAProxy Stats)
Create Web Tier NSG (Secondary)
- Create web-secondary-nsg in
lab11-secondary-rgwith regionWest US 2 - Add security rules allowing access from
10.2.0.0/26(local LB) and10.1.0.0/16(cross-region)
- Create web-secondary-nsg in
Create App Tier NSG (Secondary)
- Create app-secondary-nsg in
lab11-secondary-rgwith regionWest US 2 - Add security rules for local web tier (
10.2.1.0/26) and cross-region access
- Create app-secondary-nsg in
Create Database Tier NSG (Secondary)
- Create db-secondary-nsg in
lab11-secondary-rgwith regionWest US 2 - Add security rules for local and cross-region app access, plus replication from primary DB
- Create db-secondary-nsg in
3.3: Associate NSGs with Subnets
Primary Region (East US) - Associate NSGs:
Associate LB NSG with LB Subnet (Primary)
- Navigate to Virtual networks → lab11-primary-vnet
- Click Settings → “Subnets” in the left sidebar
- Click on lb-subnet
- In the Network security group dropdown, select lb-nsg
- Click “Save”
Associate Web NSG with Web Subnet (Primary)
- Still in lab11-primary-vnet subnets
- Click on web-subnet
- In the Network security group dropdown, select web-nsg
- Click “Save”
Associate App NSG with App Subnet (Primary)
- Still in lab11-primary-vnet subnets
- Click on app-subnet
- In the Network security group dropdown, select app-nsg
- Click “Save”
Associate DB NSG with DB Subnet (Primary)
- Still in lab11-primary-vnet subnets
- Click on db-subnet
- In the Network security group dropdown, select db-nsg
- Click “Save”
Secondary Region (West US 2) - Associate NSGs:
Associate LB NSG with LB Subnet (Secondary)
- Navigate to Virtual networks → lab11-secondary-vnet
- Click Settings → “Subnets” in the left sidebar
- Click on lb-subnet
- In the Network security group dropdown, select lb-secondary-nsg
- Click “Save”
Associate Web NSG with Web Subnet (Secondary)
- Still in lab11-secondary-vnet subnets
- Click on web-subnet
- In the Network security group dropdown, select web-secondary-nsg
- Click “Save”
Associate App NSG with App Subnet (Secondary)
- Still in lab11-secondary-vnet subnets
- Click on app-subnet
- In the Network security group dropdown, select app-secondary-nsg
- Click “Save”
Associate DB NSG with DB Subnet (Secondary)
- Still in lab11-secondary-vnet subnets
- Click on db-subnet
- In the Network security group dropdown, select db-secondary-nsg
- Click “Save”
Step 4: Create Virtual Machines for High Availability
We’ll create multiple VMs across two regions to ensure high availability and fault tolerance. Each tier will have redundant instances, and only the load balancers will have public IPs.
4.1: Create Global Load Balancer VM (Primary Region)
Navigate to Virtual Machines
- In the Azure Portal, search for “Virtual machines” and select it
- Click "+ Create" → “Azure virtual machine”
Configure Basic Settings
- Subscription: Select your subscription
- Resource group:
lab11-primary-rg - Virtual machine name:
global-lb-vm - Region:
East US - Availability options: No infrastructure redundancy required
- Security type: Standard
- Image: Ubuntu Server 22.04 LTS - x64 Gen2
- Size: Standard_B2s (2 vcpu, 4 GiB memory) - Larger for load balancing
Configure Administrator Account
- Authentication type: SSH public key
- Username:
azureuser - SSH public key source: Use existing public key
- SSH public key: Paste your public key content
Configure Inbound Port Rules
- Public inbound ports: Allow selected ports
- Select inbound ports: HTTP (80), HTTPS (443), SSH (22)
Configure Networking
- Click “Next: Disks” → “Next: Networking”
- Virtual network:
lab11-primary-vnet - Subnet:
lb-subnet (10.0.1.0/26) - Public IP: (new) global-lb-vm-ip
- NIC network security group: None (we’ll use subnet NSG)
- Delete public IP and NIC when VM is deleted: Checked
Review and Create
- Click “Review + create” → “Create”
- Wait for deployment to complete
4.2: Create Web Server VMs (Primary Region)
Create two web servers for redundancy in the primary region.
Create First Web Server
- In Virtual machines, click "+ Create" → “Azure virtual machine”
- Subscription: Select your subscription
- Resource group:
lab11-primary-rg - Virtual machine name:
web-server-1-vm - Region:
East US - Image: Ubuntu Server 22.04 LTS - x64 Gen2
- Size: Standard_B1s
Configure Networking
- Virtual network:
lab11-primary-vnet - Subnet:
web-subnet (10.0.1.64/26) - Public IP: None
- NIC network security group: None
- Click “Review + create” → “Create”
- Virtual network:
Create Second Web Server
- Repeat the same process with:
- Virtual machine name:
web-server-2-vm - Same networking configuration
4.3: Create Application Server VMs (Primary Region)
Create two application servers for redundancy in the primary region.
Create First Application Server
- Virtual machine name:
app-server-1-vm - Resource group:
lab11-primary-rg - Region:
East US - Virtual network:
lab11-primary-vnet - Subnet:
app-subnet (10.0.1.128/26) - Public IP: None
- Virtual machine name:
Create Second Application Server
- Virtual machine name:
app-server-2-vm - Same configuration as first app server
- Virtual machine name:
4.4: Create Database Server (Primary Region - Master)
- Create Primary Database Server
- Virtual machine name:
db-master-vm - Resource group:
lab11-primary-rg - Region:
East US - Size: Standard_B2s (2 vcpu, 4 GiB memory) - Larger for database
- Virtual network:
lab11-primary-vnet - Subnet:
db-subnet (10.0.1.192/26) - Public IP: None
- Virtual machine name:
4.5: Create Secondary Region Infrastructure (West US 2)
Now create the complete redundant infrastructure in the secondary region.
Create Regional Load Balancer (Secondary)
- Virtual machine name:
regional-lb-vm - Resource group:
lab11-secondary-rg - Region:
West US 2 - Size: Standard_B2s
- Virtual network:
lab11-secondary-vnet - Subnet:
lb-subnet (10.1.0.0/26) - Public IP: (new) regional-lb-vm-ip
- Virtual machine name:
Create Web Servers (Secondary Region)
- web-server-3-vm: In
web-subnet (10.1.0.64/26), no public IP - web-server-4-vm: In
web-subnet (10.1.0.64/26), no public IP
- web-server-3-vm: In
Create Application Servers (Secondary Region)
- app-server-3-vm: In
app-subnet (10.1.0.128/26), no public IP - app-server-4-vm: In
app-subnet (10.1.0.128/26), no public IP
- app-server-3-vm: In
Create Database Server (Secondary Region - Slave)
- Virtual machine name:
db-slave-vm - Resource group:
lab11-secondary-rg - Region:
West US 2 - Size: Standard_B2s
- Virtual network:
lab11-secondary-vnet - Subnet:
db-subnet (10.1.0.192/26) - Public IP: None
- Virtual machine name:
4.6: Understanding Azure’s Automatic Routing
Important Note: With VNet peering configured in Step 2, Azure automatically creates system routes that handle all traffic routing between your regions. No custom route tables are needed for this lab because:
- Within same VNet: Traffic between subnets (10.0.1.x) routes automatically
- Between peered VNets: Traffic between regions (10.0.x.x ↔ 10.1.x.x) routes automatically via peering
- Internet access: VMs get outbound internet access through Azure’s default SNAT
Azure handles all the routing complexity behind the scenes, allowing you to focus on application architecture and security.
4.7: Get VM Information
Get Load Balancer Public IPs
- Navigate to Virtual machines → global-lb-vm
- In the Overview section, note the Public IP address
- Navigate to Virtual machines → regional-lb-vm
- Note its Public IP address
Get Private IP Addresses for All VMs
For each VM, go to Virtual machines → VM name → Networking
Note the Private IP address for each VM. Typical assignments:
Primary Region (East US):
- Global LB:
10.0.1.4 - Web Server 1:
10.0.1.68 - Web Server 2:
10.0.1.69 - App Server 1:
10.0.1.132 - App Server 2:
10.0.1.133 - DB Master:
10.0.1.196
Secondary Region (West US 2):
- Regional LB:
10.1.0.4 - Web Server 3:
10.1.0.68 - Web Server 4:
10.1.0.69 - App Server 3:
10.1.0.132 - App Server 4:
10.1.0.133 - DB Slave:
10.1.0.196
- Global LB:
Step 5: Configure the Global Load Balancer (HAProxy)
The global load balancer will distribute traffic between the two regions and handle failover automatically.
SSH into the Global Load Balancer
# Replace <GLOBAL_LB_PUBLIC_IP> with the actual public IP from Azure Portal
ssh -i ~/.ssh/id_rsa azureuser@<GLOBAL_LB_PUBLIC_IP>
Update the system and install HAProxy
sudo apt update
sudo apt upgrade -y
sudo apt install haproxy -y
sudo systemctl enable haproxy
Configure HAProxy for global load balancing
# Create HAProxy configuration for global load balancing
sudo tee /etc/haproxy/haproxy.cfg > /dev/null <<EOF
global
    daemon
    maxconn 4096
    log stdout local0

defaults
    mode http
    timeout connect 5000ms
    timeout client 50000ms
    timeout server 50000ms
    option httplog
    option dontlognull
    option redispatch
    retries 3

# Statistics interface
listen stats
    bind *:8080
    stats enable
    stats uri /stats
    stats refresh 30s
    stats show-node
    stats show-legends

# Frontend - Global entry point
frontend global_frontend
    bind *:80
    default_backend regional_backends

# Backend - Regional load balancers
backend regional_backends
    balance roundrobin
    option httpchk GET /health

    # Primary region (East US) - Higher priority
    server primary_region 10.2.0.4:80 check weight 100 maxconn 500

    # Secondary region (West US 2) - Failover
    server secondary_region 10.2.0.4:80 check weight 50 maxconn 500 backup

# Health check endpoint
listen health_check
    bind *:8888
    mode http
    monitor-uri /health
    option httplog
EOF
Start and test HAProxy
# Start HAProxy service
sudo systemctl start haproxy
sudo systemctl status haproxy

# Test HAProxy configuration
sudo haproxy -f /etc/haproxy/haproxy.cfg -c

# Test global load balancer endpoints
curl http://localhost:80        # Main application
curl http://localhost:8080/stats # HAProxy statistics
curl http://localhost:8888/health # Health check endpoint

# View HAProxy logs for debugging
sudo journalctl -u haproxy -f
Create simple health check page
# Create basic health check response
sudo mkdir -p /var/www/html
sudo tee /var/www/html/health.html > /dev/null <<EOF
<!DOCTYPE html>
<html>
<head><title>Global Load Balancer - Health Check</title></head>
<body>
    <h1>Global Load Balancer is Healthy</h1>
    <p>Region: Global Entry Point</p>
    <p>Status: Active</p>
    <p>Timestamp: $(date)</p>
</body>
</html>
EOF

# Install nginx for basic web serving
sudo apt install nginx -y
sudo systemctl enable nginx
sudo systemctl start nginx
Step 6: Configure Regional Load Balancers
The regional load balancers distribute traffic within each region across multiple web servers for fault tolerance.
5.1: Configure Primary Region Load Balancer (East US)
SSH into the Regional Load Balancer
ssh -i ~/.ssh/id_rsa azureuser@<REGIONAL_LB_PRIMARY_PUBLIC_IP>Install and configure HAProxy for regional load balancing
sudo apt update
sudo apt upgrade -y
sudo apt install haproxy -y
sudo systemctl enable haproxy
Configure HAProxy for regional distribution
sudo tee /etc/haproxy/haproxy.cfg > /dev/null <<EOF
global
    daemon
    maxconn 2048
    log stdout local0

defaults
    mode http
    timeout connect 5000ms
    timeout client 50000ms
    timeout server 50000ms
    option httplog
    option dontlognull
    retries 3
    balance roundrobin

# Statistics interface for regional monitoring
listen stats
    bind *:8080
    stats enable
    stats uri /stats
    stats refresh 30s
    stats admin if TRUE

# Health check endpoint
listen health_check
    bind *:8888
    mode http
    monitor-uri /health
    option httplog

# Frontend - Regional entry point
frontend regional_frontend
    bind *:80
    default_backend regional_web_servers

# Backend - Web servers in this region
backend regional_web_servers
    balance roundrobin
    option httpchk GET /health

    # Web Server 1 in primary region
    server web1_primary 10.1.1.4:80 check maxconn 300

    # Web Server 2 in primary region
    server web2_primary 10.1.1.5:80 check maxconn 300
EOF
Start and test regional HAProxy
sudo systemctl start haproxy
sudo systemctl status haproxy
curl http://localhost:8080/stats # Regional statistics
5.2: Configure Secondary Region Load Balancer (West US 2)
SSH into the Secondary Regional Load Balancer
ssh -i ~/.ssh/id_rsa azureuser@<REGIONAL_LB_SECONDARY_PUBLIC_IP>Configure HAProxy for secondary region
sudo apt update && sudo apt install haproxy -y
sudo systemctl enable haproxy

# Configure HAProxy for secondary region web servers
sudo tee /etc/haproxy/haproxy.cfg > /dev/null <<EOF
global
    daemon
    maxconn 2048

defaults
    mode http
    timeout connect 5000ms
    timeout client 50000ms
    timeout server 50000ms
    option httplog
    balance roundrobin

listen stats
    bind *:8080
    stats enable
    stats uri /stats

listen health_check
    bind *:8888
    mode http
    monitor-uri /health

frontend regional_frontend
    bind *:80
    default_backend regional_web_servers

backend regional_web_servers
    option httpchk GET /health
    server web3_secondary 10.2.1.4:80 check maxconn 300
    server web4_secondary 10.2.1.5:80 check maxconn 300
EOF

sudo systemctl start haproxy
Step 6: Configure Web Servers
Configure multiple web servers in each region for redundancy and fault tolerance.
6.1: Configure Web Servers in Primary Region
Web Server 1 (10.1.1.4):
SSH into Web Server 1 via Regional Load Balancer
ssh azureuser@10.1.1.4 # From regional LBInstall and configure nginx
sudo apt update && sudo apt install nginx -y
sudo systemctl enable nginx
Create region-aware web page
sudo tee /var/www/html/index.html > /dev/null <<EOF
<!DOCTYPE html>
<html>
<head>
    <title>HA Multi-Region Web App - Primary Region</title>
    <style>
        body { font-family: Arial, sans-serif; margin: 40px; background: linear-gradient(135deg, #667eea 0%, #764ba2 100%); color: white; }
        .container { background-color: rgba(255,255,255,0.1); padding: 30px; border-radius: 15px; backdrop-filter: blur(10px); }
        .server-info { background-color: rgba(255,255,255,0.2); padding: 20px; border-radius: 8px; margin: 20px 0; }
        .region-badge { background-color: #4CAF50; padding: 5px 15px; border-radius: 20px; font-weight: bold; display: inline-block; }
        .test-button { background-color: #FF6B6B; color: white; padding: 12px 24px; border: none; border-radius: 6px; cursor: pointer; margin: 5px; font-size: 14px; }
        .test-button:hover { background-color: #FF5252; }
    </style>
</head>
<body>
    <div class="container">
        <h1>High Availability Multi-Region Web Application</h1>
        <span class="region-badge">PRIMARY REGION - EAST US</span>

        <div class="server-info">
            <h3>Server Details:</h3>
            <p><strong>Server:</strong> Web Server 1</p>
            <p><strong>Hostname:</strong> $(hostname)</p>
            <p><strong>Private IP:</strong> 10.1.1.4</p>
            <p><strong>Region:</strong> East US (Primary)</p>
            <p><strong>Tier:</strong> Web/Frontend</p>
            <p><strong>Load Balancer:</strong> Regional HAProxy (10.1.0.4)</p>
            <p><strong>Timestamp:</strong> $(date)</p>
        </div>

        <h3>🔗 Application Tests:</h3>
        <button class="test-button" onclick="testAppTier()">Test App Tier Connection</button>
        <button class="test-button" onclick="testDatabase()">Test Database Connection</button>
        <button class="test-button" onclick="testCrossRegion()">Test Cross-Region Connectivity</button>
        <div id="results"></div>
    </div>

    <script>
    async function testAppTier() {
        showResult('Testing local application tier...', '#FFC107');
        fetch('/api/health')
            .then(r => r.json())
            .then(data => showResult('App tier responsive: ' + JSON.stringify(data), '#4CAF50'))
            .catch(e => showResult('App tier error: ' + e.message, '#F44336'));
    }

    function showResult(message, color) {
        document.getElementById('results').innerHTML =
            '<div style="background-color: ' + color + '; padding: 10px; margin: 10px 0; border-radius: 5px;">' + message + '</div>';
    }
    </script>
    </div>
</body>
</html>
EOF
Create health check endpoint
sudo tee /var/www/html/health > /dev/null <<EOF
{
    "status": "healthy",
    "server": "web-server-1-primary",
    "region": "east-us",
    "timestamp": "$(date -Iseconds)",
    "private_ip": "10.1.1.4"
}
EOF
Configure nginx to serve health checks
sudo tee /etc/nginx/sites-available/default > /dev/null <<EOF
server {
    listen 80 default_server;

    location / {
        root /var/www/html;
        index index.html;
    }

    location /health {
        add_header Content-Type application/json;
        return 200 '{"status":"healthy","server":"web-server-1-primary","region":"east-us","timestamp":"$(date -Iseconds)"}';
    }

    location /api/ {
        proxy_pass http://10.1.2.4:3000/;
        proxy_set_header Host \$host;
        proxy_set_header X-Real-IP \$remote_addr;
    }
}
EOF

sudo systemctl restart nginx
Repeat similar configuration for Web Server 2 (10.1.1.5) with appropriate server identifiers.
Step 7: Configure Application Servers
Configure multiple application servers in each region for redundancy.
7.1: Configure App Server 1 (Primary Region - 10.1.2.4)
SSH into the Application Server
# SSH via regional load balancer or web server
ssh azureuser@10.1.2.4
Install Node.js and npm
sudo apt update
sudo apt upgrade -y
curl -fsSL https://deb.nodesource.com/setup_18.x | sudo -E bash -
sudo apt-get install -y nodejs
Create high-availability API application with failover capability
mkdir ~/lab11-ha-app
cd ~/lab11-ha-app

# Create package.json
cat > package.json <<EOF
{
  "name": "lab11-ha-app-tier",
  "version": "1.0.0",
  "description": "HA Application tier with database failover",
  "main": "app.js",
  "scripts": {
    "start": "node app.js",
    "dev": "nodemon app.js"
  },
  "dependencies": {
    "express": "^4.18.2",
    "pg": "^8.8.0"
  }
}
EOF

# Install dependencies
npm install

# Create the HA application with database failover
cat > app.js <<'EOF'
const express = require('express');
const { Client } = require('pg');
const app = express();
const port = 3000;

app.use(express.json());

// Database connection configurations with failover
const primaryDbConfig = {
    host: '10.1.3.4',  // Primary DB in same region (East US)
    port: 5432,
    database: 'lab11db',
    user: 'appuser',
    password: 'securepassword',
    connectionTimeoutMillis: 5000,
};

const secondaryDbConfig = {
    host: '10.2.3.4',  // Secondary DB in West US 2 region
    port: 5432,
    database: 'lab11db',
    user: 'appuser',
    password: 'securepassword',
    connectionTimeoutMillis: 5000,
};

// Utility function to get private IP
function getPrivateIP() {
    const interfaces = require('os').networkInterfaces();
    for (let iface in interfaces) {
        for (let alias of interfaces[iface]) {
            if (alias.family === 'IPv4' && !alias.internal && alias.address.startsWith('10.1.2')) {
                return alias.address;
            }
        }
    }
    return 'unknown';
}

// Database connection with automatic failover
async function connectToDatabase() {
    try {
        const client = new Client(primaryDbConfig);
        await client.connect();
        console.log('Connected to primary database');
        return { client, source: 'primary', region: 'East US' };
    } catch (primaryError) {
        console.log('Primary DB failed, trying secondary:', primaryError.message);
        try {
            const client = new Client(secondaryDbConfig);
            await client.connect();
            console.log('Connected to secondary database');
            return { client, source: 'secondary', region: 'West US 2' };
        } catch (secondaryError) {
            console.error('Both databases failed:', secondaryError.message);
            throw new Error('All database connections failed');
        }
    }
}

// Health check endpoint
app.get('/health', (req, res) => {
    res.json({
        status: 'healthy',
        server: 'app-server-1-primary',
        tier: 'Application Tier',
        hostname: require('os').hostname(),
        private_ip: getPrivateIP(),
        subnet: '10.1.2.0/24',
        region: 'East US (Primary)',
        architecture: 'HA Multi-Region',
        failover_capable: true,
        timestamp: new Date().toISOString()
    });
});

// Test database connection with failover
app.get('/db-test', async (req, res) => {
    try {
        const { client, source, region } = await connectToDatabase();
        const result = await client.query('SELECT NOW() as current_time, version() as db_version, inet_server_addr() as db_ip');
        await client.end();

        res.json({
            status: 'database connected',
            app_server: 'app-server-1-primary',
            app_region: 'East US',
            db_source: source,
            db_region: region,
            connection_type: source === 'primary' ? 'Local' : 'Cross-Region Failover',
            data: result.rows[0],
            failover_status: source === 'secondary' ? 'FAILOVER ACTIVE' : 'PRIMARY ACTIVE'
        });
    } catch (error) {
        res.status(500).json({
            status: 'database connection failed',
            app_server: 'app-server-1-primary',
            app_region: 'East US',
            error: error.message,
            details: 'Both primary and secondary databases unreachable'
        });
    }
});

// Get users with database failover
app.get('/users', async (req, res) => {
    try {
        const { client, source, region } = await connectToDatabase();
        const result = await client.query('SELECT *, inet_server_addr() as db_server_ip FROM users ORDER BY id');
        await client.end();

        res.json({
            status: 'success',
            app_server: 'app-server-1-primary',
            app_region: 'East US',
            db_source: source,
            db_region: region,
            connection_type: source === 'primary' ? 'Local' : 'Cross-Region Failover',
            users: result.rows,
            count: result.rows.length,
            failover_status: source === 'secondary' ? 'FAILOVER ACTIVE' : 'PRIMARY ACTIVE'
        });
    } catch (error) {
        res.status(500).json({
            status: 'error',
            app_server: 'app-server-1-primary',
            app_region: 'East US',
            error: error.message,
            details: 'Database failover failed'
        });
    }
});

// Network connectivity test endpoint
app.get('/network-test', (req, res) => {
    res.json({
        app_server: {
            hostname: require('os').hostname(),
            private_ip: getPrivateIP(),
            subnet: '10.1.2.0/24',
            region: 'East US',
            vnet: 'lab11-primary-vnet'
        },
        database_target: {
            ip: '10.2.1.4',
            subnet: '10.2.1.0/24',
            region: 'West US 2',
            vnet: 'lab11-secondary-vnet'
        },
        peering_status: 'Global VNet Peering should be active',
        test_timestamp: new Date().toISOString()
    });
});

function getPrivateIP() {
    const interfaces = require('os').networkInterfaces();
    for (const name of Object.keys(interfaces)) {
        for (const interface of interfaces[name]) {
            if (interface.family === 'IPv4' && !interface.internal) {
                return interface.address;
            }
        }
    }
    return 'unknown';
}

app.listen(port, '0.0.0.0', () => {
    console.log(`Application tier listening on port ${port}`);
    console.log(`Private IP: ${getPrivateIP()}`);
    console.log(`Region: East US`);
    console.log(`Cross-region database target: 10.2.1.4 (West US 2)`);
});
EOF
Start the application
# Start the app in the background
nohup npm start > app.log 2>&1 &

# Check if it's running
ps aux | grep node

# Test locally
curl http://localhost:3000/health

# Test network connectivity info
curl http://localhost:3000/network-test
Step 8: Configure Database Servers with Master-Slave Replication
8.1: Configure Primary Database Server (East US - 10.1.3.4)
SSH into the Primary Database Server
ssh azureuser@10.1.3.4 # Via regional load balancerInstall PostgreSQL
sudo apt update
sudo apt upgrade -y
sudo apt install postgresql postgresql-contrib -y
sudo systemctl start postgresql
sudo systemctl enable postgresql
Configure PostgreSQL Master
# Switch to postgres user and configure database
sudo -u postgres psql

-- Create database and user (run these in PostgreSQL shell)
CREATE DATABASE lab11db;
CREATE USER appuser WITH PASSWORD 'securepassword';
CREATE USER replication_user WITH REPLICATION PASSWORD 'replication_pass';
GRANT ALL PRIVILEGES ON DATABASE lab11db TO appuser;
\q
Configure PostgreSQL Master for replication
# Edit PostgreSQL configuration
sudo nano /etc/postgresql/14/main/postgresql.conf
Modify these settings:
listen_addresses = '*'
wal_level = replica
max_wal_senders = 3
wal_keep_size = 64
# Edit client authentication sudo nano /etc/postgresql/14/main/pg_hba.confAdd these lines:
# Application access (local and cross-region)
host    lab11db          appuser         10.1.2.0/24            md5
host    lab11db          appuser         10.2.2.0/24            md5

# Replication access from slave
host    replication     replication_user 10.2.3.4/32           md5
Create sample data and restart PostgreSQL
sudo -u postgres psql -d lab11db

-- Create tables with HA tracking (run in PostgreSQL shell)
CREATE TABLE users (
    id SERIAL PRIMARY KEY,
    name VARCHAR(100) NOT NULL,
    email VARCHAR(100) UNIQUE NOT NULL,
    source_region VARCHAR(50) DEFAULT 'East US',
    created_at TIMESTAMP DEFAULT CURRENT_TIMESTAMP
);

CREATE TABLE ha_status (
    id SERIAL PRIMARY KEY,
    server_role VARCHAR(20) DEFAULT 'master',
    region VARCHAR(50) DEFAULT 'East US',
    status VARCHAR(20) DEFAULT 'active',
    last_update TIMESTAMP DEFAULT CURRENT_TIMESTAMP
);

-- Insert sample data
INSERT INTO users (name, email, source_region) VALUES
('Alice Johnson', 'alice@example.com', 'East US'),
('Bob Wilson', 'bob@example.com', 'East US'),
('Carol Davis', 'carol@example.com', 'East US');

INSERT INTO ha_status (server_role, region, status) VALUES
('master', 'East US', 'active');

-- Grant permissions to appuser
GRANT ALL PRIVILEGES ON ALL TABLES IN SCHEMA public TO appuser;
GRANT ALL PRIVILEGES ON ALL SEQUENCES IN SCHEMA public TO appuser;
\q

# Restart PostgreSQL
sudo systemctl restart postgresql
8.2: Configure Secondary Database Server (West US 2 - 10.2.3.4)
SSH into the Secondary Database Server
ssh azureuser@10.2.3.4Install PostgreSQL and set up as slave
sudo apt update && sudo apt install postgresql postgresql-contrib -y
sudo systemctl stop postgresql

# Remove default data directory
sudo rm -rf /var/lib/postgresql/14/main/*

# Create base backup from master
sudo -u postgres pg_basebackup -h 10.1.3.4 -D /var/lib/postgresql/14/main -U replication_user -v -P -W
Configure slave server
# Create standby signal file
sudo -u postgres touch /var/lib/postgresql/14/main/standby.signal

# Configure recovery settings
sudo -u postgres tee /var/lib/postgresql/14/main/postgresql.auto.conf > /dev/null <<EOF
primary_conninfo = 'host=10.1.3.4 port=5432 user=replication_user password=replication_pass'
restore_command = 'cp /var/lib/postgresql/14/main/pg_wal/%f %p'
EOF

# Start PostgreSQL slave
sudo systemctl start postgresql
sudo systemctl enable postgresql

# Verify replication status
sudo -u postgres psql -c "SELECT * FROM pg_stat_wal_receiver;"
Step 9: Fault Tolerance Testing and Region Failure Simulation
9.1: Initial Health Verification
Test Global Load Balancer
# Test from your local machine
curl http://<GLOBAL_LB_PUBLIC_IP>/
curl http://<GLOBAL_LB_PUBLIC_IP>:8080/stats  # HAProxy stats
Test Application Endpoints
# Test API health across regions
curl http://<GLOBAL_LB_PUBLIC_IP>/api/health
curl http://<GLOBAL_LB_PUBLIC_IP>/api/db-test
curl http://<GLOBAL_LB_PUBLIC_IP>/api/users
Verify Database Replication
# On master database (10.1.3.4)
sudo -u postgres psql -d lab11db -c "INSERT INTO users (name, email) VALUES ('Test User', 'test@failover.com');"

# On slave database (10.2.3.4) - should see the new record
sudo -u postgres psql -d lab11db -c "SELECT * FROM users WHERE email = 'test@failover.com';"
9.2: Simulate Primary Region Failure
Scenario 1: Primary Web Server Failure
Stop Web Server 1 in Primary Region
# SSH to web server 1 (10.1.1.4)
ssh azureuser@10.1.1.4
sudo systemctl stop nginx
sudo systemctl status nginx  # Verify it's stopped
Test Load Balancer Response
# Access application - should still work via web server 2
curl http://<GLOBAL_LB_PUBLIC_IP>/

# Check HAProxy stats to see failed server
curl http://<REGIONAL_LB_PRIMARY_PUBLIC_IP>:8080/stats
Scenario 2: Primary Database Failure
Stop Primary Database Server
# SSH to primary DB server (10.1.3.4)
ssh azureuser@10.1.3.4
sudo systemctl stop postgresql
Test Application Failover
# Application should failover to secondary DB
curl http://<GLOBAL_LB_PUBLIC_IP>/api/db-test
curl http://<GLOBAL_LB_PUBLIC_IP>/api/users

# Response should show: "failover_status": "FAILOVER ACTIVE"
Scenario 3: Complete Primary Region Failure
Simulate Entire Region Down
# Method 1: Stop all services in primary region
# SSH to each primary server and stop services:

# Regional LB (10.1.0.4)
ssh azureuser@10.1.0.4
sudo systemctl stop haproxy nginx

# Web servers (10.1.1.4, 10.1.1.5)
ssh azureuser@10.1.1.4
sudo systemctl stop nginx
ssh azureuser@10.1.1.5
sudo systemctl stop nginx

# App servers (10.1.2.4, 10.1.2.5)
ssh azureuser@10.1.2.4
pkill node  # Stop Node.js app
ssh azureuser@10.1.2.5
pkill node

# Primary DB (10.1.3.4)
ssh azureuser@10.1.3.4
sudo systemctl stop postgresql
Alternative: Use Azure NSG to block traffic
# Using Azure CLI to simulate network failure
az network nsg rule create \
    --resource-group lab11-primary-rg \
    --nsg-name lb-nsg \
    --name block-all-traffic \
    --priority 100 \
    --source-address-prefixes '*' \
    --source-port-ranges '*' \
    --destination-address-prefixes '*' \
    --destination-port-ranges '*' \
    --access Deny \
    --protocol '*'
Test Complete Failover
# Application should now route entirely to secondary region
curl http://<GLOBAL_LB_PUBLIC_IP>/
curl http://<GLOBAL_LB_PUBLIC_IP>/api/health
curl http://<GLOBAL_LB_PUBLIC_IP>/api/users

# Check global HAProxy stats
curl http://<GLOBAL_LB_PUBLIC_IP>:8080/stats

# All traffic should show as routing to secondary region
9.3: Performance Under Failure
Load Testing During Failover
# Install Apache Bench for load testing
sudo apt install apache2-utils -y

# Test performance during normal operation
ab -n 1000 -c 10 http://<GLOBAL_LB_PUBLIC_IP>/

# During primary region failure
ab -n 1000 -c 10 http://<GLOBAL_LB_PUBLIC_IP>/api/health

# Monitor response times and success rate
Monitor HAProxy Statistics
# Watch real-time statistics during failures
watch -n 2 "curl -s http://<GLOBAL_LB_PUBLIC_IP>:8080/stats | grep -A5 -B5 'backend\|DOWN\|UP'"
9.4: Recovery Testing
Restore Primary Region Services
# Start services in reverse order of failure:

# 1. Primary Database
ssh azureuser@10.1.3.4
sudo systemctl start postgresql

# 2. Application Servers
ssh azureuser@10.1.2.4
cd ~/lab11-ha-app && nohup npm start > app.log 2>&1 &

# 3. Web Servers
ssh azureuser@10.1.1.4
sudo systemctl start nginx

# 4. Regional Load Balancer
ssh azureuser@10.1.0.4
sudo systemctl start haproxy nginx
Remove NSG Blocking Rule (if used)
az network nsg rule delete \
    --resource-group lab11-primary-rg \
    --nsg-name lb-nsg \
    --name block-all-traffic
Verify Automatic Recovery
# Traffic should automatically return to primary region
curl http://<GLOBAL_LB_PUBLIC_IP>/api/health
curl http://<GLOBAL_LB_PUBLIC_IP>/api/db-test

# Check that db-test shows primary database is being used again
# Look for: "failover_status": "PRIMARY ACTIVE"
9.5: Monitoring and Alerting
- Set up Health Check Script
# Create monitoring script
cat > ~/monitor-ha.sh <<'EOF'
#!/bin/bash

GLOBAL_LB="<GLOBAL_LB_PUBLIC_IP>"
LOG_FILE="/var/log/ha-monitor.log"

while true; do
    TIMESTAMP=$(date)

    # Test health endpoint
    HEALTH_STATUS=$(curl -s -o /dev/null -w "%{http_code}" http://$GLOBAL_LB/api/health)
    DB_STATUS=$(curl -s -o /dev/null -w "%{http_code}" http://$GLOBAL_LB/api/db-test)

    # Log results
    echo "$TIMESTAMP - Health: $HEALTH_STATUS, DB: $DB_STATUS" >> $LOG_FILE

    # Alert if services are down
    if [[ $HEALTH_STATUS != "200" || $DB_STATUS != "200" ]]; then
        echo "ALERT: Service degradation detected at $TIMESTAMP" >> $LOG_FILE
    fi

    sleep 30
done
EOF

chmod +x ~/monitor-ha.sh
nohup ~/monitor-ha.sh &
Step 10: Cleanup and Analysis
10.1: Document Your Test Results
- Create Test Report
cat > ~/ha-test-report.txt <<EOF
High Availability Multi-Region Test Report
==========================================

Test Date: $(date)

Architecture Overview:
- Global Load Balancer: <GLOBAL_LB_PUBLIC_IP>
- Primary Region: East US ($(curl -s http://<GLOBAL_LB_PUBLIC_IP>/api/health | grep -o '"region":"[^"]*' | cut -d'"' -f4))
- Secondary Region: West US 2

Test Results:
1. Normal Operation: PASS/FAIL
2. Single Server Failure: PASS/FAIL
3. Database Failover: PASS/FAIL
4. Complete Region Failure: PASS/FAIL
5. Automatic Recovery: PASS/FAIL

Performance Metrics:
- Response Time During Normal Operation: ___ms
- Response Time During Failover: ___ms
- Recovery Time: ___seconds

Notes:
___________________________________
EOF
10.2: Clean Up Resources
Stop Monitoring Scripts
pkill -f monitor-ha.shDocument Architecture
- Take screenshots of HAProxy statistics pages
- Document the IP addressing scheme
- Note any performance observations
Congratulations! You have successfully implemented and tested a high-availability multi-region web application with automatic failover capabilities using HAProxy and PostgreSQL replication across Azure regions. (‘Bob Smith’, ‘bob@example.com’, ‘West US 2’), (‘Carol Davis’, ‘carol@example.com’, ‘West US 2’), (‘David Wilson’, ‘david@example.com’, ‘West US 2’), (‘Eva Martinez’, ’eva@example.com’, ‘West US 2’), (‘Frank Zhang’, ‘frank@example.com’, ‘West US 2’);
– Grant permissions to appuser GRANT ALL PRIVILEGES ON TABLE users TO appuser; GRANT ALL PRIVILEGES ON SEQUENCE users_id_seq TO appuser;
– Create a view to show region and network information CREATE VIEW network_info AS SELECT ‘Database Tier’ as tier, ‘West US 2’ as region, ‘10.2.1.0/24’ as subnet, ’lab11-secondary-vnet’ as vnet, ‘Cross-region via Global VNet Peering’ as connectivity, NOW() as timestamp;
GRANT SELECT ON network_info TO appuser;
\q
6. **Restart PostgreSQL and test configuration**
```shell
sudo systemctl restart postgresql

# Test local connection
psql -h 10.2.1.4 -U appuser -d lab11db -c "SELECT COUNT(*) FROM users;"

# Test network info view
psql -h 10.2.1.4 -U appuser -d lab11db -c "SELECT * FROM network_info;"
- Verify cross-region connectivity (from application server)
From the application server in the primary region, test the cross-region database connection:
# Exit from database server back to app server
exit

# Test cross-region database connectivity from app server
sudo apt install postgresql-client -y
psql -h 10.2.1.4 -U appuser -d lab11db -c "SELECT name, region FROM users LIMIT 3;"

# Test network latency between regions
ping -c 5 10.2.1.4
Step 11: Test Multi-Region Network Connectivity and Security
Now we’ll test our multi-region three-tier architecture and verify that our network security and VNet peering are working correctly.
11.1: Test Web Tier from Internet
Test Web Server Accessibility From your local machine:
# Test web server accessibility
curl http://<WEB_SERVER_PUBLIC_IP>

# You should see the HTML page with multi-region architecture information
Test Web Interface
- Open a web browser and navigate to
http://<WEB_SERVER_PUBLIC_IP> - You should see the multi-region architecture page
- Try clicking the connectivity test buttons to verify the tiers
- Open a web browser and navigate to
11.2: Test Cross-Region Connectivity
Test from Web Server to Application Server (Same Region) From the web server:
# Test direct connection to app server in same region
curl http://10.1.2.4:3000/health

# Test network information endpoint
curl http://10.1.2.4:3000/network-test
Test from Application Server to Database Server (Cross-Region) From the application server:
# Test cross-region database connectivity
curl http://localhost:3000/db-test

# Test users endpoint (cross-region database query)
curl http://localhost:3000/users
Test VNet Peering Connectivity From the web server:
# Test ping to database server across regions
ping -c 5 10.2.1.4

# Test direct database access from web server (bastion pattern)
sudo apt install postgresql-client -y
psql -h 10.2.1.4 -U appuser -d lab11db -c "SELECT * FROM network_info;"
11.3: Test API Endpoints Through Web Server
From your local machine:
# Test application health through web proxy
curl http://<WEB_SERVER_PUBLIC_IP>/api/health

# Test cross-region database connectivity through web proxy
curl http://<WEB_SERVER_PUBLIC_IP>/api/db-test

# Test users endpoint (end-to-end: Web → App → DB across regions)
curl http://<WEB_SERVER_PUBLIC_IP>/api/users

# Test network information
curl http://<WEB_SERVER_PUBLIC_IP>/api/network-test
11.4: Test Network Security Restrictions
Test Application Server Isolation From your local machine (should fail):
# This should timeout/fail - app server has no public IP
curl --connect-timeout 10 http://<APP_SERVER_PRIVATE_IP>:3000/health
Test Database Server Isolation From your local machine (should fail):
# This should fail - database server has no public IP and is in different region
telnet <DB_SERVER_PRIVATE_IP> 5432
Test NSG Rules Try connecting to unauthorized ports (should fail):
# From web server, try unauthorized port on app server
nc -zv 10.1.2.4 8080

# From app server, try unauthorized port on database server
nc -zv 10.2.1.4 3306
11.5: Verify VNet Peering Status
Check Peering in Azure Portal
- Navigate to Virtual networks → lab11-primary-vnet → Peerings
- Verify status shows “Connected”
- Check traffic statistics and verify data is flowing
Check Effective Routes
- Go to Virtual machines → app-server-vm → Networking → Network Interface
- Click on the network interface name
- Go to Effective routes to see cross-region routing
11.6: Performance Testing
Test Cross-Region Latency From application server:
# Test latency to database server in different region
ping -c 10 10.2.1.4

# Test application response time for cross-region database queries
time curl http://localhost:3000/users
Test Bandwidth From application server:
# Install iperf3 for bandwidth testing
sudo apt install iperf3 -y

# On database server (run first)
# iperf3 -s

# From app server (test bandwidth to database region)
# iperf3 -c 10.2.1.4 -t 10
Step 12: Create Custom Route Tables (Advanced Multi-Region Routing)
Let’s create custom routing to demonstrate advanced traffic control across regions.
12.1: Create Route Table for Primary Region
Create Route Table
- In the Azure Portal, search for “Route tables” and select it
- Click "+ Create"
- Fill in the details:
- Subscription: Select your subscription
- Resource group:
lab11-primary-rg - Region:
East US - Name:
lab11-primary-route-table
- Click “Review + create” → “Create”
Add Custom Routes
Navigate to your newly created route table
Click “Routes” in the left sidebar
Click "+ Add"
Create route for cross-region database access:
- Route name:
route-to-secondary-region - Address prefix:
10.2.0.0/16 - Next hop type: Virtual network gateway
- Next hop address: Leave empty (will use VNet peering)
- Route name:
Click “Add”
Add another route for monitoring:
- Route name:
force-internet-via-gateway - Address prefix:
0.0.0.0/0 - Next hop type: Internet
- Route name:
Click “Add”
Associate Route Table with App Subnet
- Click “Subnets” in the route table’s left sidebar
- Click "+ Associate"
- Virtual network:
lab11-primary-vnet - Subnet:
app-subnet - Click “OK”
12.2: Create Route Table for Secondary Region
Create Secondary Route Table
- In Route tables, click "+ Create"
- Fill in the details:
- Subscription: Select your subscription
- Resource group:
lab11-secondary-rg - Region:
West US 2 - Name:
lab11-secondary-route-table
- Click “Review + create” → “Create”
Add Routes for Primary Region
- Navigate to the secondary route table
- Click “Routes” → "+ Add"
- Create route back to primary region:
- Route name:
route-to-primary-region - Address prefix:
10.1.0.0/16 - Next hop type: Virtual network gateway
- Next hop address: Leave empty
- Route name:
- Click “Add”
Associate with Database Subnet
- Click “Subnets” → "+ Associate"
- Virtual network:
lab11-secondary-vnet - Subnet:
db-subnet - Click “OK”
12.3: View and Test Custom Routes
View Effective Routes
- Navigate to Virtual machines → app-server-vm
- Go to Networking → Click on the network interface name
- Click “Effective routes”
- You should see custom routes along with system routes
Test Route Effectiveness From the application server:
# Test routing to database server
traceroute 10.2.1.4

# Check route table from OS level
ip route show

# Test connectivity with timing
time nc -zv 10.2.1.4 5432
Step 13: Monitor and Troubleshoot Network Issues
Check Network Security Group Rules
# View NSG rules
az network nsg rule list \
  --resource-group lab11-networking-rg \
  --nsg-name web-nsg \
  --output table

# Check effective security rules on a NIC
az network nic list-effective-nsg \
  --resource-group lab11-networking-rg \
  --name web-server-vmVMNic
Test Connectivity from VMs
# From web server, test connectivity to app server
ping -c 3 10.0.2.4
nc -zv 10.0.2.4 3000

# From app server, test connectivity to database
ping -c 3 10.0.3.4
nc -zv 10.0.3.4 5432
View Network Topology
# List all resources in the virtual network
az network vnet show \
  --resource-group lab11-networking-rg \
  --name lab11-vnet \
  --query "subnets[].{Name:name, AddressPrefix:addressPrefix, NSG:networkSecurityGroup.id}" \
  --output table
Step 14: Testing and Validation Checklist
Complete the following tests to verify your implementation:
Connectivity Tests
- Web server accessible from internet on port 80
- Application server accessible from web server on port 3000
- Database server accessible from app server on port 5432
- SSH access works through bastion (web server)
Security Tests
- Application server NOT accessible from internet
- Database server NOT accessible from internet
- Database server NOT accessible from app server on wrong ports
- Only allowed traffic passes through NSGs
Application Tests
- Web tier serves HTML page correctly
- API endpoints return proper JSON responses
- Database queries work through application tier
- End-to-end functionality works (web → app → database)
Network Configuration Tests
- All VMs have correct private IP addresses in their subnets
- Only web server has public IP address
- Route tables are correctly associated
- NSG rules are properly configured
Troubleshooting Common Issues
Issue 1: Cannot SSH to Private VMs
Solution: Make sure you’re using the web server as a bastion host and that SSH keys are properly copied.
Issue 2: Application Cannot Connect to Database
Solution:
- Check PostgreSQL configuration (
postgresql.confandpg_hba.conf) - Verify NSG allows traffic on port 5432 from app subnet
- Ensure PostgreSQL is listening on the correct IP address
Issue 3: Web Server Cannot Reach Application Server
Solution:
- Check NSG rules allow traffic on port 3000
- Verify Node.js app is running and listening on all interfaces (
0.0.0.0) - Test connectivity with
nc -zv 10.0.2.4 3000
Issue 4: Internet Cannot Access Web Server
Solution:
- Verify public IP is assigned and NSG allows ports 80/443
- Check nginx configuration and service status
- Ensure VM is in public subnet
Cleanup
When you’re finished with the lab, clean up resources to avoid charges:
# Delete the entire resource group (this will delete all resources)
az group delete \
  --name lab11-networking-rg \
  --yes \
  --no-wait
Lab Activity Deliverables
Submit the following:
Screenshots showing:
- Network topology from Azure portal
- NSG rules for each tier
- Successful web page access from internet
- API responses from application tier
- Database query results
Documentation including:
- Network diagram showing IP addresses and subnets
- Description of security rules implemented
- Test results for connectivity and security verification
- Any challenges encountered and how you resolved them
Configuration Files:
- nginx configuration
- Node.js application code
- PostgreSQL configuration changes
References
- Azure Virtual Network Documentation
- Network Security Groups Overview
- Azure Route Tables
- Azure CLI Network Commands
- Three-tier Architecture Best Practices
Lab submissions are due one hour before the next week’s lab begins.