Install and configure a distributed software system that uses the LAMP stack (Linux, Apache web server, MySQL/MariaDB, and PHP).
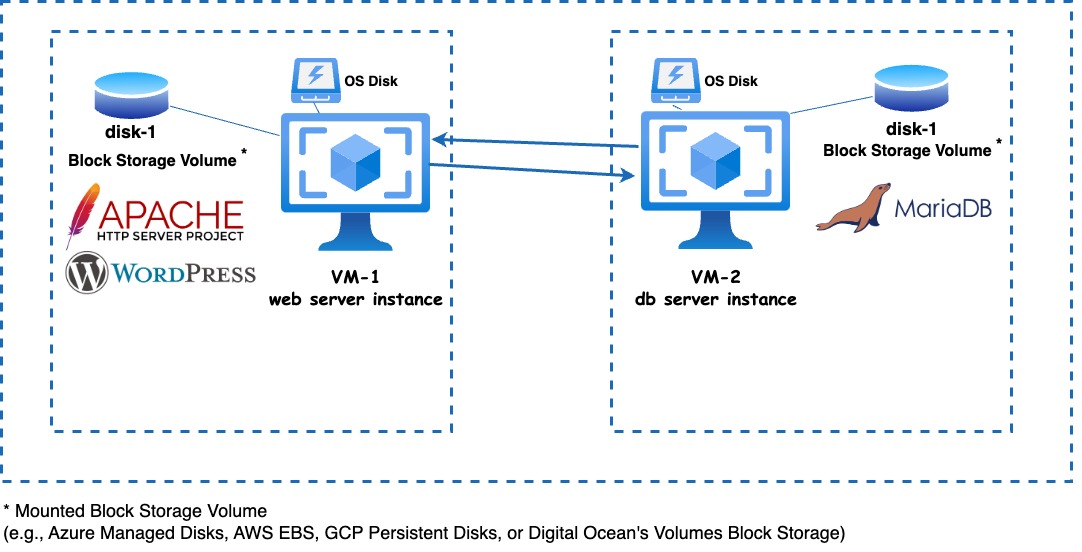
You will install and configure a web application called WordPress, a popular Content Management System (CMS), on two different VM instances where the first one hosts the web server and the second one hosts the database server.
Prerequisites
Note
- Most cloud providers feature a web-based SSH client accessible from the dashboard/portal. This is in particular useful in situations when you’re behind a firewall and the default SSH port 22 is blocked. For instance, Microsoft Azure has web-based CLI called Azure Cloud Shell that runs in an Azure-managed container linked to your account, which allows you to upload your keys and access your Azure resources.
- Below is a list of new commands you will be using in these lab exercises. Make sure you read the manual of each one using the command
man.lsblk – list block devicesblkid – list block device attributes such as uuid.mkfs – build a Linux filesystemfile – determine file typecp -a <source> <target> – Copy the source directory recursively while preserving all file attributes (mode/permission bits, ownership, and timestamps) into the target directory.
Step 1: Create VM instances, attach data disks, and ssh into the instance
- Generate public/private SSH key pair
ssh-keygen -t ed25519 -f lab5key_ed25519
- This should generate two key pairs in the current working directory: private key
lab5key_ed25519 and public key lab5key_ed25519.pub.
- Create two Linux (Ubuntu) VM instances with two additional disks (5-10 GB each) and attach them into each instance.
- The first instance is the web server instance and will run Apache, php, and wordpress. In the following steps, we will refer to this instance as web server instance.
- The second instance is the database server and will run MariaDB. In the following steps, we will refer to this instance as db instance.
- Log in to your VM instances using SSH
ssh -i lab5key_ed25519 azureuser@public-ip-or-DNS-name
- If you have created the SSH key pairs, then you’ll need to type the passphrase you entered when generating your SSH key pair.
- If you’re not logged in to your VM as a user with sudo access, add your user name to the wheel group.
Step 2: Mount the external disk
- Make sure that your external storage devices are attached to the instance from the dashboard of your cloud provider.
- Find the device name of the external storage/disk you have created and attached to the instances by running the command
lsblk to list all available devices:
lsblk
NAME    MAJ:MIN RM  SIZE RO TYPE MOUNTPOINT
loop0     7:0    0 63.9M  1 loop /snap/core20/2182
loop1     7:1    0 91.9M  1 loop /snap/lxd/24061
loop2     7:2    0 40.4M  1 loop /snap/snapd/20671
sda       8:0    0   30G  0 disk
├─sda1    8:1    0 29.9G  0 part /
├─sda14   8:14   0    4M  0 part
└─sda15   8:15   0  106M  0 part /boot/efi
sdb       8:16   0    4G  0 disk
└─sdb1    8:17   0    4G  0 part /mnt
sdc       8:32   0    4G  0 disk
- The above output shows that the default (OS) disk is
sda with a partition called sda1 mounted on the root file system (/). The additional/external disk volume that we provisioned and attached to the VM is called sdc and it is not mounted on the filesystem yet as listed in the MOUNTPOINT column. - Next, we need to determine whether the disk has been formatted with a filesystem or not. In this example, the disk device_name is called sdc. In the following steps, replace device_name with the name of your disk device. To determine whether your disk has a filesystem or not, run the following command:
sudo file -s /dev/device_name
- You should see the following output on a brand new/not formatted disk:
/dev/xvdf: data
- You should also see an output similar to the following on a disk that has already a file system:
/dev/sdc: Linux rev 1.0 ext4 filesystem data, UUID=de3819b8-068f-48f2-a11e-e6483e10705f (extents) (64bit) (large files) (huge files)
- If your disk is not empty, then please skip this step. If you have an empty disk, then you need to format the disk with a file system such as ext4.
Format the disk with a single ext4 file system:
Warning ⚠The following command assumes that you're going to mount and format an empty disk. If your disk has data, then skip this step. If you do not, you'll end up formatting the wrong disk and erasing all existing data. There's no way you can undo this operation easily. You have been warned!
sudo mkfs -t ext4 /dev/device_name
This command should have resulted in an output similar to the one below:
mke2fs 1.42.9 (28-Dec-2013)
Filesystem label=
OS type: Linux
Block size=4096 (log=2)
Fragment size=4096 (log=2)
Stride=0 blocks, Stripe width=0 blocks
524288 inodes, 2097152 blocks
104857 blocks (5.00%) reserved for the super user
First data block=0
Maximum filesystem blocks=2147483648
64 block groups
32768 blocks per group, 32768 fragments per group
8192 inodes per group
Superblock backups stored on blocks:
      32768, 98304, 163840, 229376, 294912, 819200, 884736, 1605632

Allocating group tables: done
Writing inode tables: done
Creating journal (32768 blocks): done
Writing superblocks and filesystem accounting information: done
- Create a mounting point using:
sudo mkdir -p /mnt/disk-1
- Mount the disk
sudo mount /dev/device_name /mnt/disk-1
- Mount the disk every time you reboot your instance:
- For the drive to be automatically remounted after a system reboot, it needs to be included in the
/etc/fstab file. It’s strongly advised to use the UUID (Universally Unique Identifier) in the /etc/fstab file to reference the drive, instead of the device name (like /dev/sdc). This practice helps prevent the wrong disk from being mounted at a specific location if the operating system encounters a disk error during boot. The remaining data disks could then receive those same device IDs. To identify the UUID of the new drive, you will use the blkid utility.
/dev/sda1: LABEL="cloudimg-rootfs" UUID="8b0c6e4a-0cab-4db1-83d8-62ef36ce6e95" TYPE="ext4" PARTUUID="8bc09b18-d521-4996-9501-2d20068dc767"
/dev/sda15: LABEL_FATBOOT="UEFI" LABEL="UEFI" UUID="CFA6-63A2" TYPE="vfat" PARTUUID="be89ef0d-74a9-44dc-bfc9-90f1e1d964ce"
/dev/sdb1: UUID="879cbb90-4683-431a-84aa-e671e16f98c9" TYPE="ext4" PARTUUID="0b529588-01"
/dev/sdc: UUID="de3819b8-068f-48f2-a11e-e6483e10705f" TYPE="ext4"
/dev/loop0: TYPE="squashfs"
/dev/loop1: TYPE="squashfs"
/dev/loop2: TYPE="squashfs"
/dev/sda14: PARTUUID="fad88384-86a5-4764-8de3-d490c101b231"
- You need to add an entry for the device to the
/etc/fstab file, but before that it’s recommended that you backup the original file before edit it. This is important because improperly editing the /etc/fstab file could result in an unbootable system.:
sudo cp /etc/fstab /etc/fstab.orig
- Open the
/etc/fstab file using any text editor, such as nano (e.g., sudo nano /etc/fstab). - Add a line to the end of the file with the following after replacing
<device-name> with the uuid of the disk (e.g., “de3819b8-068f-48f2-a11e-e6483e10705f”).
UUID=<put-the-uuid-here> /mnt/disk-1 ext4 defaults,nofail 1 2
So, this line means mount the filesystem with given UUID at /mnt/disk-1, using the ext4 filesystem type and the default options, plus nofail. Allow dump to backup this filesystem, and check this filesystem at boot time after the root filesystem.
- Repeat the previous steps on the second instance
Step 3: Install MariaDB
- On the db instance install MariaDB (both the server and the client).
sudo apt update
sudo apt upgrade -y
sudo apt install mariadb-server mariadb-client
- Start MariaDB and check if it’s running successfully:
sudo systemctl start mariadb
sudo systemctl status mariadb
Step 4: Change MariaDB’s Data Directory to a new location
We need to change the default data directory of MariaDB into a directory on the external disk we mounted in the previous step:
- Find the name of the mariadb background service:
sudo systemctl status mariadb
$ sudo systemctl status mariadb
mariadb.service - MariaDB 10.3.39 database server
     Loaded: loaded (/lib/systemd/system/mariadb.service; enabled; vendor >
     Active: active (running) since Tue 2024-03-12 18:55:04 UTC; 2h 13min >
       Docs: man:mysqld(8)
             https://mariadb.com/kb/en/library/systemd/
   Main PID: 24522 (mysqld)
     Status: "Taking your SQL requests now..."
      Tasks: 30 (limit: 1002)
     Memory: 82.9M
     CGroup: /system.slice/mariadb.service
             └─24522 /usr/sbin/mysqld
Take note of the process name that is shown above as Main PID: 24522 (mysqld). Here, the process name is mysqld. If you get a different process name such as mariadbd, then please replace mysqld with mariadbd for the subsequent steps.
- Find the user that mariadb process is running under:
The output should look like:
mysql      22844  0.0 11.2 1251744 97156 ?       Ssl  18:14   0:00 /usr/sbin/mysqld
azureus+   23755  0.0  0.0   8168   724 pts/0    S+   18:24   0:00 grep --color=auto mysqld
The first line shows that the process mysqld is running under the user mysql. This means there’s a user account named mysql that runs the mysqld process. Similarly, if you get a different username such as mariadb, then please replace mysql with mariadb for the subsequent steps.
- Stop MariaDB:
sudo systemctl stop mariadb
- Ensure MariaDB has stopped
sudo systemctl status mariadb
You should see in the output that the status is “MariaDB server is down”
4. Create a new data directory for the database server to use:
sudo mkdir /mnt/disk-1/db-data
- Change the owner of that directory into the default user that runs mariadb (e.g., the user is “mysql” as per step#1 but if you got a different username such as
mariadb, then please replace mysql with mariadb as stated above.):
sudo chown mysql:mysql /mnt/disk-1/db-data
- Copy the current/default data directory into the new location while preserving file’s permission mode, ownership, and timestamps using the command
cp with the -p option.
sudo cp -R -p /var/lib/mysql /mnt/disk-1/db-data
- Edit MariaDB’s configuration files to use the new location:
- Edit the server config file at
/etc/mysql/mariadb.conf.d/50-server.cnf
sudo nano /etc/mysql/mariadb.conf.d/50-server.cnf
- Find the line that begins with
datadir and change it to the new path:
. . .
datadir                 = /mnt/disk-1/db-data/mysql/
. . .
Note: If datadir starts with # that means it’s commented. Please remove the # to uncomment it.
- Next start MariaDB using
sudo systemctl start mariadb - Make sure that the new data directory is being used:
- Start the MariaDB/MySQL client using:
- Run the following SQL statement:
select @@datadir; - You should see the following output:
MariaDB [(none)]> select @@datadir;
+----------------------------+
| @@datadir                  |
+----------------------------+
| /mnt/disk-1/db-data/mysql/ |
+----------------------------+
1 row in set (0.000 sec)
- Type the command
exit and hit Enter to exit.
Step 5: Install the Apache HTTP Server (httpd)
Install the apache HTTP Server (httpd) web server on the web server instance.
- Install Apache using apt:
sudo apt update
sudo apt install apache2
- Ensure the apache httpd server is running. If not, start it:
sudo systemctl status apache2
sudo systemctl start apache2
- Create a new directory on the external disk you mounted previously and change its owner to the default user that runs apache:
- Find the user that is running the
apache2 process
ps aux | grep apache2
root        5692  0.0  0.9   6676  3212 ?        Ss   07:19   0:00 /usr/sbin/apache2 -k start
www-data    5694  0.0  1.2 752892  4464 ?        Sl   07:19   0:00 /usr/sbin/apache2 -k start
www-data    5695  0.0  0.9 752820  3236 ?        Sl   07:19   0:00 /usr/sbin/apache2 -k start
azureus+    6143  0.0  0.1   8168   656 pts/0    S+   07:42   0:00 grep --color=auto apache2
Here the default user that is running apache2 web server is www-data.
- Create a directory for our web app and change its ownership into the user that runs the web server.
sudo mkdir /mnt/disk-1/www/
sudo chown www-data:www-data /mnt/disk-1/www/
Change the document root directory of the Apache web server to point to the new directory instead of the default directory (/var/www). Edit two configuration files at /etc/apache2/sites-available/000-default.conf and /etc/apache2/apache2.conf using a text editor:
sudo nano /etc/apache2/sites-available/000-default.conf- Change the Path to the root directory of your web server. The default value is
/var/www so change it to /mnt/disk-1/www.
<VirtualHost *:80>

        ServerAdmin webmaster@localhost
        DocumentRoot /mnt/disk-1/www

. . .
sudo nano /etc/apache2/apache2.conf and modify the <Directory> directive from /var/www into /mnt/disk-1/www
  <Directory /mnt/disk-1/www>
        Options Indexes FollowSymLinks
        AllowOverride None
        Require all granted
  </Directory>
Restart the Apache HTTP Server and make sure it is running.
 sudo systemctl restart apache2
 sudo systemctl status apache2
Step 6: Install PHP
We need to install PHP version 7.4 or greater as per the system requirement of WordPress.
- Install PHP and the required modules
sudo apt update
sudo apt install -y php8.3 libapache2-mod-php8.3 php8.3-mysql php8.3-gd php8.3-xml php8.3-curl php8.3-mbstring
- Verify that you have installed a compatible php version
PHP 7.4.3-4ubuntu2.20 (cli) (built: Feb 21 2024 13:54:34) ( NTS )
Copyright (c) The PHP Group
Zend Engine v3.4.0, Copyright (c) Zend Technologies
    with Zend OPcache v7.4.3-4ubuntu2.20, Copyright (c), by Zend Technologies
Step 7: Install WordPress
- Download WordPress and extract it at your home directory:
- Download the latest WordPress release and extract it
curl -LO http://wordpress.org/latest.tar.gz
tar xvzf latest.tar.gz
- Copy the extracted wordpress directory recursively while preserving all file attributes (mode/permission bits, ownership, and timestamps) into Apache’ document root directory.
sudo cp -av wordpress/* /mnt/disk-1/www/
- Create a directory for WordPress to store uploaded files
sudo mkdir /mnt/disk-1/www/wp-content/uploads
- Change the owner of the WordPress directory to the apache web server’s owner owner (
www-data), so the web pages can be accessed by the apache web server.
sudo chown -R www-data:www-data /mnt/disk-1/www/
It’s always a good security practice to use private IP addresses for communication between VMs in the same network. This way, the traffic doesn’t go over the internet and is not exposed to external threats.
- We need to allow traffic on the MariaDB port in the db instance server VM. By default, MariaDB listens on port
3306. We need to make sure that the db instance server VM’s network/firewall settings allows inbound traffic on 3306 port from the web server VM’s private IP address.
Configuring the db server instance VM instance
- By default, MariaDB listens only on localhost (127.0.0.1). To allow connections from the web server instance or any other host, we need to modify the MariaDB configuration file
/etc/mysql/mariadb.conf.d/50-server.cnf and set the bind-address to 0.0.0.0 or commented it out.- Modify MariaDB’s config file and set the
bind-address directive to 0.0.0.0:
sudo nano /etc/mysql/mariadb.conf.d/50-server.cnf
bind-address = 0.0.0.0
- restart the MariaDB background service:
sudo systemctl restart mariadb
sudo systemctl status mariadb
Allow communication originated from the web server instance into the db server instance
- Go to the Azure portal and select the db instance vm
- Network settings -> Create port rule -> Inbound port rule
- Go the web server instance and get the private IP address.
- Add the “Source IP addresses/CIDR range” of the web server instance (e.g.,
10.0.0.0/24) - Under the Destination port ranges, enter
3306 and click add
- Use the sample config file
cd /mnt/disk-1/www/
sudo cp -a wp-config-sample.php wp-config.php
- Open the default config file
wp-config.php in your text editor:
Change the database name, database username, and password. We also need to change the default hostname from localhost into the private ip address of your db instance (assuming both instances are in the same region and private network).
// ** MySQL settings - You can get this info from your web host ** //
/** The name of the database for WordPress */
define('DB_NAME', 'wpdb');

/** MySQL database username */
define('DB_USER', 'wpuser');

/** MySQL database password */
define('DB_PASSWORD', 'wppassword');
/** MySQL hostname */
define('DB_HOST', 'put-the-private-ip-of-db-instance-here');
NoteWhen we have a web server and a database server, it's important to encrypt data at rest (via data encryption) and in transit (via SSL). It's also important to restrict the communication between the database server and web server to only over a private network, because you don't need to allow access over the public Internet.
- In the same config file
wp-config.php, scroll down and copy the link from the config file (https://api.wordpress.org/secret-key/1.1/salt/) to generate authentication unique keys and salts. Copy the generated keys and add them to the config file.
define( 'AUTH_KEY',         'put your unique phrase here' );
define( 'SECURE_AUTH_KEY',  'put your unique phrase here' );
define( 'LOGGED_IN_KEY',    'put your unique phrase here' );
define( 'NONCE_KEY',        'put your unique phrase here' );
define( 'AUTH_SALT',        'put your unique phrase here' );
define( 'SECURE_AUTH_SALT', 'put your unique phrase here' );
define( 'LOGGED_IN_SALT',   'put your unique phrase here' );
define( 'NONCE_SALT',       'put your unique phrase here' );
- Create a MySQL database and user for WordPress using the same values you declared in the
wp-config.php in the previous step. - Log in to your db instance and start the MariaDB/MySQL client using:
- Leave the password blank and hit Enter if you have not set a root password or enter the root password used during installation
- Once logged in, run the following SQL statement:
CREATE DATABASE wpdb;
USE wpdb;
- Create a new database user:
CREATE USER wpuser@localhost IDENTIFIED BY 'wppassword';
- Grant privileges to the new user. Obtain the private IP address of the web server instance before executing the command below. Replace ip-address with the IP address of the web server instance.
GRANT ALL PRIVILEGES ON wpdb.* TO wpuser@private-ip-web-server-instance IDENTIFIED BY 'wppassword';
FLUSH PRIVILEGES;
- Exit the MySQL prompt using:
exit
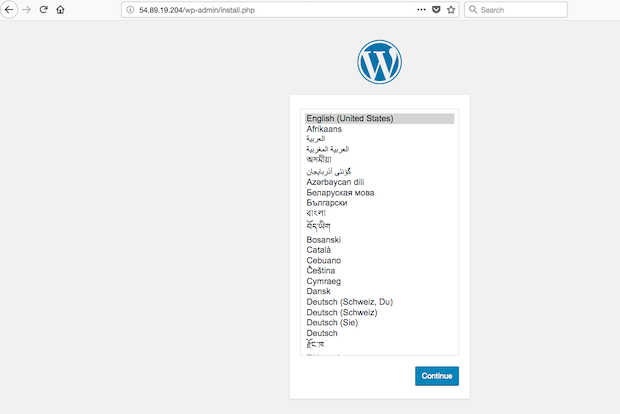
Step 9: Complete the Installation Through the Web Interface
- From your web browser, visit the WordPress dashboard using the public ip address of your web server instance
http://server_domain_name_or_public_IP/wp-admin/. - Complete the installation through the web interface.
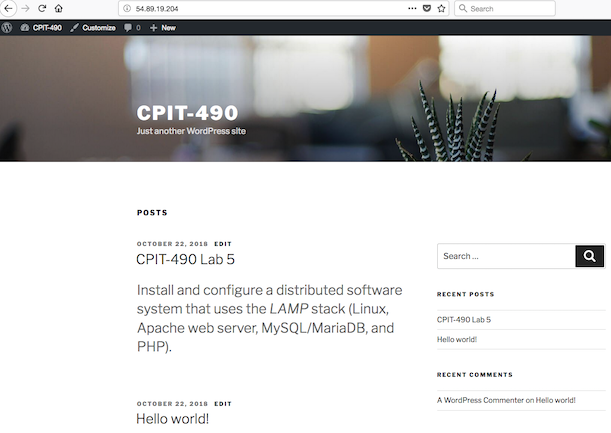
- Log in to the admin dashboard, write your first blog post, and publish it.
- Access the website to show the blog post
- Clean up resources and delete VM instance, public IP, and disks from your account on the Azure portal.
Submission
Submit your answers with screenshots showing the commands you executed as a PDF file by the due date.
Lab submissions are due one hour before the next week’s lab begins.