Introduction
Reverse proxy servers and load balancers are core components in client-server cloud computing architecture. While both act as intermediaries between the clients and servers, they do serve different purposes:
A reverse proxy receives an incoming client’s request, forwards it to a specific server that can process it, and then returns the server’s response to the client. It can provide functions like encryption, compression, and caching. A reverse proxy is often used as the “public interface” for clients accessing a website. Clients are communicating with the reverse proxy through its public IP address and all internal backend servers (web servers, database servers, etc.) remain entirely hidden from the client’s view.
A load balancer: receives incoming client’s requests, distributes them evenly across a group of servers, and then returns the server’s response to the client. A load balancer is often deployed to avoid a single point of failure and overloading a single server. This is especially important when running into a situation where the volume of requests is just too much for a single server. When a single server is down, a load balancer can detect that and stop forwarding subsequent requests to that server. Another important feature of a load balancer is sticky session (also known as session affinity) to make sure all requests from a particular user during the session are sent to the same target server.
Reverse proxies and load balancers can be deployed as dedicated hardware appliances, however, most modern web applications use them as software systems that run on commodity hardware such as virtual private servers (VPSs).
In this lab, we will set up a reverse proxy and load balancer using HAProxy for a Python web server that serves static pages. We will configure one VM for the load balancer, and two additional VMs, each of which will run a WSGI server (Gunicorn) and an HTTP server (nginx).
Objective
- Deploy a multi-tier web application
- Configure HAProxy for load balancing
- Configure TLS Encryption with Let’s Encrypt’s Certbot
- Configuring NGINX as the HTTP Server
- Deploying Python web servers with Gunicorn
- Test and verify the load balancing
Technologies
In this lab, we make use of the following technologies:
- HAProxy, which stands for High Availability Proxy, is a fast reverse-proxy that provides high availability, load balancing, and proxy services for TCP and HTTP-based applications.
- Flask is a lightweight web framework for Python. It can be used to serve static HTML templates or as a RESTful API server, which can handle API requests and responses. We will use Flask to serve a static HTML template.
- Gunicorn ‘Green Unicorn’ is a Python Web Server Gateway Interface (WSGI) HTTP server. Gunicorn is a WSGI http server, which acts as a bridge between the nginx web server and the Flask web application. WSGI is a standard interface between web servers (e.g., apache and nginx) and web applications (e.g., Python Flask). We’re using Gunicorn, which is an implementation of the WSGI standard due to the limitations of the built-in Flask web server that is not production ready. Flask’s built-in web server is not efficient, stable, or secure, making it primarily intended for development purposes.
- nginx HTTP Server is an open-source HTTP server that is widely used to serve websites. Although nginx is a web server that can also be used as a reverse proxy or load balancer, HAProxy is specifically designed for high availability and load balancing as it’s capable of distributing large volumes of traffic by utilizing sophisticated scheduling algorithms and health checks than nginx.
- Certbot: is a free, open source ACME client for automatically using Let’s Encrypt’s TLS certificates to enable HTTPS without the need to purchase a certificate and set it up via your DNS provide.
Let’s Encrypt is a free, automated, and open Certificate Authority (CA) provided by the Internet Security Research Group (ISRG). It provides free digital TLS certificates needed to enable HTTPS for millions of websites. Installing TLS certificates can be complicated. Let’s Encrypt solves this problem by providing an ACME (Automatic Certificate Management Environment) client that uses the ACME protocol to verify that you control a given domain name and to issue you a certificate. In order to get a Let’s Encrypt certificate, you’ll need to choose an ACME client software to use. An ACME client is used to communicate with Let’s Encrypt and other ACME-based Certificate Authorities (CAs) to automate the process of obtaining, deploying, and renewing existing certificates TLS certificates. Certbot is a popular example of ACME client software.
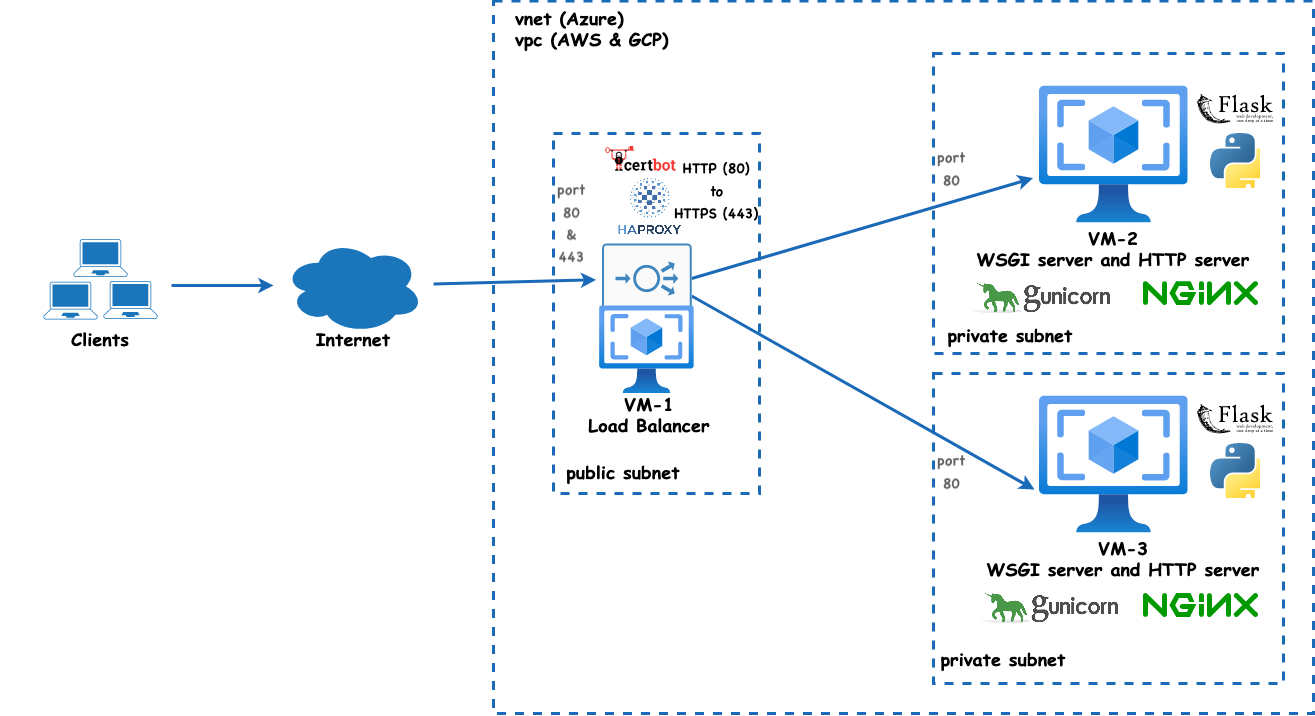
Figure 1: The solution architecture diagram that illustrates setting up a load balancer with three VMs: VM-1 acts as the load balancer using HAProxy and is located in a public subnet. The other two VMs (VM-2 and VM-3) run a WSGI server (Gunicorn) and an HTTP server (nginx) and are located in two private subnets. Client requests are directed to the load balancer, which subsequently routes the traffic to either of these two VMs.
HAProxy works as a reverse proxy, so what is a reverse proxy?
A reverse proxy is an application that sits in front of back-end servers and forwards client requests to those servers instead of having the client directly communicating with the back-end servers.
HAProxy is a reverse proxy, where it accepts client requests, forwards the requests to the appropriate backend servers (based on its load balancing configuration), and then returns the server’s response to the client.
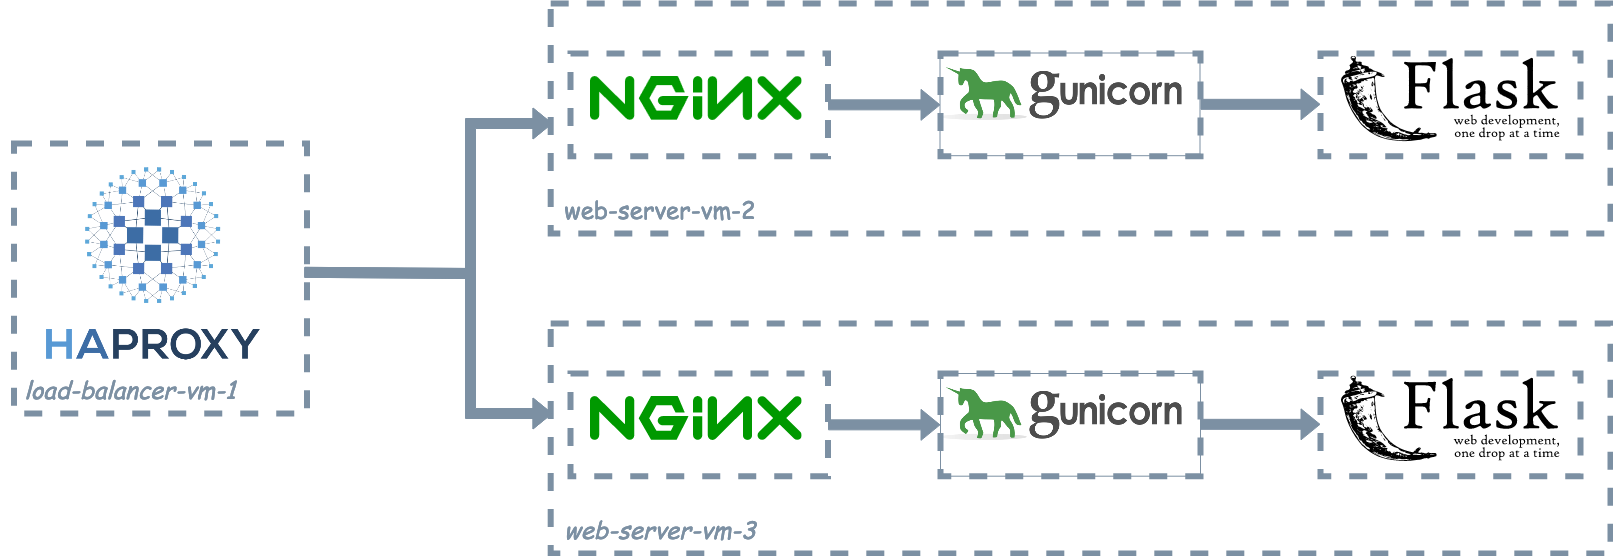
Figure 2: HAProxy acts as the public interface for the web application as it sits in front of two VMs, each running Nginx (HTTP server), Gunicorn (WSGI server), and the Python Flask web app. HAProxy receives all incoming traffic and distributes it between the VMs running the web app.
Setup/Prerequisites
Step 1: Provision three virtual machines
Create a Virtual Network (VNet in Azure, VPC in AWS, or VPC Network in GCP) with a public subnet and two private subnets.
Create three Linux VM instances: load-balancer-vm-1, web-server-vm-2, and web-server-vm-3. Select Debian 12 (bookworm) as the OS image. The instance type should be the cheapest general-purpose available type by your cloud provider. At the time of writing this lab activity, the cheapest types are listed in the follow table:
| Cloud Provider | Instance Type | vCPU | Memory |
|---|
| Azure | B1ls | 1 | 0.5 GiB |
| AWS | t4g.nano | 2 | 0.5 GiB |
| GCP | f1-micro | 1 | 0.6 GB |
| Digital Ocean | Basic Droplet | 1 | 0.5 GiB |
Table 1: the cheapest VM instance types across different cloud providers
Please check the minimum hardware requirements to run the OS image as some images (e.g., Ubuntu) require more memory.
- Place load-balancer-vm-1 in the public subnet. Assign it a public IPv4 address. Configure the network security group/firewall rules to allow inbound traffic on ports 22 (SSH), 80 (HTTP), and 443 (HTTPS)
- Place web-server-vm-2 and web-server-vm-3 in the private subnets. These VMs should not have public IP addresses. Configure the network security group/firewall rules to allow inbound traffic on ports 22 (SSH) and 80 (HTTP).
Please refer to the figure 1 above for the architecture of the setup. and figure 2 for on how the communication takes place between the core technologies used in this lab
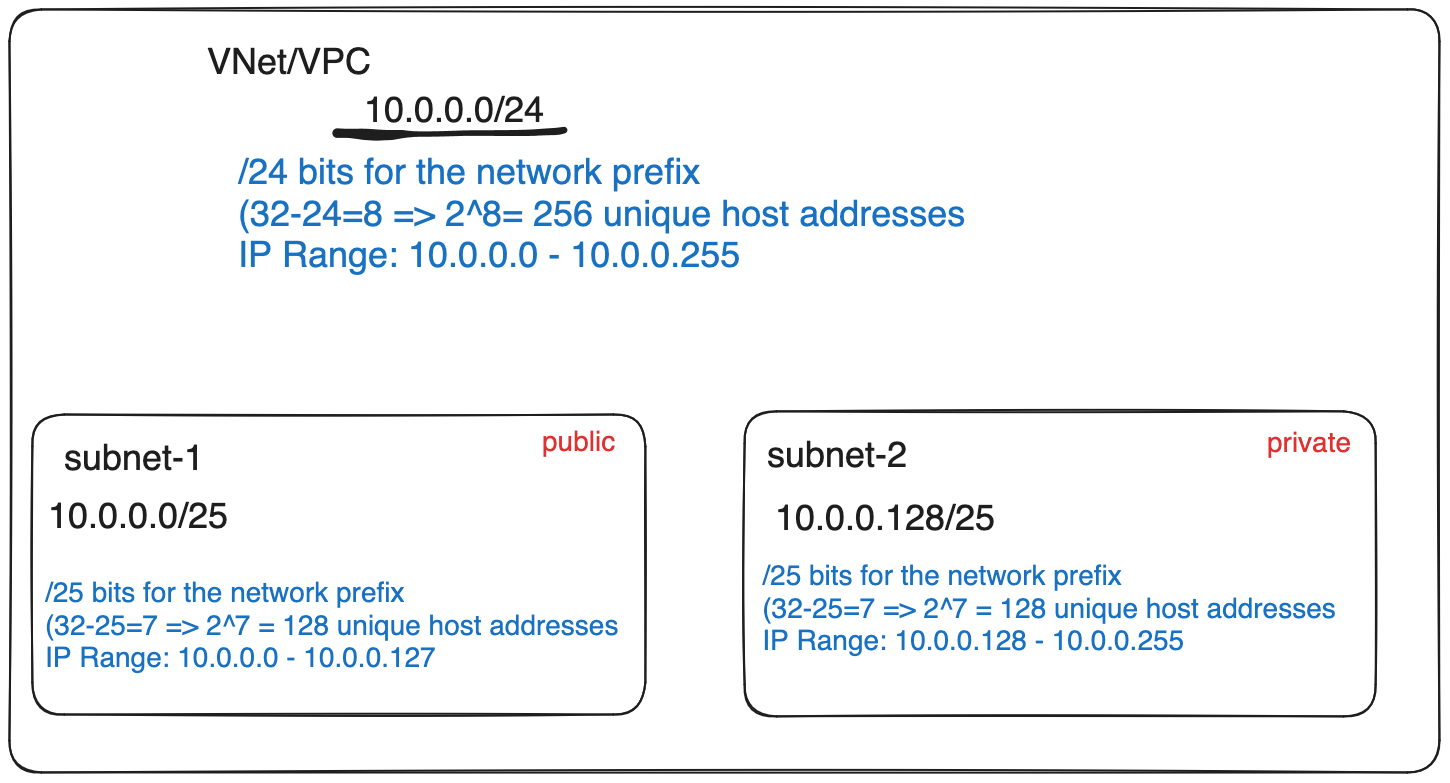
The figure below illustrates the CIDR IP range for the VNet/VPC and the two subnets:
Step 2: SSH into instances with no public IPs
We can SSH into an instance that does not have a public IP using one of the following options:
- SSH into the VM with public IP address and then SSH into the VMs with private IP address within the same VNet/VPC.
- The Cloud Provider’s Web-based Cloud Shell, which is an interactive, authenticated, browser-accessible shell for SSH access. By default, the cloud shell is deployed in a VNet seprate from your own VNet, so you can’t use the cloud shell to SSH to connect from Cloud Shell to a virtual machine that has only a private IP address. The cloud shell needs to be deployed into your own virtual network (Vnet or VPC). For more information, see Use Cloud Shell in an Azure virtual network. All major cloud providers such as AWS, Azure, GCP have cloud shell. DigitalOcean’s control panel provides shell access to the Droplet through a web-based console.
- Bastion Host: A bastion host is an instance that is provisioned with a public IP address and can be accessed via SSH. It acts as a jump server, allowing secure connection to instances provisioned without a public IP address. We can SSH into the Bastion Host (which has a public IP) and then SSH from the Bastion Host to the instance that doesn’t have a public IP.
- Fully Managed PaaS Bastion Service: Most cloud providers have fully managed Bastion service that allow customers to get Remote Desktop Protocol (RDP) and Secure Shell Protocol (SSH) access to virtual machines (VMs) without any exposure through public IP addresses.
For the sake of simplicity, we’ll use the VM with public IP address for SSH access to instances without a public IP address within the same VNet/VPC. First we will copy the private SSH key over to the VM with the public IP.
scp -i <private_key_file> <private_key_file> <username>@<public_IP_address>:<server_path>
- First, do an update and upgrade to ensure we have the latest software packages and apply any security fixes
sudo apt update
sudo apt upgrade -y
- Install
git (the version control system), pip (the package manager for Python), and gunicorn (the WSGI).
sudo apt install git python3-pip gunicorn -y
- Install nginx
sudo apt install -y nginx
sudo systemctl status nginx
Now, we need to find the user that nginx is running as.
root        4659  0.0  1.2  55196  4352 ?        S    12:31   0:00 nginx: master process /usr/sbin/nginx -g daemon on; master_process on;
www-data    4672  0.0  1.1  55868  3772 ?        S    12:31   0:00 nginx: worker process
azureus+    4774  0.0  0.6   7008  2304 pts/0    S+   12:33   0:00 grep --color=auto nginx
This shows that www-data is the user that nginx is running as.
- Download the sample static website app and run it. Create a directory with your domain name at
/var/www/yourwebsite.com (replace yourwebsite.com with your domain name) and clone the sample static website app.
mkdir -p ~/www/yourwebsite.com
cd ~/www/yourwebsite.com
git clone https://gitlab.com/cpit490/static-website.git .
We also need to install the dependencies of our web app and start the Gunicorn server in the background
pip install -r requirements.txt
gunicorn -c config.py app:app > output.log 2>&1 &
cat output.log
Appending the command with & will result in running the process of the Gunicorn WSGI server in the background and returning control to the terminal.
Check the web server run successfully in the background:
If the command ran successfully, you should see the process ID.
Note: The WSGI server is running as a background process, so if you want to stop it, then you need to find the process if (PID) using ps aux | grep gunicorn and then run kill -9 <PID> after replacing <PID> with the actual process ID.
Test the WSGI server, which is running by default on localhost port 8080:
curl -i http://127.0.0.1:8080
You should see 200 status code and the content of the HTML page.
HTTP/1.1 200 OK
Server: gunicorn
Date: Sun, 14 Apr 2024 12:55:36 GMT
Connection: close
Content-Type: text/html; charset=utf-8
Content-Length: 340

<!DOCTYPE html>
<html lang="en">

<head>
    <meta charset="UTF-8">
    <meta name="viewport" content="width=device-width, initial-scale=1.0">
    <title>CPIT-490/632: Lab 6</title>
</head>

<body>
    <h1>Welcome to the Sample Static Page</h1>
    <h2>Hostname: web-server-vm-2</h2>
    <h3>2024-04-14 12:54:41.509315</h3>
</body>

</html
Configure nginx: nginx configuration files will be found in the /etc/nginx/ directory. Nginx uses multiple configuration files listed in table 2 below. We will create a config file at /etc/nginx/sites-available/yourwebsite.com.conf.
| File | Location | Description |
|---|
| Main Configuration File | /etc/nginx/nginx.conf | Sets up global configuration parameters for Nginx. |
| Default Server Block Configuration File | /etc/nginx/sites-available/default | Defines the configuration for a specific server and the directory from which it serves files. This config file is not used by nginx unless it is linked to the sites-enabled directory. |
| Domain Specific Server Block File | /etc/nginx/sites-available/yourwebsite.com.conf | Defines the configuration for a specific domain (e.g., yourwebsite.com). This config file is not used by nginx unless it is linked to the sites-enabled directory. |
Table 2: nginx configuration files
Open the main config file and change the user that nginx is running as. This is done for security reasons as the nginx worker processes should be run as a non-root user.
sudo nano /etc/nginx/nginx.conf
At the top of the file, you should see a line that starts with user. Make sure it is set to the name of the non-root user that the worker processes should be run as. For example, the www-data user is typically created by default on Debian servers when installing web servers like Apache or nginx. If the user is not www-data, then set it to the non-root user that nginx is running as.
user www-data;
worker_processes auto;
pid /run/nginx.pid;
include /etc/nginx/modules-enabled/*.conf;

... ... ...
Next, create a config file at /etc/nginx/sites-available/yourwebsite.com.conf with the following content. Please replace yourwebsite.com with your domain name
sudo touch /etc/nginx/sites-available/yourwebsite.com.conf
sudo nano /etc/nginx/sites-available/yourwebsite.com.conf
server {
    listen 80;
    location / {
        include proxy_params;
        proxy_pass http://127.0.0.1:8080;
    }
}
Please note that this assumes that your WSGI (Gunicorn) is running the Python Flask web app at localhost port 8080. Save the file and exits. Now, our nginx configuration file has a location block that forwards requests to the Gunicorn server.
Note: The sample static website we cloned uses Gunicorn and binds it to localhost (127.0.0.1). This ensures that only connections from the local machine (i.e., from nginx) can reach Gunicorn, which makes our setup more secure.
Enable the new nginx configuration file we created at /etc/nginx/sites-available/yourwebsite.com.conf by creating a new symbolic link to it in the /etc/nginx/sites-enabled directory.
sudo ln -s /etc/nginx/sites-available/yourwebsite.com.conf /etc/nginx/sites-enabled/
ls -l /etc/nginx/sites-enabled/
We also need to remove the default Nginx site enabled, so it does not interfere with our new site:
sudo rm /etc/nginx/sites-enabled/default
Test the nginx configuration to make sure there are no syntax errors:
nginx: the configuration file /etc/nginx/nginx.conf syntax is ok
nginx: configuration file /etc/nginx/nginx.conf test is successful
Restart nginx to apply all the changes we made:
sudo systemctl restart nginx
- Test the nginx web server is running:
You should see 200 status code and the content of the HTML page.
In this setup, Nginx, acts as the reverse proxy server, accepts incoming client requests and forwards them to Gunicorn, the application server. Gunicorn handles these requests by running the Python web application and returning the response to Nginx, which then sends the response back to the client (curl).
Exit from web-server-vm-3 back to load-balancer-vm-1
Step 4: Set up the load balancer server VM: DNS, Certbot, and HAProxy
SSH into the load balancer VM, load-balancer-vm-1 and update and upgrade all system packages to ensure we have the latest software packages and any security fixes are applied.
sudo apt update
sudo apt upgrade -y
1. Add DNS records
Go to the domain name registrar (for example, Namechaeap), and add two DNS records of type A to the hosts @ and www that point to the public IP address of the load-balancer-vm-1. If you’re not sure how to do this, please refer to the lecture note on linking a domain to an instance.
We will use Certbot to obtain a TLS certificate for our domain. certbot will be installed using snap. This is perhaps the first time that we install a software package using snap as we often install packages using the apt package manager. While certbot may be installed using apt, it’s not recommended to install critical software that requires instant automatic updates to be applied promptly using apt. Snaps are a modern type of packages for Linux distributions. They are self-contained, meaning they include all dependencies that the application needs to run and are sandboxed from the rest of the system. This minimizes security risks and provides robustness and reliability since all software updates are automatic and over-the-air (OTA).
We will install certbot as per the official instructions.
First, make sure that the snap daemon (snapd) is already installed. snapd is the background service that manages and maintains installed snaps. snapd should be preinstalled on modern linux distributions but if it’s not installed on your system, then follow the official instructions on snapcraft’s site on how to install snapd.
The command above should return the version number if snapd is installed and running, and “command not found” if it’s not installed or not available in your PATH environment variable.
azureuser@load-balancer-vm-1:~$ snap version
snap    2.61.3+22.04
snapd   2.61.3+22.04
Next, make sure that port 80 is open on the load-balancer-vm-1 machine and is accessible from the internet. You should have done this at the time of provisioning this VM from the web portal. This is required because we will run certbot with the standalone plugin, which means Certbot will temporarily start a tiny web server on port 80 to respond to the ACME server’s requests coming from Let’s Encrypt CA. Let’s encrypt will connect and validate the server’s identity before issuing a certificate.
Check if port 80 is in use:
If port 80 is not being used by any process, you should receive no output.
If you receive output, then you need to stop the service or process is using that uses this port using sudo ps aux <process_name> and sudo kill -9 <PID> after replacing <process_name> and with the actual process name and PID respectively.
Next, install Certbot:
sudo snap install --classic certbot
certbot 2.10.0 from Certbot Project (certbot-eff✓) installed
This should have installed certbot at /snap/bin/certbot and should be added to your PATH environment variable.
Now, request a new certificate:
sudo certbot certonly --standalone -d yourwebsite.com -d www.yourwebsite.com
Requesting a certificate for yourwebsite.com and www.yourwebsite.com

Successfully received certificate.
Certificate is saved at: /etc/letsencrypt/live/yourwebsite.com/fullchain.pem
Key is saved at:         /etc/letsencrypt/live/yourwebsite.com/privkey.pem
This certificate expires on 2024-07-13.
These files will be updated when the certificate renews.
Certbot has set up a scheduled task to automatically renew this certificate in the background.
Please replace yourwebsite.com, with your domain name. Please note that we need to issue a certificate for the domain with and without the www prefix/subdomain. You will be prompted to enter your email address, and complete a set of challenges to proof that you own the server, and agree to the Let’s Encrypt terms of service.
If completed successfully, certbot will print the path at which the certificate are saved at. It’s important to know the location of the generated certificate files. This directory contains files such as certificates, certificate chains, and private keys. Below is the description of the generated .pem files:
| File Name | Description |
|---|
cert.pem | This is your domain’s certificate that contains the public key and is shared with clients that connect to your server. |
chain.pem | This file contains the additional intermediate certificates that form a chain of trust up to the root certificate. |
fullchain.pem | This file combines your domain’s certificate (cert.pem) and the chain of trust (chain.pem). It’s often used by servers that expect the certificate and chain in one file. |
privkey.pem | This is your domain’s private key corresponding to the the public key in the certificate (cert.pem). It should be kept secret and secure, as it’s used to decrypt data encrypted with the public key. The server uses this private key to decrypt data sent by the client and prove its identity. |
If an attacker gains access to the private key, privkey.pem, they could potentially impersonate your server, or decrypt sensitive data. Therefore, it’s crucial to keep the privkey.pem file secure and confidential. If you suspect that your private key has been compromised, you should immediately generate a new private key and certificate, and revoke the old certificate.
3. Install HAProxy
Install HAProxy 2.9 or above.
sudo apt install --no-install-recommends software-properties-common
sudo add-apt-repository ppa:vbernat/haproxy-2.9 -y
sudo apt install haproxy=2.9.\* -y
haproxy -v
You should get the very latest release of HAProxy 2.9.x. If not, head over to haproxy.debian.net and follow the instructions there.
Find the directory that certbot stores the SSL/TLS certificates at. Again, certbot should have printed the path at which the certificate are saved at. It’s typically at /etc/letsencrypt/live/your_domain_name. To verify that the certificates have been correctly generated and stored, run:
sudo ls /etc/letsencrypt/live/your_domain_name
Find the user that HAProxy runs as:
root        7425  0.0  2.2  46992  7680 ?        Ss   14:17   0:00 /usr/sbin/haproxy -Ws -f /etc/haproxy/haproxy.cfg -p /run/haproxy.pid -S /run/haproxy-master.sock
haproxy     7427  0.0 11.5 153488 39092 ?        S    14:17   0:00 /usr/sbin/haproxy -Ws -f /etc/haproxy/haproxy.cfg -p /run/haproxy.pid -S /run/haproxy-master.sock
azureus+    7455  0.0  0.6   7008  2304 pts/0    S+   14:19   0:00 grep --color=auto haproxy
This shows that HAProxy is running as both the root and haproxy users. The process that runs as a root user is called the master process and it needs root privileges to bind to ports lower than 1024 (like port 80 or 443 for HTTP/HTTPS).
The second process that is running as the haproxy user is the worker process that handles the actual processing of the requests. For security reasons, this process runs as the less privileged haproxy user.
HAProxy needs to have the fullchain.pem and privkey.pem combined in one file. Create a directory to store the combined file at /etc/haproxy/certs and concatenate the two files. Run the following commands after replacing yourwebsite.com with your domain. We also need to set the owner of the directory /etc/haproxy/certs to the user that runs the HAProxy process as determined by the previous command. Once we know the haproxy process user, we need to set the permissions so that only it can read and write files in the directory.
DOMAIN='yourwebsite.com'
sudo mkdir -p /etc/haproxy/certs
sudo sh -c "cat /etc/letsencrypt/live/$DOMAIN/fullchain.pem /etc/letsencrypt/live/$DOMAIN/privkey.pem > /etc/haproxy/certs/$DOMAIN.pem"
sudo chmod -R 600 /etc/haproxy/certs
Next, edit the config file to configure HAProxy as our load balancer:
sudo nano /etc/haproxy/haproxy.cfg
In the configuration file, set up a frontend that listens for incoming connections and a backend that distributes the connections to the application servers. Please replace <web-server-vm-1-ip> and <web-server-vm-2-ip> with the IP addresses of the application servers. Also, replace, yourwebsite.com with your domain.
Frontend section
In HAProxy configuration, the frontend section defines the settings for incoming network traffic. We will set up two frontends, one for HTTP traffic and one for HTTPS traffic, with the HTTP traffic being redirected to HTTPS, forward Let’s Encrypt domain validation requests to a specific backend named letsencrypt-backend, and all incoming HTTPS traffic are forwarded to a specific backend named www-backend. Add the following after the global and defaults sections. Please note that we need to tell HAProxy where to find the file that combines the fullchain.pem and privkey.pem that we did in step 4, which represents the TLS certificate HAProxy needs to establish secure connections.
after replacing yourwebsite.com with your domain as in the highlighted line below.
frontend www-http
  bind *:80
  http-request add-header X-Forwarded-Proto http
  redirect scheme https if !{ ssl_fc }

frontend www-https
  bind *:443 ssl crt /etc/haproxy/certs/yourwebsite.com.pem
  http-request add-header X-Forwarded-Proto https
  acl letsencrypt-acl path_beg /.well-known/acme-challenge/
  use_backend letsencrypt-backend if letsencrypt-acl
  default_backend www-backend
Backend section
In HAProxy configuration, the backend section defines the group of servers that will handle the requests forwarded by the frontend. We will define the two backends referenced in the frontend section above: www-backend and letsencrypt-backend. The www-backend will set the load balancing algorithm to round robin, which distributes incoming connections evenly across the listed servers in a circular order. The letsencrypt-backend will be used for handling Let’s Encrypt validation requests, which will be handled on localhost port 9876.
We also need to enable HTTP health checks, so HAProxy stops routing requests to servers that are down or offline. We will configure HAProxy to perform a TCP connection check by sending an HTTP GET request to the /health endpoint for health checks. This because our sample website is configured to return OK/successful (200) status code when it’s running or online.
backend www-backend
  option httpchk

  http-check connect
  http-check send meth GET uri /health
  http-check expect status 200

  balance roundrobin
  server server1 <web-server-vm-2-ip>:80 check
  server server2 <web-server-vm-3-ip>:80 check

backend letsencrypt-backend
  server letsencrypt 127.0.0.1:9876
Now, let’s check HAProxy’s configuration file for errors:
sudo haproxy -c -f /etc/haproxy/haproxy.cfg
If the config file is valid, then this should produce no output.
Now, HAProxy will distribute incoming requests to the two web servers, which will use Nginx and Gunicorn to serve our Python Flask application. HAProxy will also handle TLS encryption using the certificate obtained by Certbot and perform health checks. While we configured HAProxy to use round-robin as the load balancing algorithm, there are other routing algorithms listed here.
5. Set up TLS certificate auto renewal
The validity period of a Let’s Encrypt certificate is 90 days. This means that certificates issued by Let’s Encrypt are valid for 90 days from the date of issuance. When the TLS certificate expires, browsers will warn users from visiting your website. We can have Certbot check if the TLS certificates are due for renewal, then renew them automatically minimizing server down time.
First, we need to change the port that the Certbot listens on, so it does’t conflict with the ports haproxy is already listening on (ports 80 and 443). Open the config file in a text editor:
sudo nano /etc/letsencrypt/renewal/yourwebsite.com.conf
and change the port that was used during the challenge. For example, if the challenge was http01 then change the port to something other than port 80 such as 9876. Let’s add the http01_port option to the [renewalparams] section to change the port that Certbot listens on during renewal:
The config file (/etc/letsencrypt/renewal/yourwebsite.com.conf) should look like:
# renew_before_expiry = 30 days
version = 2.10.0
archive_dir = /etc/letsencrypt/archive/yourwebsite.com
cert = /etc/letsencrypt/live/yourwebsite.com/cert.pem
privkey = /etc/letsencrypt/live/yourwebsite.com/privkey.pem
chain = /etc/letsencrypt/live/yourwebsite.com/chain.pem
fullchain = /etc/letsencrypt/live/yourwebsite.com/fullchain.pem

# Options used in the renewal process
[renewalparams]
account = 6979223c0645b4cef3ab5c0823ea313e
authenticator = standalone
server = https://acme-v02.api.letsencrypt.org/directory
key_type = ecdsa
http01_port = 9876
To schedule a task in Linux to run automatically at fixed times, we need to schedule a cron job that is a
Next, we need to create a special configuration file called crontab using the cron tab.
Before creating the cron job, we need to change the default editor on Linux from vim to nano. This is only needed if you’re not familiar with vim and have not used it before:
Select an editor.  To change later, run 'select-editor'.
  1. /bin/nano        <---- easiest
  2. /usr/bin/vim.basic
  3. /usr/bin/vim.tiny
  4. /bin/ed

Choose 1-4 [1]: 1
This command show display a list of editors. You can select nano, the easiest 🙂 from the list by typing the corresponding number and pressing Enter.
Next, open the crontab editor in nano:
And add a line to run certbot renew once every day at 3:00am. The format of the cron job is as follows: minute hour day month day-of-week command. Therefore, we need to add the following line to the bottom of the file:
0 3 * * * /snap/bin/certbot renew --quiet
6. Restart HAProxy and test the TLS certificate auto renewal
Now that we have configure HAproxy and certbot TLS certificate, we can restart the HAproxy service to apply these that changes.
sudo systemctl restart haproxy
sudo systemctl status haproxy
This should show that HAProxy is active (running).
Now, test the automatic renewal process for the TLS certificates managed by Certbot.
sudo certbot renew --dry-run
Saving debug log to /var/log/letsencrypt/letsencrypt.log

- - - - - - - - - - - - - - - - - - - - - - - - - - - - - - - - - - - - - - - -
Processing /etc/letsencrypt/renewal/yourwebsite.com.conf
- - - - - - - - - - - - - - - - - - - - - - - - - - - - - - - - - - - - - - - -
Simulating renewal of an existing certificate for yourwebsite.com and www.yourwebsite.com

- - - - - - - - - - - - - - - - - - - - - - - - - - - - - - - - - - - - - - - -
Congratulations, all simulated renewals succeeded:
  /etc/letsencrypt/live/yourwebsite.com/fullchain.pem (success)
- - - - - - - - - - - - - - - - - - - - - - - - - - - - - - - - - - - - - - - -
7. Test the TLS certificate
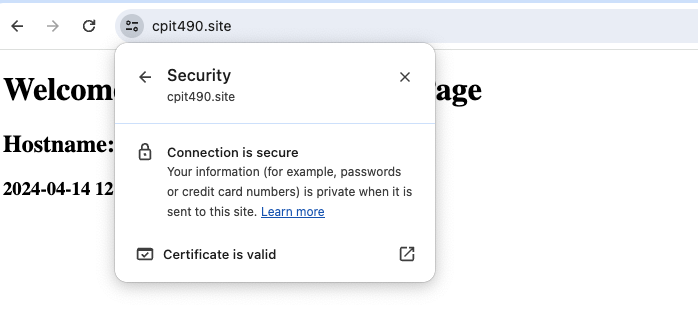
Test the certificate installation with HAProxy to make sure that your site is set up properly by visiting the https https://yourwebsite.com/


We will use ApacheBench (ab), an HTTP load generator for testing web servers by sending large number of concurrent requests and recording performance metrics.
We will install ab using apt.
sudo apt install apache2-utils -y
Next, have ab send a total of 5,000 HTTP requests to our load balancer, with 200 requests being sent concurrently at a time. Please replace yourwebsite.com with your domain name and be sure to include the path / at the end of the URL.
ab -n 5000 -c 200 https://yourwebsite.com/
Server Software:        nginx/1.18.0
Server Hostname:        cpit490.site
Server Port:            443
SSL/TLS Protocol:       TLSv1.2,ECDHE-ECDSA-AES128-GCM-SHA256,256,128
Server Temp Key:        X25519 253 bits
TLS Server Name:        cpit490.site

Document Path:          /
Document Length:        340 bytes

Concurrency Level:      200
Time taken for tests:   89.333 seconds
Complete requests:      5000
Failed requests:        1
   (Connect: 0, Receive: 0, Length: 1, Exceptions: 0)
Non-2xx responses:      1
Total transferred:      2534669 bytes
HTML transferred:       1699753 bytes
Requests per second:    55.97 [#/sec] (mean)
Time per request:       3573.330 [ms] (mean)
Time per request:       17.867 [ms] (mean, across all concurrent requests)
Transfer rate:          27.71 [Kbytes/sec] received

Connection Times (ms)
              min  mean[+/-sd] median   max
Connect:        2 1321 3593.5    111   35720
Processing:     3  894 2387.2     35   51033
Waiting:        3  888 2389.0     25   51033
Total:          6 2215 4362.0    392   51341

Percentage of the requests served within a certain time (ms)
  50%    392
  66%   1026
  75%   2046
  80%   3079
  90%   8054
  95%  11230
  98%  19413
  99%  19575
 100%  51341 (longest request)
The output suggests that the server was able to handle a high load of 200 concurrent requests fairly well, with a relatively high requests per second rate and a low average time per request. However, there was one failed request and one non-2xx response, which might need further investigation.
The output of ab includes the following important metrics:
| Metric | Description |
|---|
| Time taken for tests | The total time it took to send the requests. |
| Complete requests | The number of requests that were completed successfully. |
| Failed requests | The number of requests that failed. |
| Requests per second | The average number of requests the server was able to handle per second. |
| Time per request | The average time it took to process each request. |
| Transfer rate | The rate at which data was transferred calculated by the formula totalread / 1024 / timetaken |
For the full list of values returned by ab, please refer to ab documentation.
Load TestingWhile ApacheBench (ab) is a classic tool for HTTP benchmarking, there are several other modern tools that offer more features and better metrics including:
- hey: An HTTP(S) load generator and ApacheBench (ab) replacement written in Go.
- ali: An HTTP(S) load generator that plots the results in real-time written in Go.
- vegeta: An HTTP load testing tool and library written in Go.
- locust: An HTTP load testing tool written in Python.
- and many other tools
Responsible Use of Load Testing ToolsIt's important to note that load testing tools should only be used on websites or systems you own or you have explicit permission to do so. Unauthorized load testing can be disruptive and may be considered illegal, as it can be misused to perform a Denial-of-Service (DoS) attack. These tools are designed to generate a high volume of traffic to stress test systems, which is similar to what happens in a DoS attack. Always refrain from performing load testing on websites that you do not own or for which you do not have the required permissions.
Tearing down all resources
You may shutdown one VM and visit the website again. You should be able to see that the load balancer stops routing traffic into the unhealthy server and forwards all traffic the single healthy (running) web server.
You can now tear down the VMs, storage, public IPs, VNet/VPC, and clear the DNS records to clean up all utilized resources after the completion of this lab activity to prevent ongoing costs.
Delete the VMs
- Azure: Navigate to the Azure portal, select “Virtual Machines” from the left-hand menu, click on the VM you want to delete, and then click on the “Delete” button.
- AWS: Navigate to the AWS Console, select “EC2” from the “Services” menu, click on “Instances” in the left-hand menu, select the instance you want to delete, click on the “Actions” button, navigate to “Instance State”, and then click on “Terminate”.
- GCP: Navigate to the Google Cloud Console, select “Compute Engine” from the left-hand menu, click on the VM instance you want to delete, and then click on the “Delete” button.
- DigitalOcean: Navigate to the DigitalOcean Control Panel, click on “Droplets” in the left-hand menu, click on the droplet you want to delete, and then click on the “Destroy” button.
Delete the Public IPs
- Azure: Navigate to the Azure portal, select “Public IP addresses” from the left-hand menu, click on the Public IP you want to delete, and then click on the “Delete” button.
- AWS: Navigate to the AWS Console, select “EC2” from the “Services” menu, click on “Elastic IPs” in the left-hand menu, select the Elastic IP you want to delete, click on the “Actions” button, and then click on “Release addresses”.
- GCP: Navigate to the Google Cloud Console, select “VPC network” from the left-hand menu, click on “External IP addresses”, click on the IP you want to delete, and then click on the “Release Static Address” button.
- DigitalOcean: Navigate to the DigitalOcean Control Panel, click on “Networking” in the left-hand menu, click on the IP you want to delete, and then click on the “More” button and select “Delete”.
Delete the VNet/VPC
- Azure: Navigate to the Azure portal, select “Virtual networks” from the left-hand menu, click on the VNet you want to delete, and then click on the “Delete” button.
- AWS: Navigate to the AWS Management Console, select “VPC” from the “Services” menu, click on “Your VPCs” in the left-hand menu, select the VPC you want to delete, click on the “Actions” button, and then click on “Delete VPC”.
- GCP: Navigate to the Google Cloud Console, select “VPC network” from the left-hand menu, click on the VPC network you want to delete, and then click on the “Delete” button.
- DigitalOcean: Navigate to the DigitalOcean Control Panel, click on “Networking” in the left-hand menu, click on the VPC network you want to delete, and then click on the “More” button and select “Delete”.
Clear DNS records
Log into your domain registrar dashboard (e.g., NameCheap) and go to the DNS management console and delete the DNS record of type A that points to the public IP address of the load balancer VM.
Conclusion
Final Thought on the setup: Implementing a Failover Strategy for High Availability in HAProxy
While we’ve managed to set up a cluster with a reverse proxy and load balancer in a distributed server environment, the solution remains flawed as the load balancer itself is a Single Point of Failure (SPoF). If the load balancer fails, it will render the entire website inaccessible. However, we can mitigate this by setting up a failover strategy that consists of a cluster of two or more HAProxy instances (an active node and a passive node). This can be implemented using a tool such as Keepalived, which manages failover with a Virtual IP Address (VIP). Alternatively, a more complex tool like Heartbeat.
Submission
Submit your answers with screenshots showing the commands you executed as a PDF file by the due date.
Lab submissions are due one hour before the next week’s lab begins.