A fully managed database as a service is a database service managed by cloud providers that handle resiliency, scalability and maintenance. It’s a cost-effective, fully-automated database that provides maximum flexibility when it comes to setting up databases with replications to increase availability and scalability allowing you to focus on your application development as opposed to database management. Most fully managed database as a service on the cloud, have the following features:
- Auto backup and recovery to protect data in the event of a failure.
- Regular updates and patches.
- Easy to setup interfaces and tools to customize the deployment and secure the database instances.
In this lab activity, we will work with a fully managed database service on the cloud. Many cloud providers feature a fully managed database as a service (e.g., Amazon Relational Database Service (Amazon RDS) and Azure SQL Databases). Specifically, we will take a look at Azure Database for MySQL, which comes with a service-level agreement (SLA) of up to 99.99 percent or “four nines” (i.e., up to 52.60 minutes of downtime per year). To make use of the fully managed database, we will deploy WordPress.
Deploy WordPress with Azure Database for MySQL
WordPress is a content management system (CMS) that powers over 40% of all the websites 1. It started as a blog-publishing system but it evolved to become the CMS of choice for business, governments, news publishers, higher education institutes and more.
In this lab activity, you will learn how to set up a WordPress site to run a school website. WordPress requires a MySQL database to store its data. Therefore, we will use Azure Database for MySQL to run our MySQL database server. We will also launch a virtual machine instance to run our Apache web server, which will serve WordPress.
It’s worth noting that we decided to install WordPress and MySQL on separate servers for the following reasons:
- Be able to scale horizontally by adding additional web servers to host WordPress as the website becomes more popular.
- We want to avoid performing the overhead of database maintenance related tasks, including database backups and security upgrades. Going with a fully managed database service will free us from maintaining the database and allow us to focus more on the website and less on the operational aspects of operating it.
- Installing both WordPress and the MySQL database on the same server makes them compete for compute resources in addition to being a single point of failure (SPOF) deployment, which is undesirable for any system with high availability and reliability goals.
- Using a fully managed database as a service allows us to make our setup production ready with a multi-AZ deployments, for automatic failover and recovery as well as a better set of VM I/O optimized instances resulting in improved performance and increased availability and reliability.
Prerequisites
- Choose a Supported Region: Before creating your Flexible Server, visit the following page to check which Azure regions support the service and search for Azure Database for MySQL.
Step 1: Create a MySQL Database with Azure Database for MySQL
We will start by creating a fully managed MySQL database for our WordPress site.
- Login to your account on Azure Portal and search for MySQL. Select Azure Database for MySQL flexible servers.
- From the Flexible server plan, click on Advanced Create.
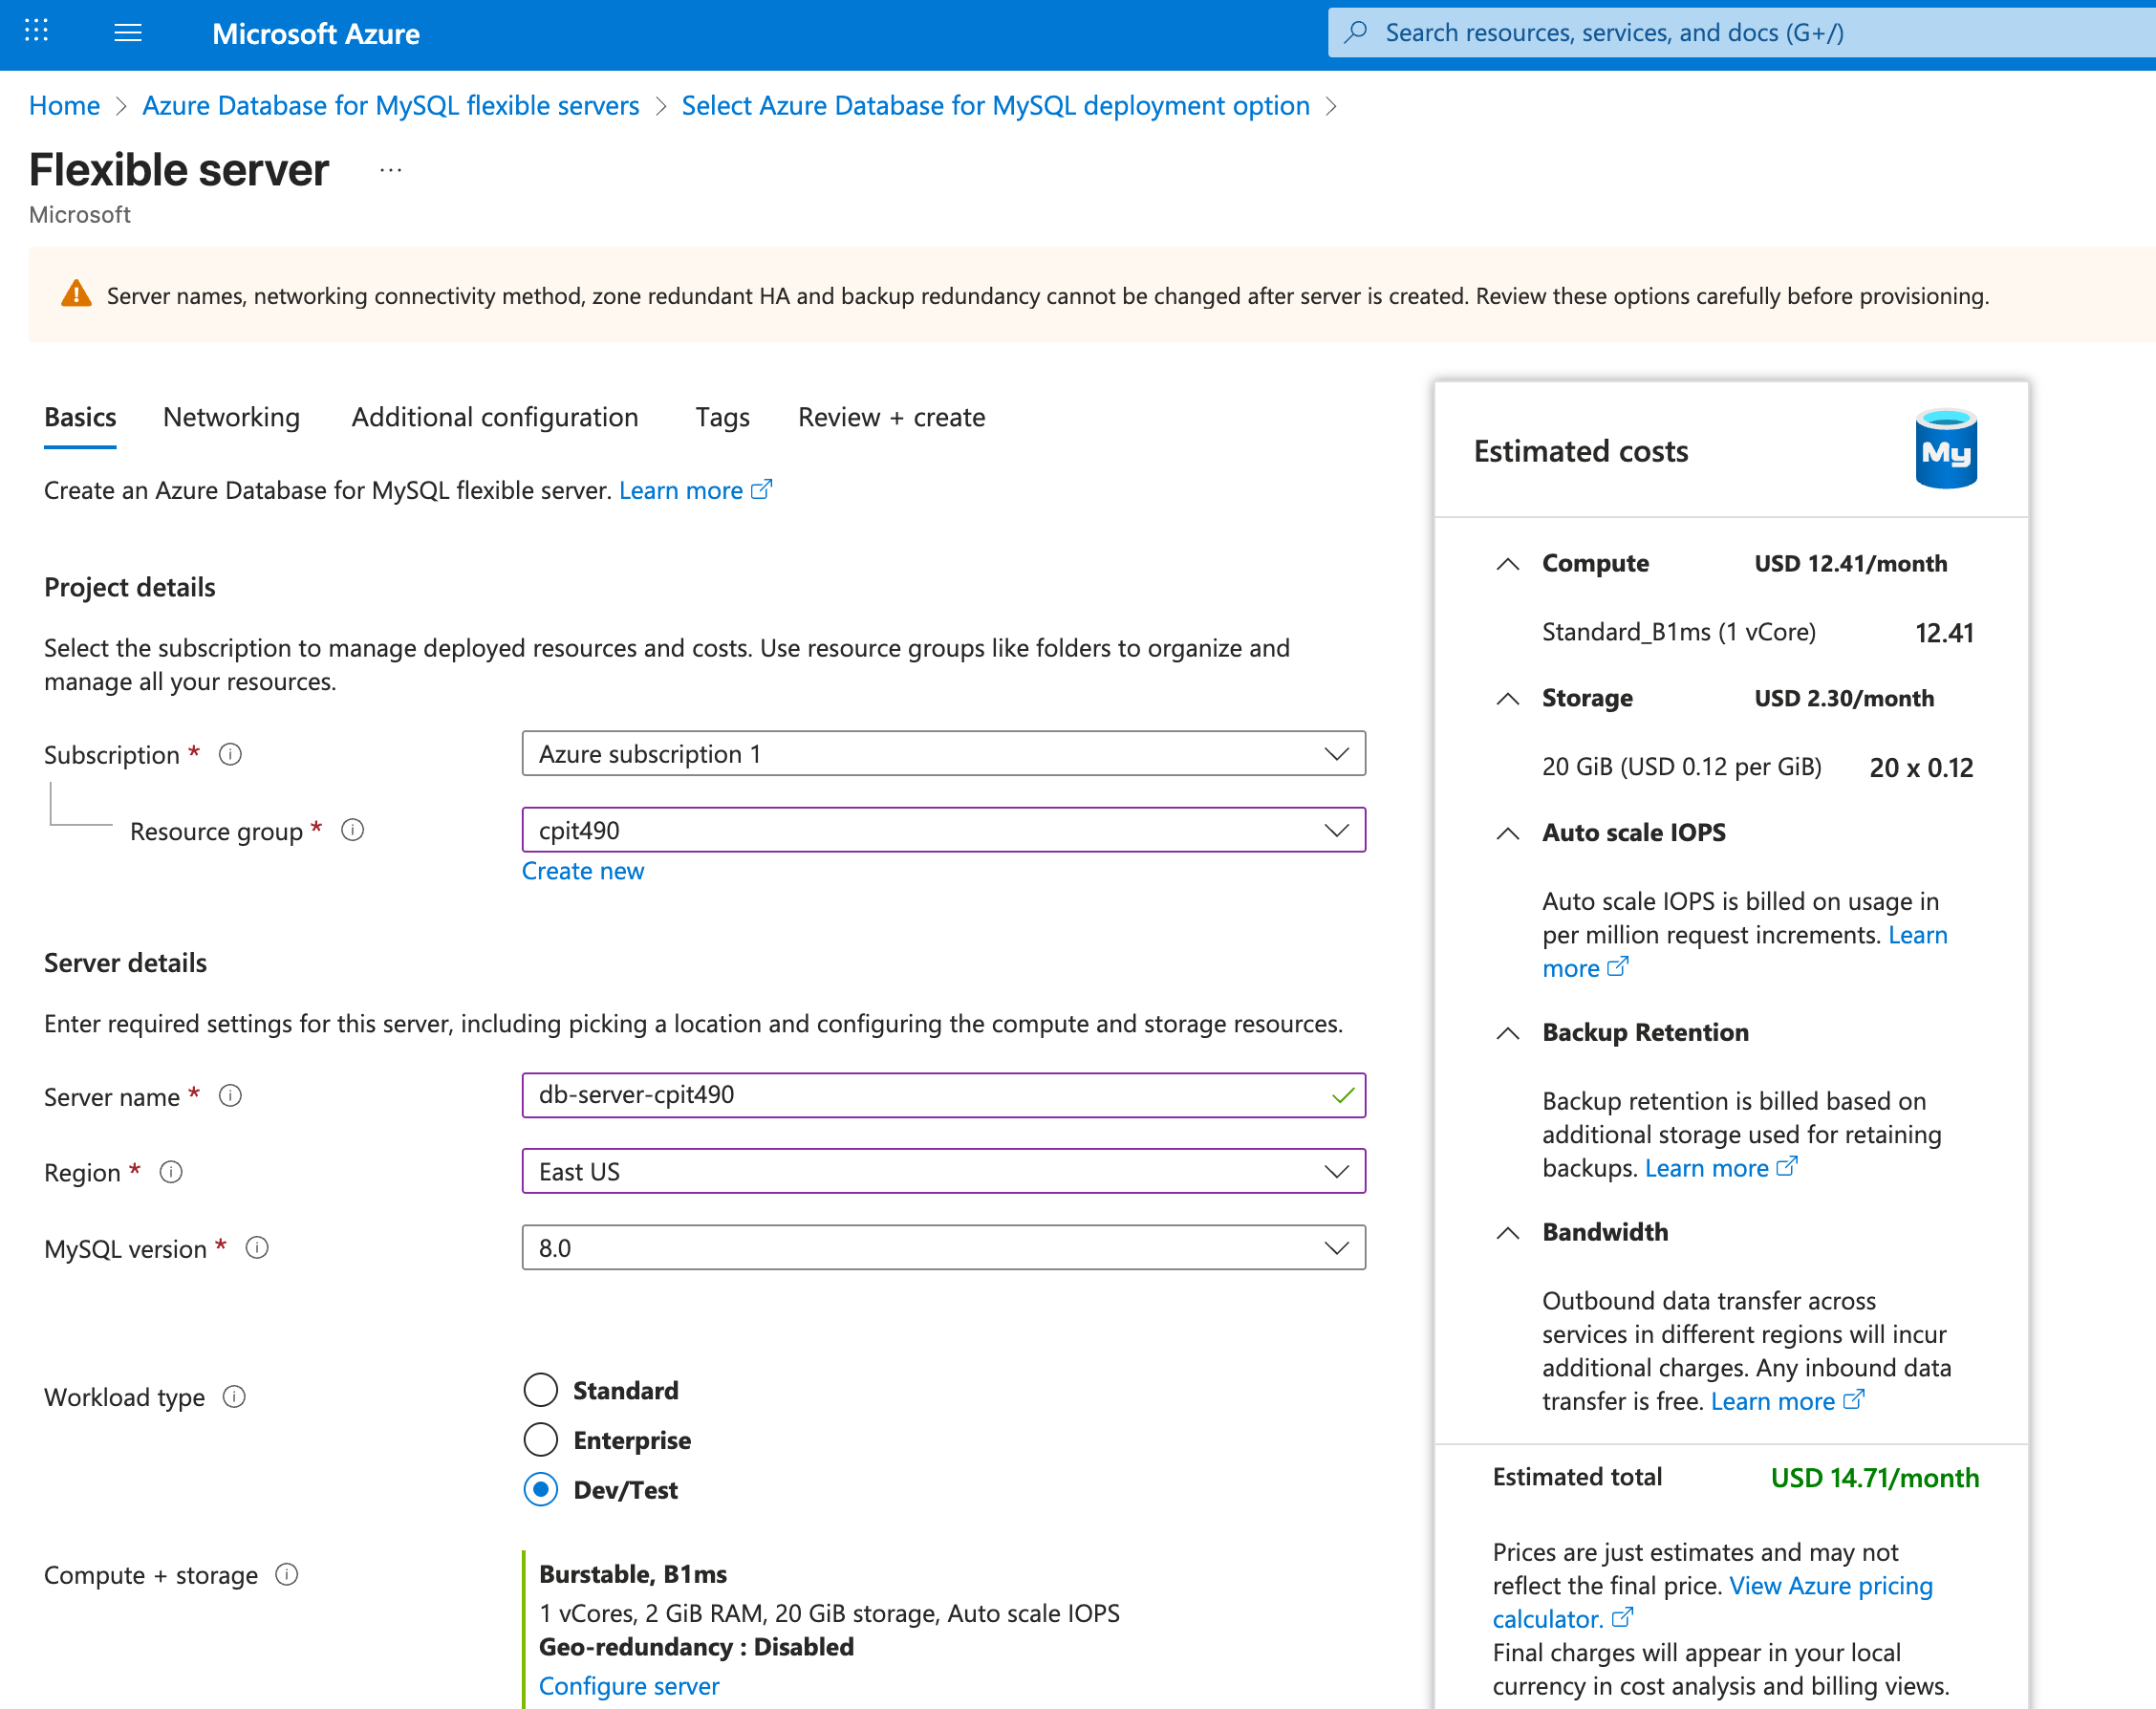
- Under Project details, select your Azure subscription and resource group.
- Under Server details, enter a unique Server name for the database server (e.g.,
db-server-cpit490) - Region: Select a supported region as indicated in the prerequisite section. Please note that this region will be selected for the web server instance as well.
- MySQL version: 8.0 or above
- Workload type: Dev/Test
- Compute + storage: Click Configure server
- Compute Tier: Select Burstable (1-20 vCores) - Best for workloads that don’t need the full CPU continuously
- Compute size: Select Standard_B1ms (1vCore, 2GiB Memory, 640max ios)
- Storage size (GiB): Enter a small value (e.g., 20 GiB).
- IOPS: Select Auto scale IOPS
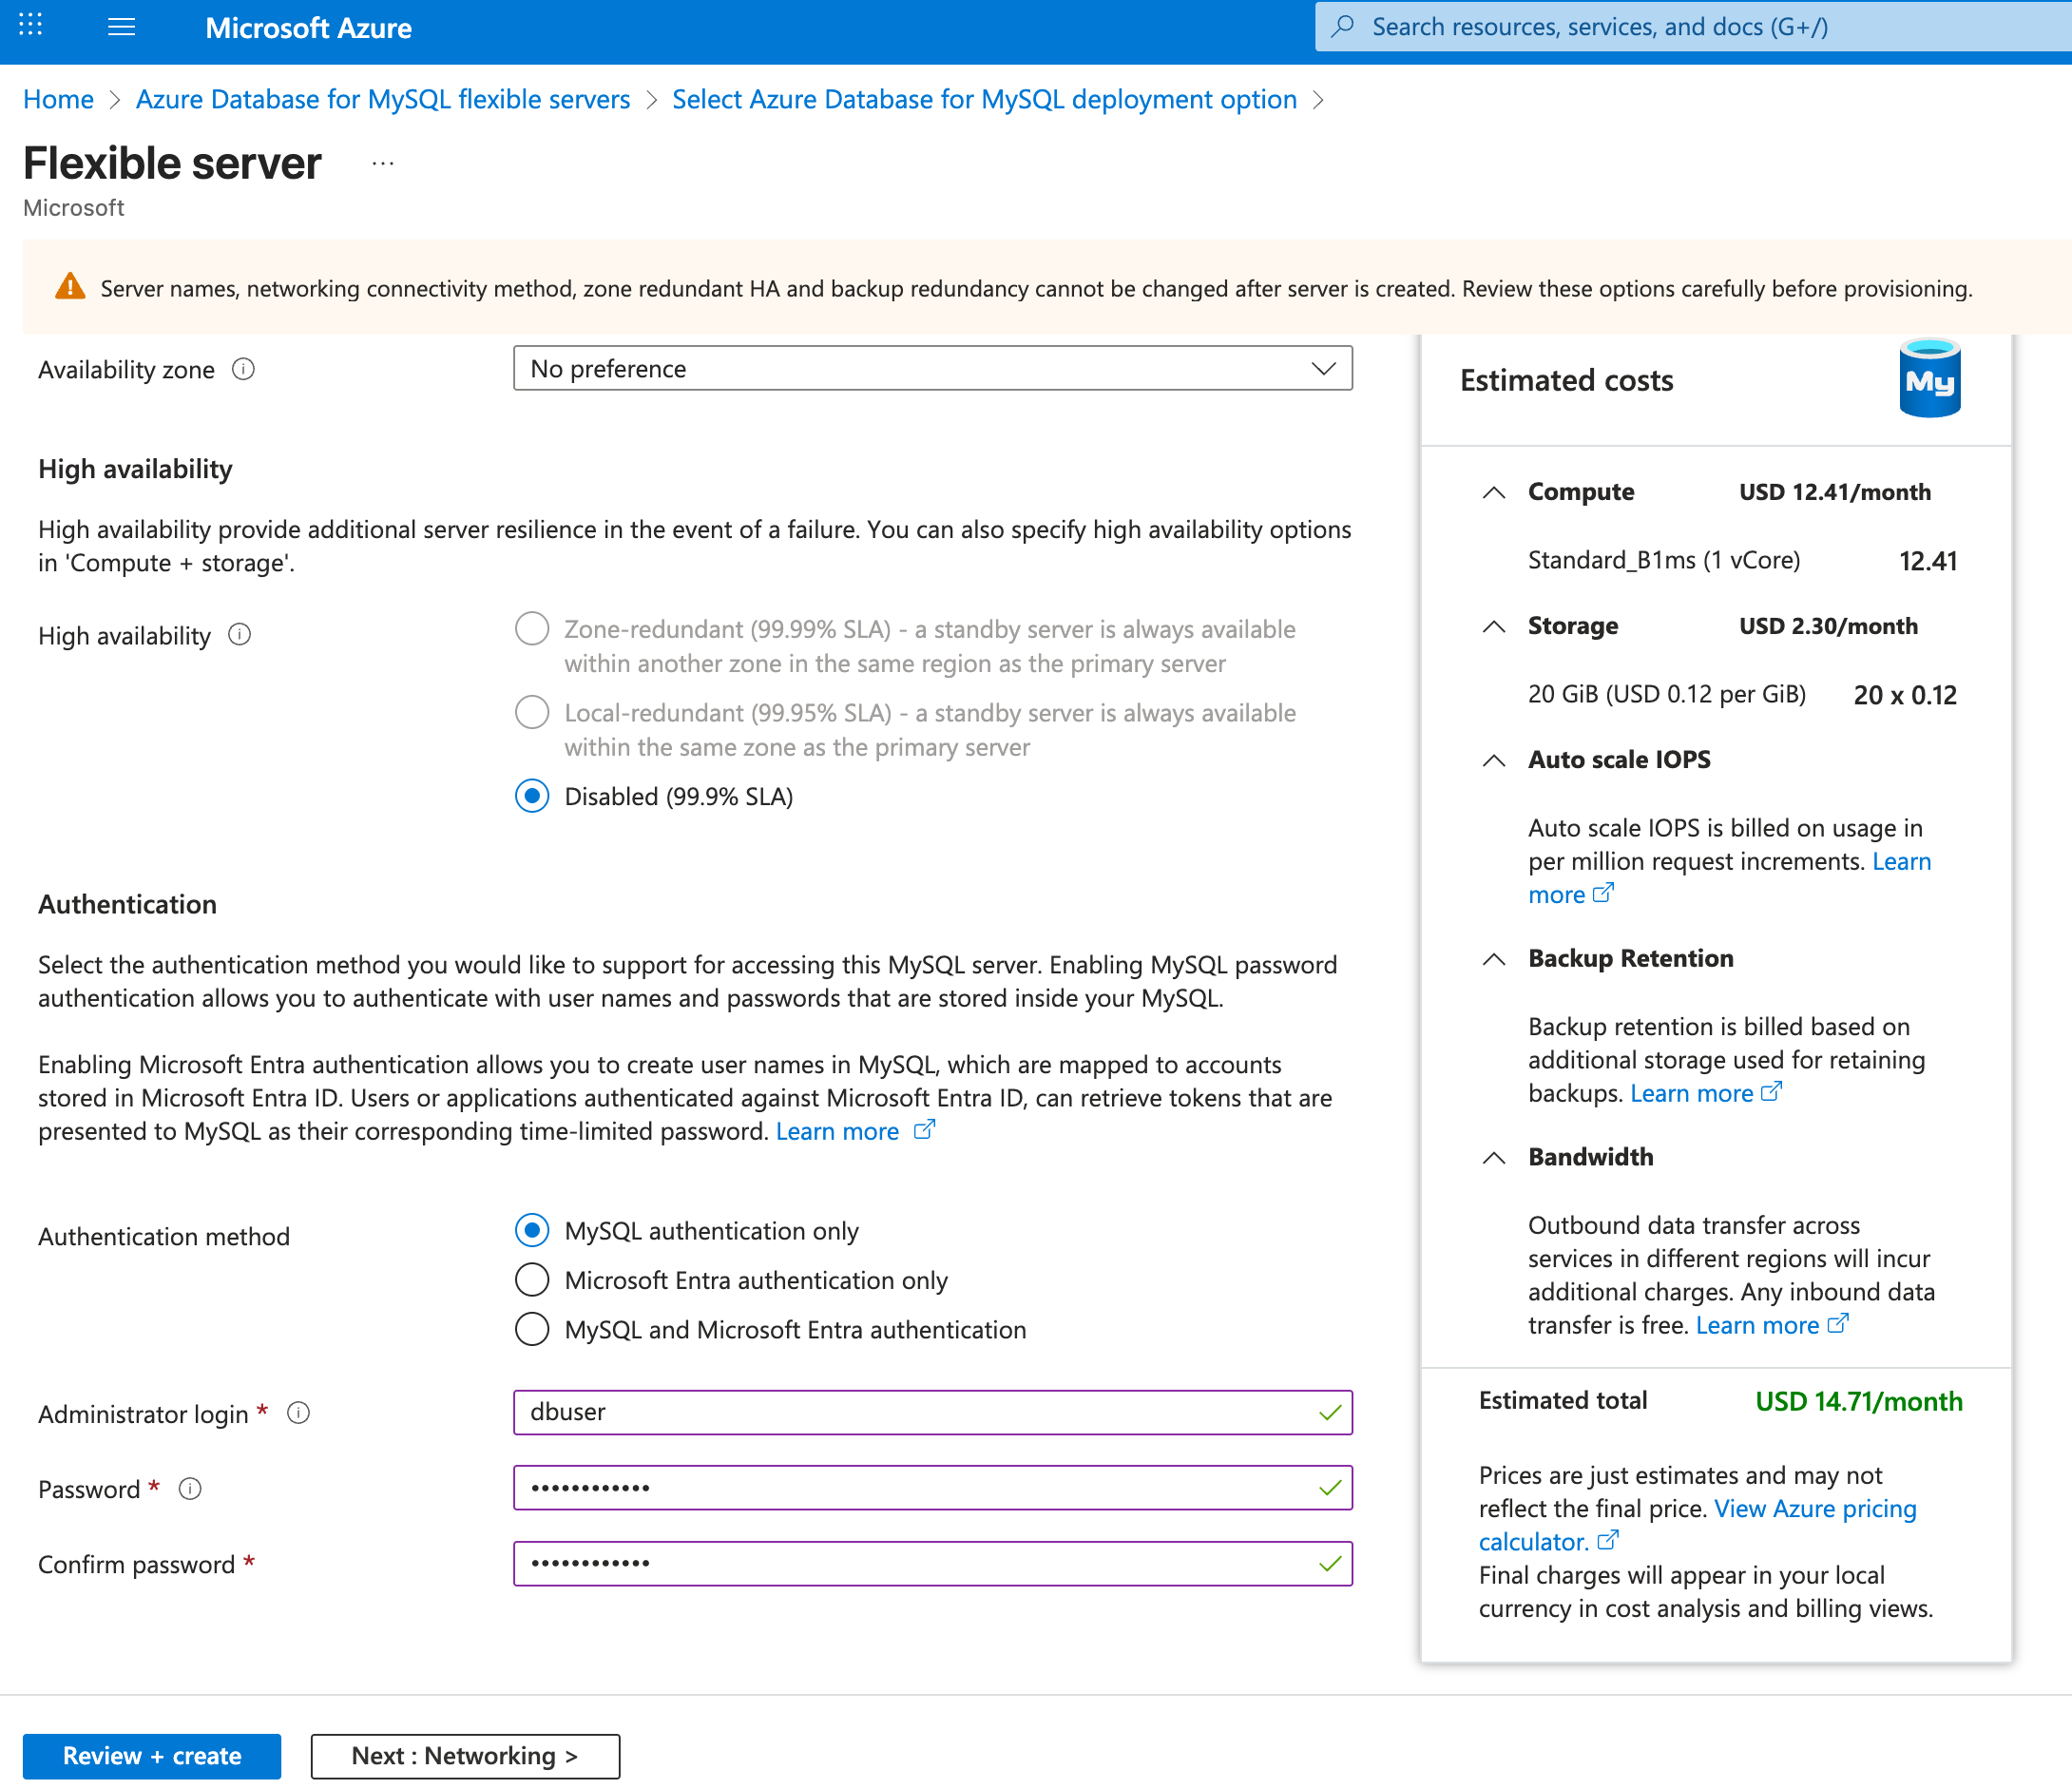
- For backups, select 14 days for the backup retention period (in days).
- Backup redundancy, select Locally-redundant
- Click Save
- Under Authentication method, select MySQL authentication only, and enter a new username and password for the root user of the MySQL database.
- Networking: Click Next: Networking> to go to the Networking tab.
- Connectivity method: Public access (allowed IP addresses) and Private endpoint.
- Database port: 3306
- Public access: Check the checkbox that says “Allow public access to this resource through the internet using a public IP address”. Additionally, you may add the public IP address of the VM instance you will create in step 2 to restrict access to the database instances.
- Firewall rules: Check the checkbox that says “Allow public access from any Azure service within Azure to this server”
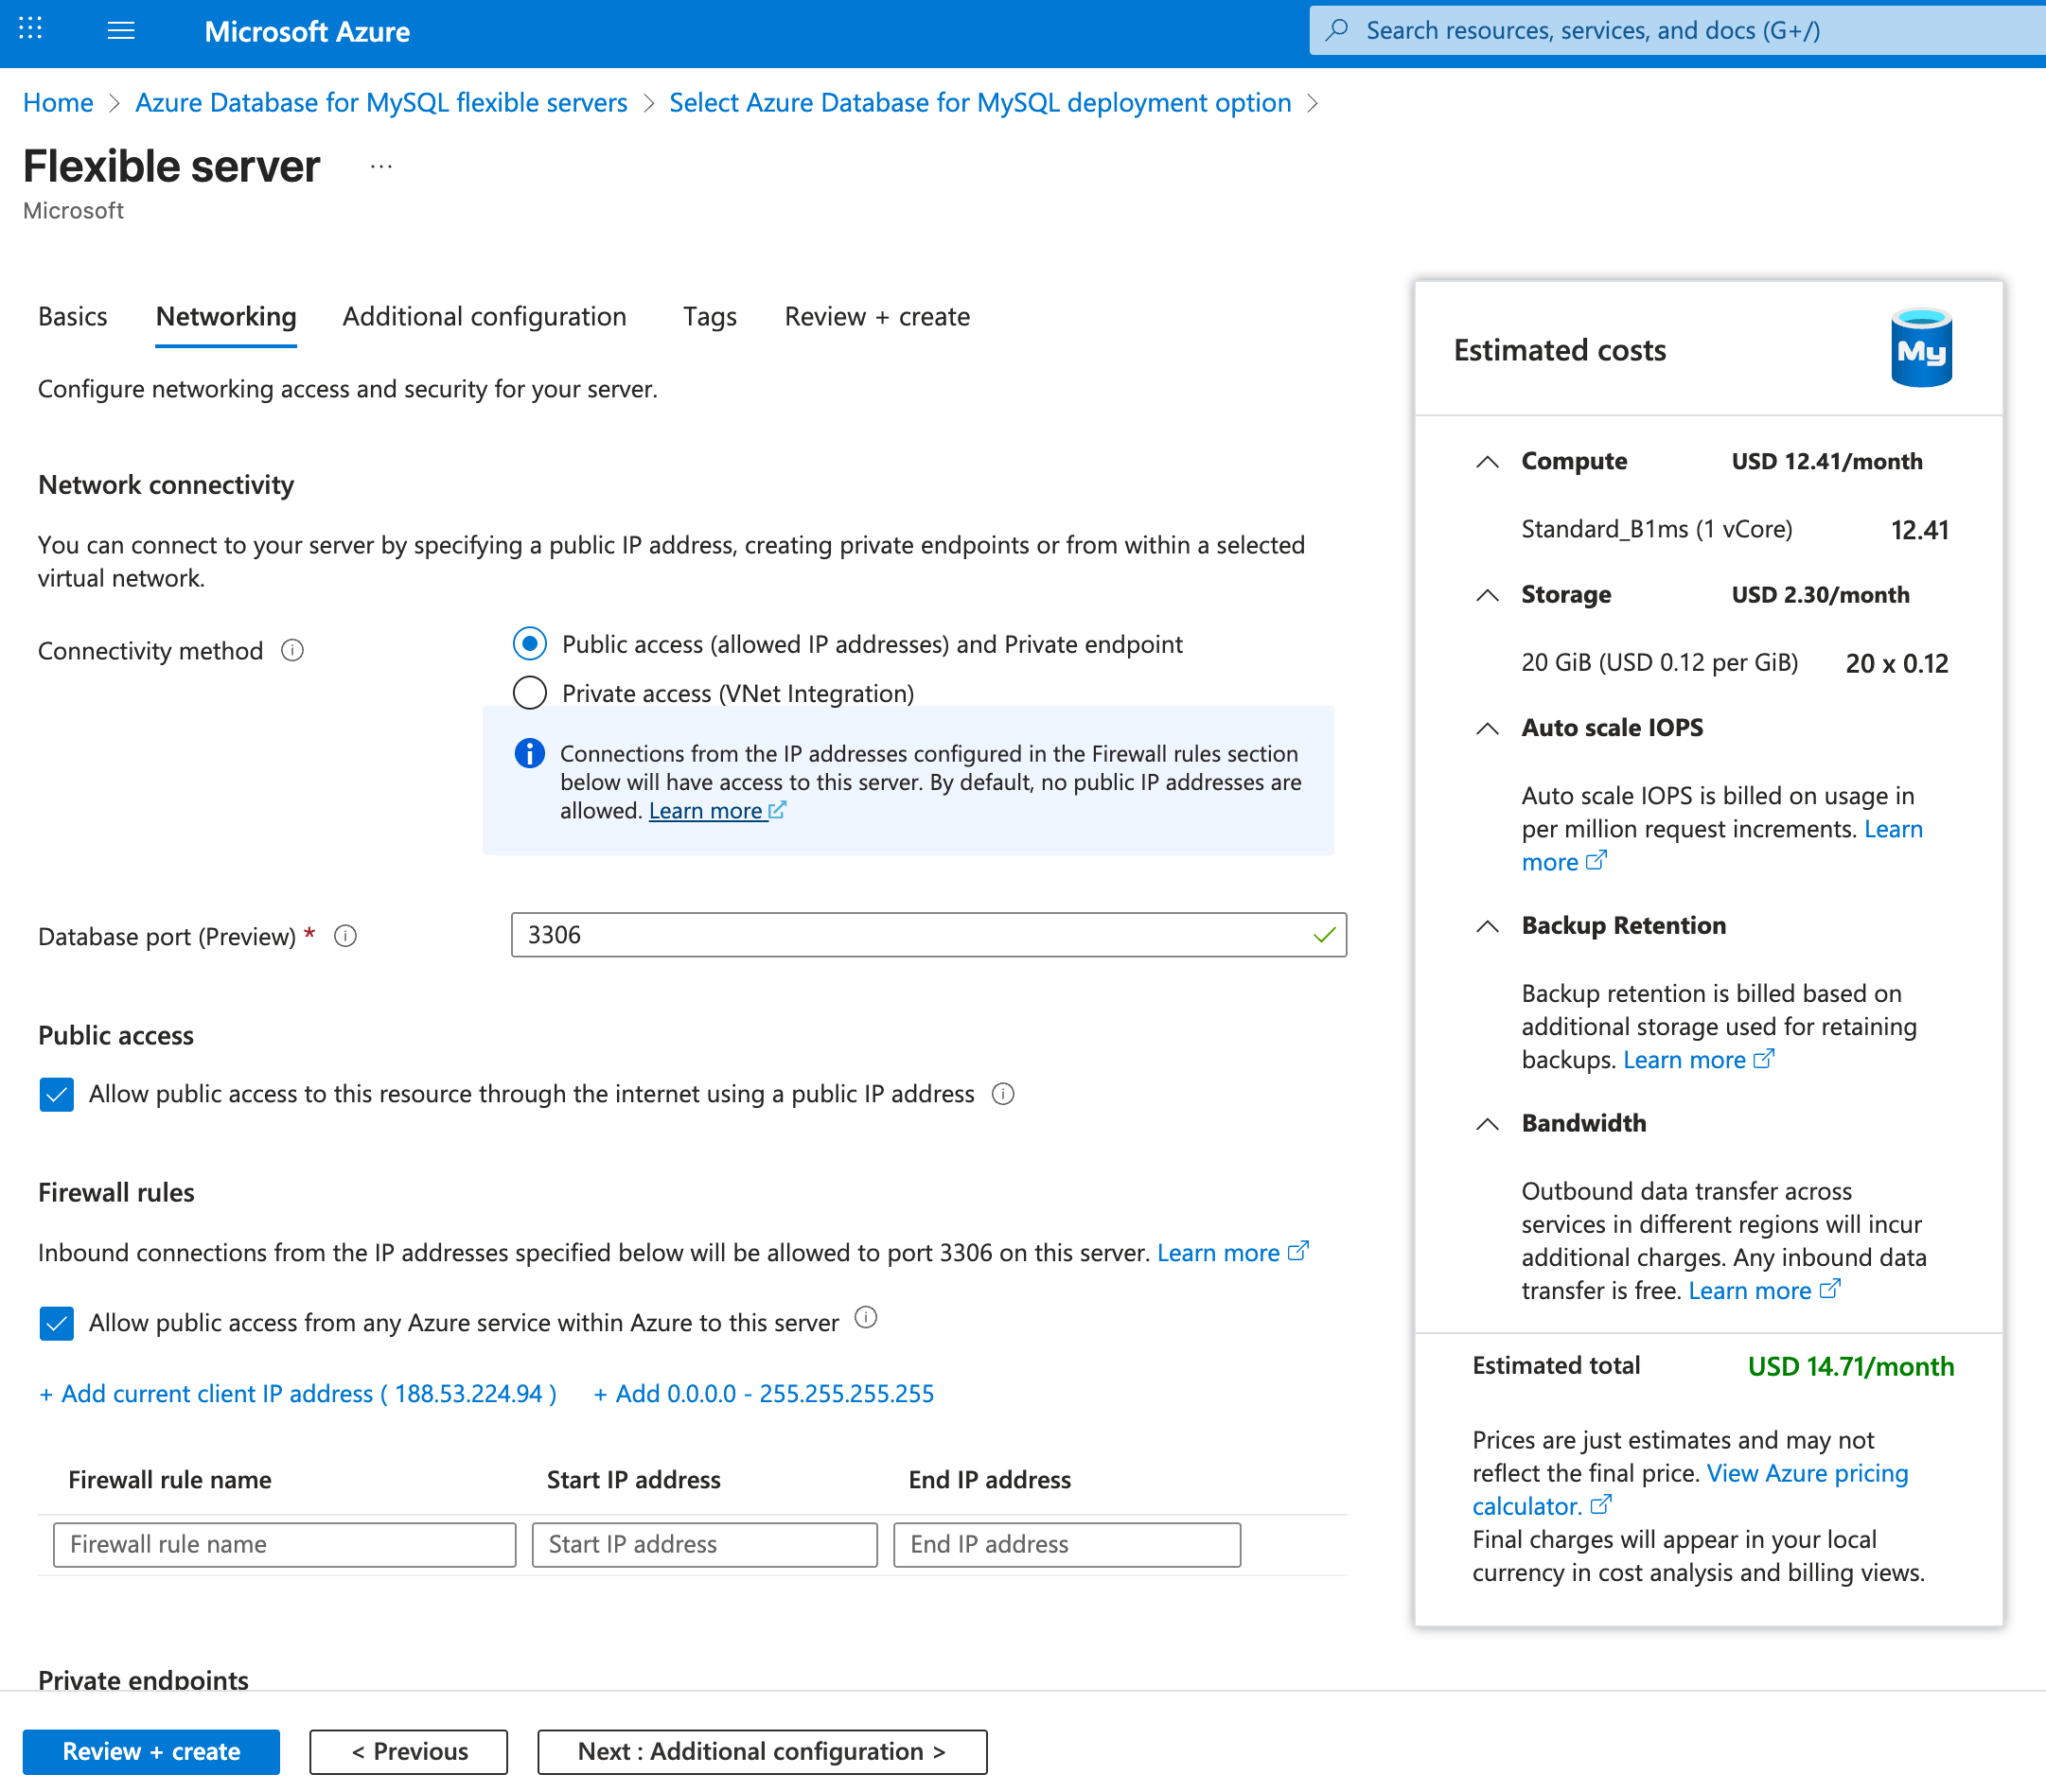
- Click “Review + create” and then Create
Note: If you encounter an error such as: “Provisioning in requested region is not supported. Your subscription might not have access to create a server in the selected region,” it means the selected region is either unsupported for this service or not available under your subscription. To proceed, select a different region that supports Flexible Server.
- Once the resource is created, click go to resource, and then Settings -> Networking. Click on “Download SSL Certificate”. You will later upload this to the web server instance from your local computer using
scp. 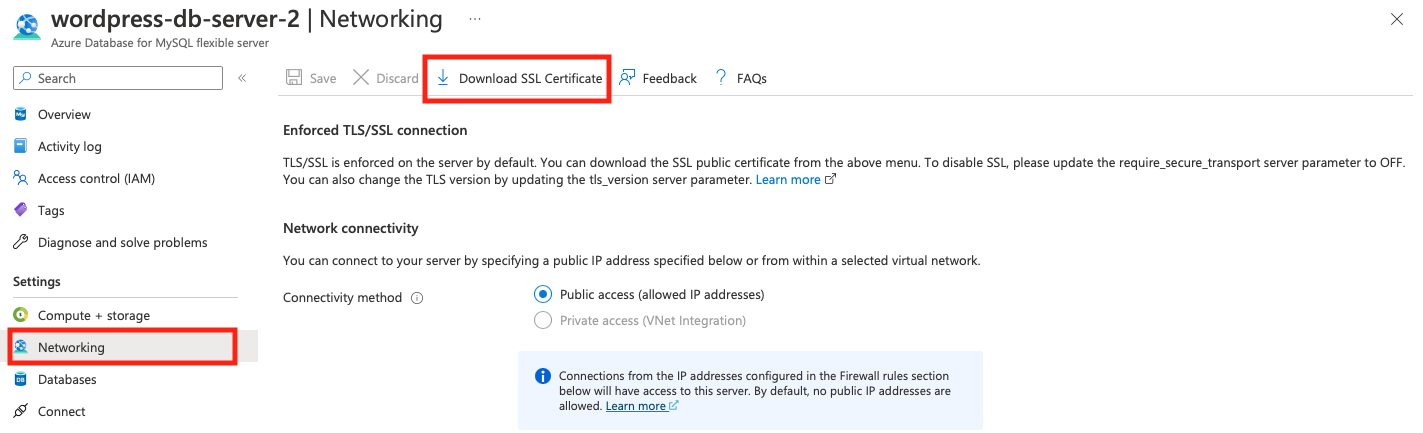
Step 2: Create a VM instance for the web server
Next, we will create a VM instance to run the Apache web server, which will serve the WordPress site.
- Go to the Azure Console/Portal and create an instance with Ubuntu 20.04 being the OS image.
- The region you chose for the VM web server should be the same as the region in which the VM instance server was launched in the previous step.
- Add security networking rules for SSH traffic (port 22), HTTP traffic (port 80) for the WordPress site.
- Launch the instance and download the SSH keys.
- SSH into the instance
ssh -i my_private_key.pem azureuser@20.124.219.137
- Next, update and upgrade all system wide libraries using
apt:
sudo apt update && sudo apt upgrade -y
- Install the Apache web server. This is needed to run WordPress and serve content from the VM instance
sudo apt install apache2
- Install PHP and PHP MySQL
sudo apt install php php-mysql
- Start the apache web server
sudo systemctl start apache2
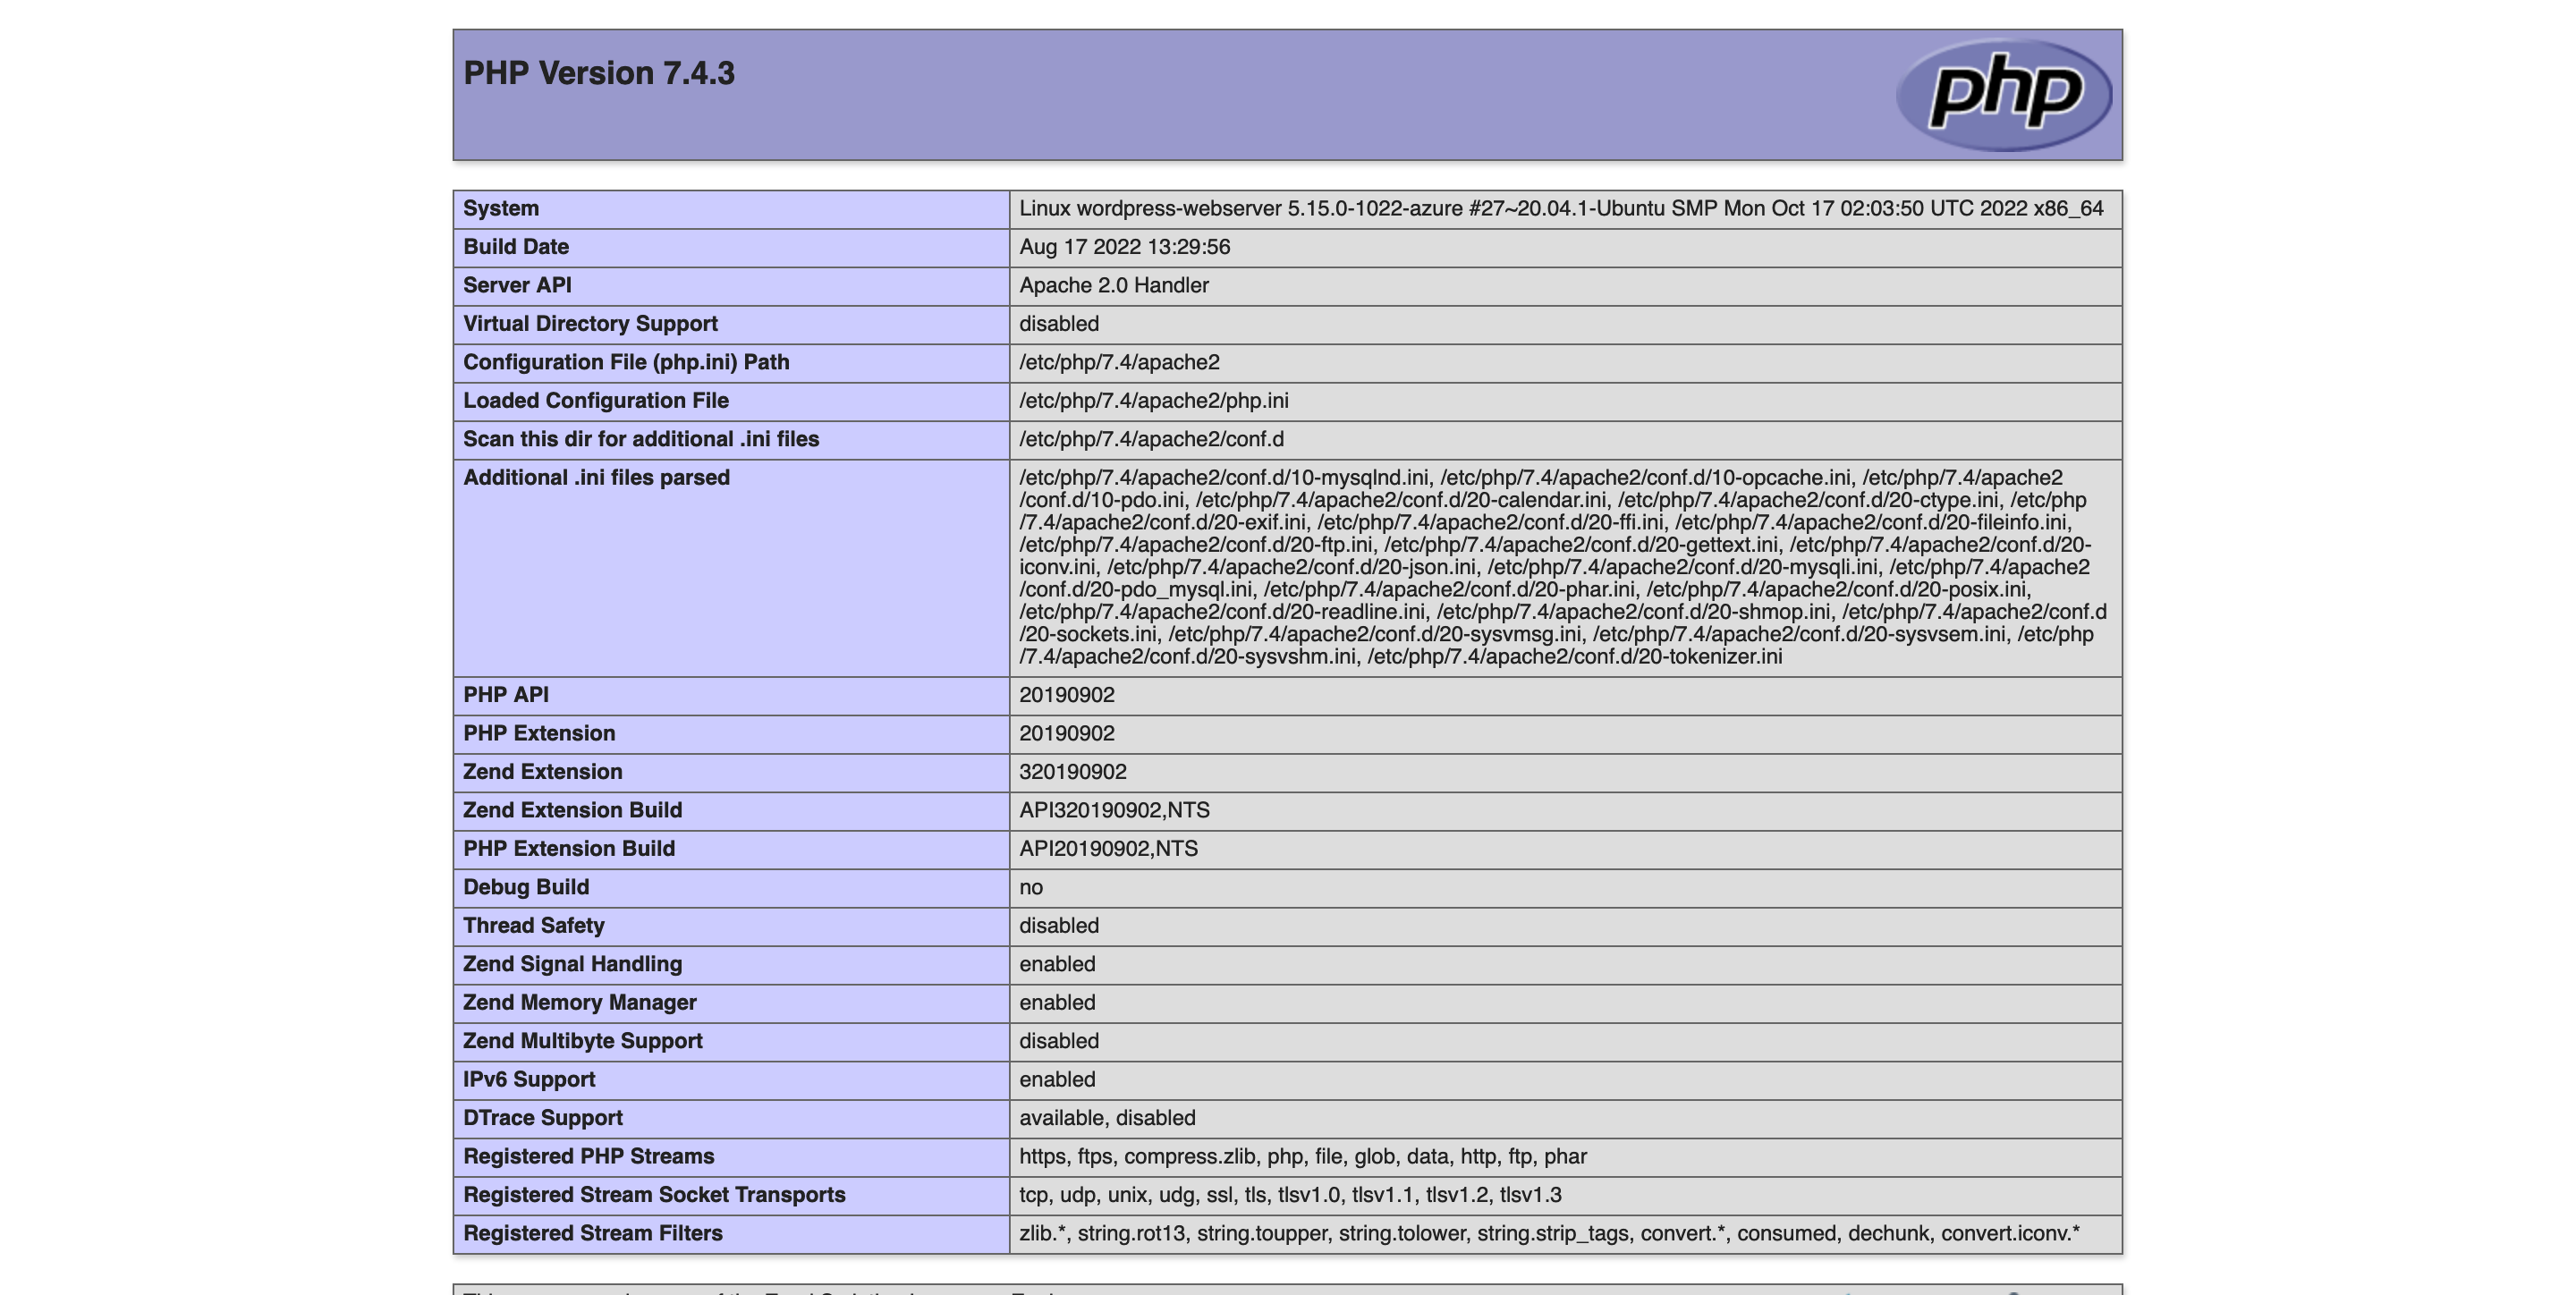
- Optional: Verify that your installation of apache and PHP is working by opening up your web browser and visiting the public IP address of the web server
sudo nano /var/www/html/test.php
Then add:
<html>
    <head>
        <title>Testing PHP</title>
    </head>
    <body>
        <?php phpinfo(); ?>
    </body>
</html>
Then, hit CTRL+O followed by CTRL+X to save the changes and exit the nano text editor. Next open up your web browser and go to the public IP address of the instance at Your-public-IP/test.php. You should see something like this:
Step 3: Configure the MySQL database
Next, we will configure the Azure Database for MySQL database to allow access to our web server
- Allow the VM instance for the web server to access the database server:
- Create a new database for WordPress.
- Connect to the database using the mysql client. You can install mysql client inside the web server instance using
sudo apt-get install default-mysql-client
and connect using the mysql client as:
mysql -h database_host -u root_user_name -p
Replace database_host with the host name and root_user_name with the one you entered upon creating the database server. You can also obtain this information from the Azure Portal: Settings -> Connect.
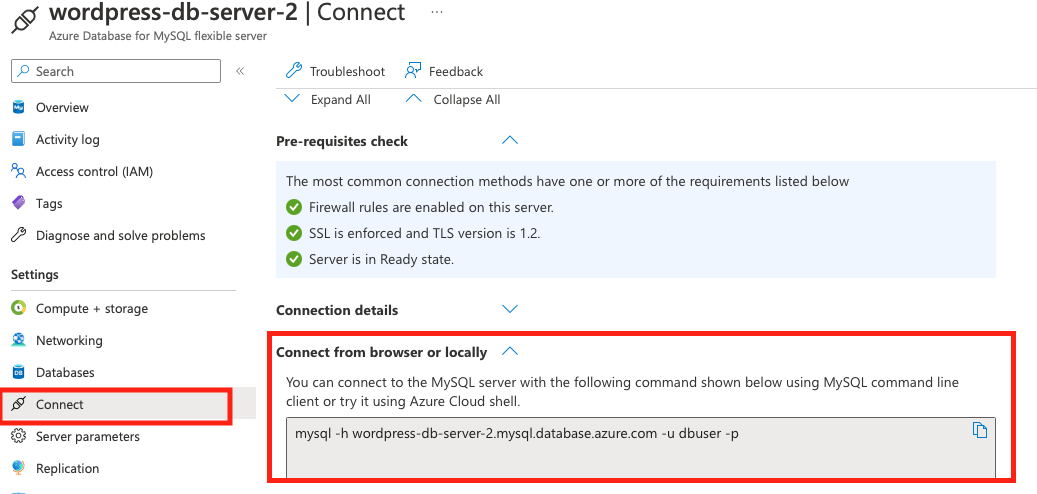
In our example, we connect using:
mysql -h wordpress-db-server-2.mysql.database.azure.com -u dbuser -p
- Create a new database: ‘wordpressdb’
CREATE DATABASE wordpressdb;
- Create a new database user with less privileges. We simply do not want WordPress to use the root database user for security reasons. In the following SQL command, replace `
with a password of your choice:
CREATE USER 'wpuser' IDENTIFIED BY '<password>';
GRANT ALL PRIVILEGES ON wordpressdb.* TO wpuser;
FLUSH PRIVILEGES;
- Exit mysql client
exit
Step 4: Configure WordPress on the VM instance
Next, we will install the WordPress app and its dependencies on the VM instance and configure it to use the MySQL database we have already created on Azure Database for MySQL.
- Download WordPress
wget https://wordpress.org/latest.tar.gz
- Extract/untar the file and move it to the Apache’s document root directory and make it owned by the user that runs apache2 (www-data).
tar -xzvf latest.tar.gz
sudo mv wordpress/* /var/www/html/
sudo chown -R :www-data /var/www/html
- Remove Apache’s default index.html
sudo rm /var/www/html/index.html
- Upload the SSL public certificate (downloaded in Step 1 from the MySQL Flexible Server) to your local Desktop.
- From your Terminal or PowerShell, open a new tab and run the following command to securely copy the certificate to your server:
scp -i my_private_key.pem /path/to/DigiCertGlobalRootCA.crt.pem azureuser@public_ip_address:/home/azureuser/
Note: Replace
/path/to/DigiCertGlobalRootCA.crt.pemwith the path to the certificate file on your local machine andazureuserwith the proper username for your virtual machine.Next, on the server’s terminal window, move the public certificate from your home directory to the appropriate system directory:
sudo mv ~/DigiCertGlobalRootCA.crt.pem /usr/local/share/ca-certificates/DigiCertGlobalRootCA.crt.pem
- Test the connection using SSL. Replace
database_hostwith the host name anduser_namewith the one you created in step 3.
mysql --host database_host --user user_name --ssl-ca /usr/local/share/ca-certificates/DigiCertGlobalRootCA.crt.pem --password
If the connection fails, then you would not be able to connect to the remote database in PHP, so you must first fix the issue that prevents the connection before proceeding to the next steps.
Copy the sample WordPress configuration file
wp-config-sample.phpintowp-config.phpsince we are going to use it as a template for our configurations:
cd /var/www/html/
sudo cp wp-config-sample.php wp-config.php
sudo nano wp-config.php
- In the nano text editor, edit the the database configuration by changing the following lines:
// ** Database settings - You can get this info from your web host ** //
/** The name of the database for WordPress */
define( 'DB_NAME', 'wordpressdb' );

/** Database username */
define( 'DB_USER', 'wpuser' );

/** Database password */
define( 'DB_PASSWORD', 'some-random-password' );

/** Database hostname */
define( 'DB_HOST', 'wordpress-db-server-2.mysql.database.azure.com' );
- We also wanted to establish an encrypted connection to our MySQL server over TLS/SSL from the WordPress web application, so in the same configuration file, add the following two lines:
/** Connect with SSL */
define('MYSQL_CLIENT_FLAGS', MYSQLI_CLIENT_SSL);
/** SSL CERT FULLPATH to DigiCertGlobalRootCA.crt.pem */
define('MYSQL_SSL_CERT','/usr/local/share/ca-certificates/DigiCertGlobalRootCA.crt.pem');
- Find the section that starts with Authentication unique keys and salts. You will need to add your own keys and salts. The section lists a link to a generator service at https://api.wordpress.org/secret-key/1.1/salt/. Visit the link and copy these values and add them to the config file. Make sure you uncomment these values by closing the comment as shown below:
/**#@+
 * Authentication unique keys and salts.
 *
 * Change these to different unique phrases! You can generate these using
 * the {@link https://api.wordpress.org/secret-key/1.1/salt/ WordPress.org secret-key service}.
 *
 * You can change these at any point in time to invalidate all existing cookies.
 * This will force all users to have to log in again.
 *
 * @since 2.6.0
 */
/**#@-*/
define('AUTH_KEY',         'PUT_VALUES_HERE');
define('SECURE_AUTH_KEY',  'PUT_VALUES_HERE');
define('LOGGED_IN_KEY',    'PUT_VALUES_HERE');
define('NONCE_KEY',        'PUT_VALUES_HERE');
define('AUTH_SALT',        'PUT_VALUES_HERE');
define('SECURE_AUTH_SALT', 'PUT_VALUES_HERE');
define('LOGGED_IN_SALT',   'PUT_VALUES_HERE');
define('NONCE_SALT',       'PUT_VALUES_HERE');
- Save the edits by hitting
CTRL+Ofollowed byCTRL+X.
Step 5: Test Connection and Create a WordPress Admin Account
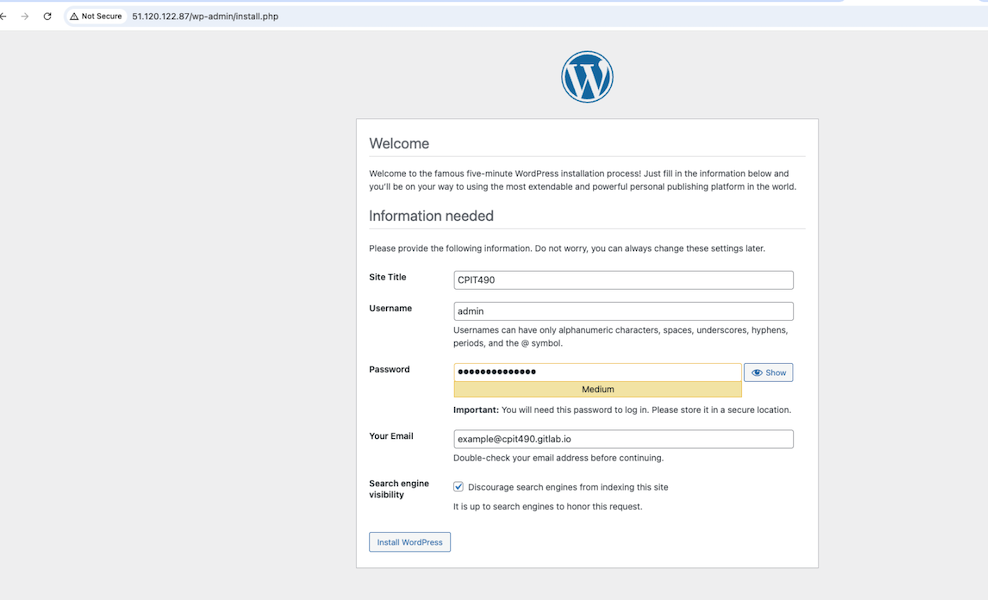
- Visit the wordpress site at
http://<Public_IP_of_WP_Server>/wp-admin/install.php - Create a new WordPress admin: Enter the details and click install WordPress as shown below.
Step 6: Configure WordPress for the school website
Next, we will configure WordPress and customize it for a school website by using a theme and a set of plugins that are suitable for a school website.
- Find a theme on GitHub
- To install the theme, log into the admin dashboard, then go to Appearance > Themes > Add New.
Step 7: Destruction and cleaning up
Finally, we will clean up the resources that we have created in this lecture so that we will not be charged.
- Stop and delete the VM instance for the web server and all the associated resources (disks and static IP).
- Stop and delete the instance(s) for the Azure Database for MySQL flexible server and all the associated resources if they exist (replicas, disks and static IP).
Submission
Submit your answers with screenshots showing the commands you executed as a PDF file by the due date.
Lab submissions are due one hour before the next week’s lab begins.