Week 2: The Filesystem
Learn the basic of files and the filesystem.
“On a UNIX/Linux system, almost everything you encounter is a file”
1. Navigating the Filesystem
The command cd is used to navigate to directories and ls is used to list the content of a directory.
Example:
pwd
/home/khalid
ls
note.txt todo.txt notes
ls -a
. .. note.txt todo.txt notes .hidden-file.txt
2. Creating directories
- Use the command
mkdirto create directories: - Use the command
mkdirwith the-poption to create parent directories as needed.
mkdir notes
mkdir -p notes/personal/summer
3. Creating and Deleting files
The command touch is used to create an empty file. Other tools can be used to create files (e.g., cp, text editors, etc.).
touch note.txt
touch .hidden-file.txt
The tool/command rm is used to delete files or directories. The tool rmdir is used to delete empty directories.
If the directory is empty, use the command rmdir ./example-directory or rm -r ./example-directory to delete directories and their contents recursively.
⚠️ Warning: Be extremely careful when using
rm -rorrm -fcommands. The-rflag recursively removes directories and their contents, while-fforces removal without prompting. These commands can permanently delete files and directories without possibility of recovery. Always double-check your path before executing these commands, especially when using them with sudo privileges.
rm -r ./dir1/
rmdir ./dir0
4. Copying files
The command cp is used to copy files from source directory into the destination directory.
cp file_1 ./target
5. File Types
The command `ls -l’ outputs a long listing format of a directory. The first character of each input line indicates the type of a file.
The three most common types are:
- - Regular file
- d Directory
- l Link, which can be either:
- Symbolic (soft) link: A pointer to another file or directory (similar to shortcuts in Windows).
- If the original file is deleted or renamed, the soft link breaks
- Created using
ln -s
- Hard link: A direct reference to the data on disk (multiple filenames pointing to the same data)
- Even if the original file is deleted, the hard link still works
- Created using
lnwithout the -s flag
- Symbolic (soft) link: A pointer to another file or directory (similar to shortcuts in Windows).
ls -l
total 3
drwxr-xr-x.   2 khalid  khalid  102 Sep  9 13:28 notes
-rw-rw-r-x.   1 khalid  khalid  102 Sep  9 14:29 note.txt
-rw-rw-r-x.   1 khalid  khalid  102 Sep  8 10:35 todo.txt
6. Soft links
A symbolic or “soft” link is a shortcut that points to a file on the system.
ln -s notes.txt
my-shortcut-to-notes
7. Changing File Ownership and Group
In UNIX/Linux, every file is owned by a user and a group user. To find the username of the current logged in user, use the command whoami and to list the groups a user belongs to, use the command groups (e.g., groups khalid.
The command chown is used to change both the owner of a file or its group (e.g., chown username:groupname ./file-or-dir). You may use the -R option to change the owner or group of a directory and its content recursively.
mkdir -p ./dir1/dir2/dir3
ls -l ./dir1/
chown khalid:staff ./dir1
ls -l ./dir1/
ls -l ./dir1/dir2
ls -l ./dir1/dir2/dir3
chown -R khalid:staff ./dir1/
ls -l ./dir1/dir2/
ls -l ./dir1/dir2/dir3
8. File Security and Access Rights
The filesystem security model is based on permission bits to control access into files and directories. The access control model categorizes users into three different categories: owner, group, and others. Every file is owned by a user (called owner) and a group user. There’s also a third types of users called others, for any user who is not the user owner and does not belong to the user group of the owner. For example, if we have a file owned by a user named khalid, and khalid belongs to a group called staff, then the access control (read, write, and execute) can be granted or denied to the owner khalid, the group staff, and everyone else (others).
The command to control the access to the file is called chmod and deals with only three bits called permission bits in the following order: read, write, and execute.
ls -l
-rw-r--r-- 1 khalid staff 545 Dec 20 2018 test.txt
The example above shows the owner, khalid, has read and write access, anyone in the group staff can read the file, and everyone else or others can read the file as well.
The permission bits can be specified in binaries or octal numbers:
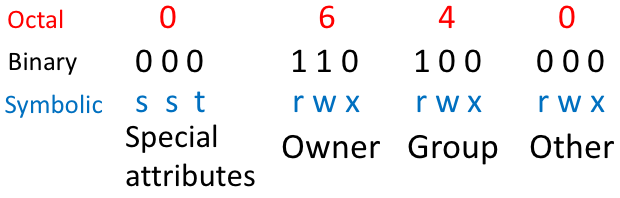
We can grant all access to the owner, read access to members of the group, and deny access to others:
chmod 740 testfile.txt
9. Free Disk space information
To display numbers and statistics about the amount of used and free space on your filesystem, use the utility df.
The df utility displays statistics about the amount of free disk space on the specified filesystem. The option -h df -h is used to display the numbers in a “Human-readable” output (i.e., with unit suffixes: Megabyte, Gigabyte, and Terabyte, etc.).
df -h
10. Working with External Storage in VMs
In virtual machines, working with external storage is a two-step process:
- Attaching: Making the storage device visible to the VM
- Mounting: Making the storage accessible in the filesystem
Attaching USB Storage in VirtualBox
- Download and install VirtualBox Extension Pack.
- With the Virtual Machine powered down:
- Select the virtual machine > Settings > USB.
- Select your USB Controller (USB 1.1, 2.0, or 3.0)
- Click the USB icon with “+” to select your USB device from the list
- Add your username to the vboxusers group using
sudo usermod -a -G vboxusers $USER
📝 Note: If you don’t see your USB device, check the following:
- The VM is not running and is powered down.
- USB controller is enabled in VM Settings > USB
- You’ve installed VirtualBox Extension Pack
- Your user is a member of the
vboxusersgroup usingsudo usermod -a -G vboxusers $USER. Then log out and log back in for the changes to take effect.
Mounting USB Storage
Once the USB device is attached:
- First, identify the name of the attached device using the
fdiskcommand, which shows all attached disk devices and their partitions, whether they are mounted or not.
sudo fdisk -l
Look for your USB device in the output - it will typically be listed as a new device like /dev/sdb. Keep note of the device name.
- Create a mount point:
sudo mkdir /mnt/usb
- Mount the device. Replace sdX1 with your device name from step 1:
sudo mount /dev/sdX1 /mnt/usb
- Verify the mount was successful using the the
dfcommand, which lists all mounted filesystems and their usage:
df -h
To safely remove the USB device:
- Unmount first:
sudo umount /mnt/usb
- Finally, detach from VM through VirtualBox USB menu
Notes
📝 Note: Use
sudo fdisk -lto see all available devices (mounted or not), anddf -hto see currently mounted filesystems and their usage.
⚠️ Warning: Always unmount USB devices before disconnecting USB devices to prevent data loss.