In this lecture note, we’ll be deploying a web server API using the three different cloud models: IaaS, PaaS, and FaaS/Serverless. We’ll look at how each one works, what parts we have to manage ourselves, and how they compare in terms of setup, scalability, management, cost, and ease of use.
These instructions assume that you have a Git repository of a Python project or will use the sentiment analysis API provided at this link.
We will demonstrate the three deployment models IaaS, PaaS, and FaaS/serverless. We will deploy an API server written in Python, the sentiment analysis API. We will use Azure as an example but the concepts are applicable to almost any cloud provider.
1. IaaS: Deploying to Azure Virtual Machine (VM)
Infrastructure as a Service (IaaS) is a cloud computing model that provides virtualized on-demand computing resources such as servers, storage, and networking. Provisioning a virtual machine is an example of how IaaS enables us to provision, deploy, and manage computing, networking, and storage resources in a virtual environment with full control over the infrastructure.
- Provision a Virtual Machine
- Generate SSH key pair. Open the Terminal/PowerShell and run:
ssh-keygen -t ed25519 -f ./azure-vm-key-ed25519 - In the Azure Portal, create a VM with 500 MB of RAM, and copy and paste your public key.
- Go to Networking, and open port 3000
- Connect to the VM via SSH:
ssh -i ~/myprivatekey.pem azureuser@<VM_PUBLIC_IP>
Install git, Python, and pip on the VM
sudo apt update
sudo apt install git -y
sudo apt install python3 python3-pip -y
Download the code (from Gitlab)
- Download the code
git clone https://gitlab.com/cpit490/sentiment-analysis-api.git
- On the VM, navigate to the project directory
cd ~/sentiment-analysis-api
Install dependencies
pip3 install -r requirements.txtRun the application
python3 server.pyTest the deployment (from your local machine)
curl http://<VM_PUBLIC_IP>:3000/sentiment -X POST -d '{"text":"This is amazing!"}' -H "Content-Type: application/json"Optional: Test with Postman (GUI Alternative)
- Download and install Postman
- Open Postman and click “Create New” → “HTTP Request”
- Configure the request:
- Method: Select
POSTfrom the dropdown - URL: Enter
http://<VM_PUBLIC_IP>:3000/sentiment - Headers: Click “Headers” tab and add:
- Key:
Content-Type - Value:
application/json
- Key:
- Body: Click “Body” tab, select “raw”, then select “JSON” from the dropdown
- Enter the following JSON in the body:
{"text":"The food was wonderful, not too spicy and not too mild; just perfect! I will come back for sure!"}
- Method: Select
- Click “Send” to test the API
- You should receive a JSON response with sentiment analysis results
2. PaaS: Deploying to Azure App Service
Platform as a Service (PaaS) is a cloud computing model that provides a complete ready to deploy environment for deploying applications. It abstracts the complexity of the infrastructure and provides runtime environments, tools, frameworks, and services such as databases without the need to manage the underlying infrastructure or operating systems. Deploying a web application or an API server on Azure App Services is an example of how PaaS enables developers to focus on writing code while the platform handles scalability, updates, and maintenance.
Create an App Service
- In the Azure Portal, search for “App Services” and click on it
- Click “+ Create” → “Web App”
- Fill in the basic details:
- Subscription: Select your subscription and Resource Group
- Name: The name must be globally unique, so pick a unique name for the api (e.g.,
sentiment-analysis-api-YOURNAME() - Publish:
Code - Runtime stack:
Python 3.11 - Operating System:
Linux - Region: Select any region (e.g.,
Qatar Central)
- Under App Service Pricing Plans:
- Create new plan:
sentiment-api-plan - Pricing tier:
Free F1 (Shared Infrastructure)orBasic (B1)
- Create new plan:
- Click “Review + create” then “Create”
Enable Basic authentication for Local git Deployment Local Git deployment requires Source Control Manager (SCM) basic authentication enabled. Please note that this method is considered less secure than other methods. In a production environment, we should configure this as part of the CI/CD pipeline instead of manually deploying the app.
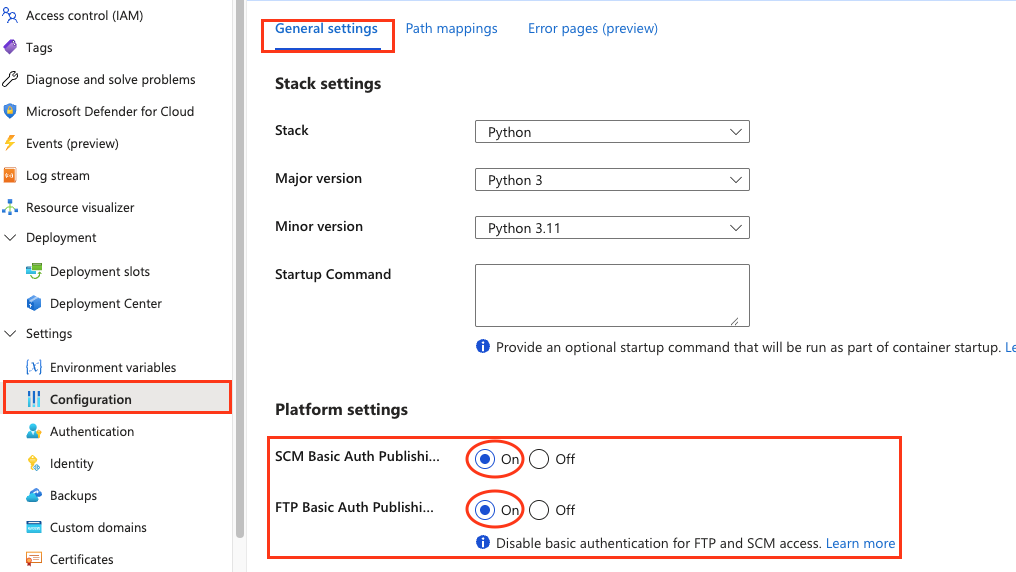
- In the left sidebar, under Settings, select Configuration. This should bring up the General Settings tab. Turn on both SCM Basic Auth Publishing Credentials and FTP Basic Auth Publishing Credentials as shown below.
- Click Save and Continue
- In the left sidebar, under Settings, select Configuration. This should bring up the General Settings tab. Turn on both SCM Basic Auth Publishing Credentials and FTP Basic Auth Publishing Credentials as shown below.
Deploy and build the app from source code
- In the left sidebar, Under Deployment, click on Deployment Center
- You will be asked to provide the source code and build provider. Under Source, select Local Git and click Save
- Azure App Service will generate a remote URL for the Git repository that will contain your code: Example:
https://sentiment-analysis-app-cpit490-a2eng3hyavcrhrg7.scm.canadacentral-01.azurewebsites.net:443/sentiment-analysis-app-cpit490.git
Deploy to Azure App Service using local Git repository In this step, we will have Azure App Services create a git repository that contains a copy of our project. We will also generate an application-specific credentials to authenticate with Azure and deploy the app. These credentials are separate from your Azure subscription login and can be either user-scoped or application-scoped. The user-scope deployment requires a user name, which can be set using the Azure CLI command. git will prompt you for these credentials when you push code to the remote git repository hosted on Azure. The application-scope deployment involves the creation of an app-specific user and is created automatically when you create an app. Therefore, we will use application-scope deployment.
- Navigate to your git-enabled project or clone the sample app from https://gitlab.com/cpit490/sentiment-analysis-api using
git.- From your computer, open Terminal (macOS/Linux) or PowerShell (Windows) and run:
- Navigate to your git-enabled project or clone the sample app from https://gitlab.com/cpit490/sentiment-analysis-api using
git clone https://gitlab.com/cpit490/sentiment-analysis-api.git
cd sentiment-analysis-api
- Copy the generated git URL from step 3, and add Azure App Services’ Local Git URL as another git remote repository.
git remote add azure https://sentiment-analysis-app-cpit490-a2eng3hyavcrhrg7.scm.canadacentral-01.azurewebsites.net:443/sentiment-analysis-app-cpit490.git
- Push your code to Azure App Services’ Local Git
git push azure master
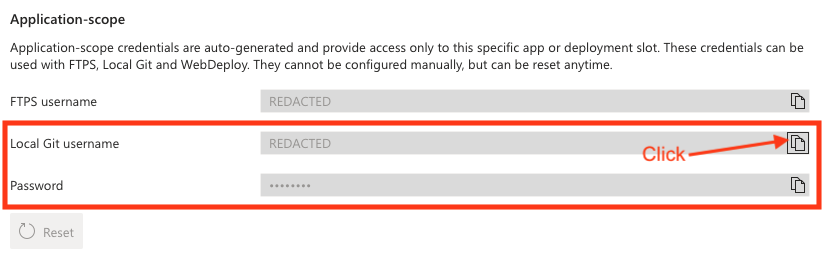
- Find the Local Git credentials. In the app’s Deployment Center, under the Local Git/FTPS credentials tab, look under Application-scope.
- Copy and enter the username and then copy and enter the password as shown below:
Enable Azure Build Automation We need to enable Azure build automation. This will have Azure App Services install any necessary dependencies and package the application to run on Azure.
- Once your deployment is complete, click on Go to resource.
- In the left sidebar, under Environment variables, select Application settings, click on Add.
- In the Add/Edit application setting dialog, enter a new setting with:
- Name: SCM_DO_BUILD_DURING_DEPLOYMENT
- Value: true
- Leave the Deployment slot setting unchecked as this feature can’t be used with free plans.
- In the App settings tab, click Apply and then Confirm
- In the Add/Edit application setting dialog, enter a new setting with:
Configure Startup Command
- In your App Service, go to Configuration in the left sidebar
- Click on General Settings tab
- Under Startup Command, enter:
python server.py - Click Save at the top of the page
Monitor Deployment and Diagnose Problems
- Go back to Deployment Center and click on Logs.
- You should see the deployment status and logs
- Wait for the deployment to become Succeeded (Active)
- If there are issues, check the “Logs” section for troubleshooting
Test the deployment
- Under Overview, copy the URL of the Default domain.
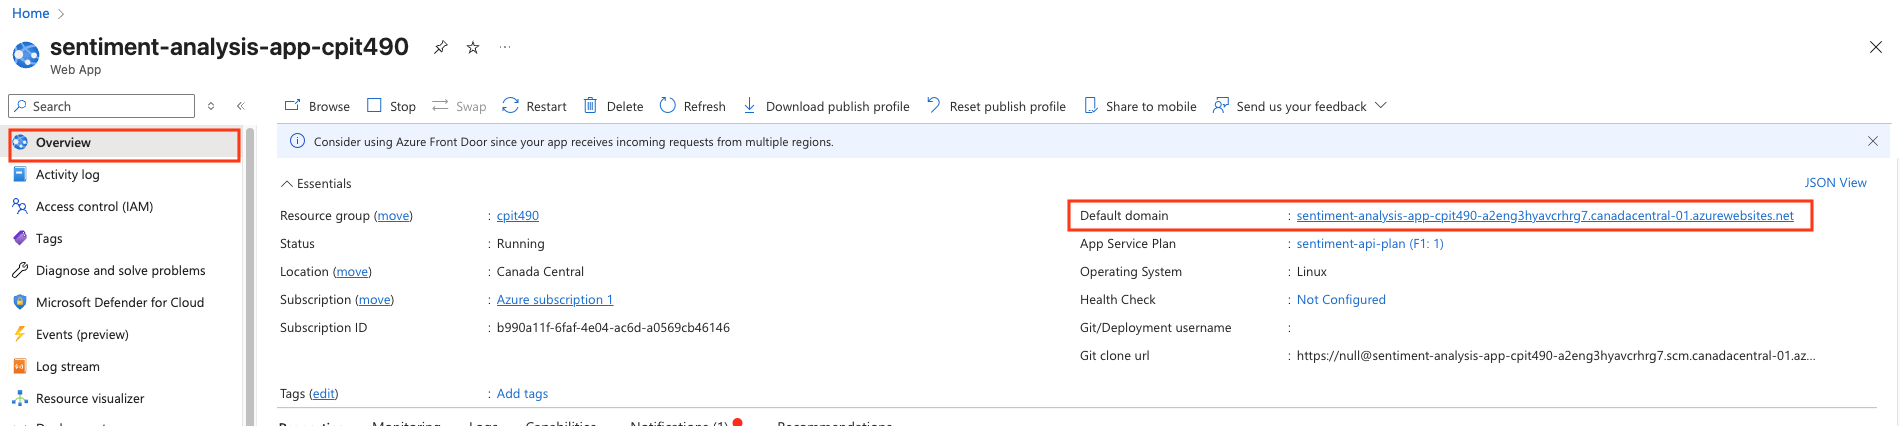
- For example, if the Default Azure domain is:
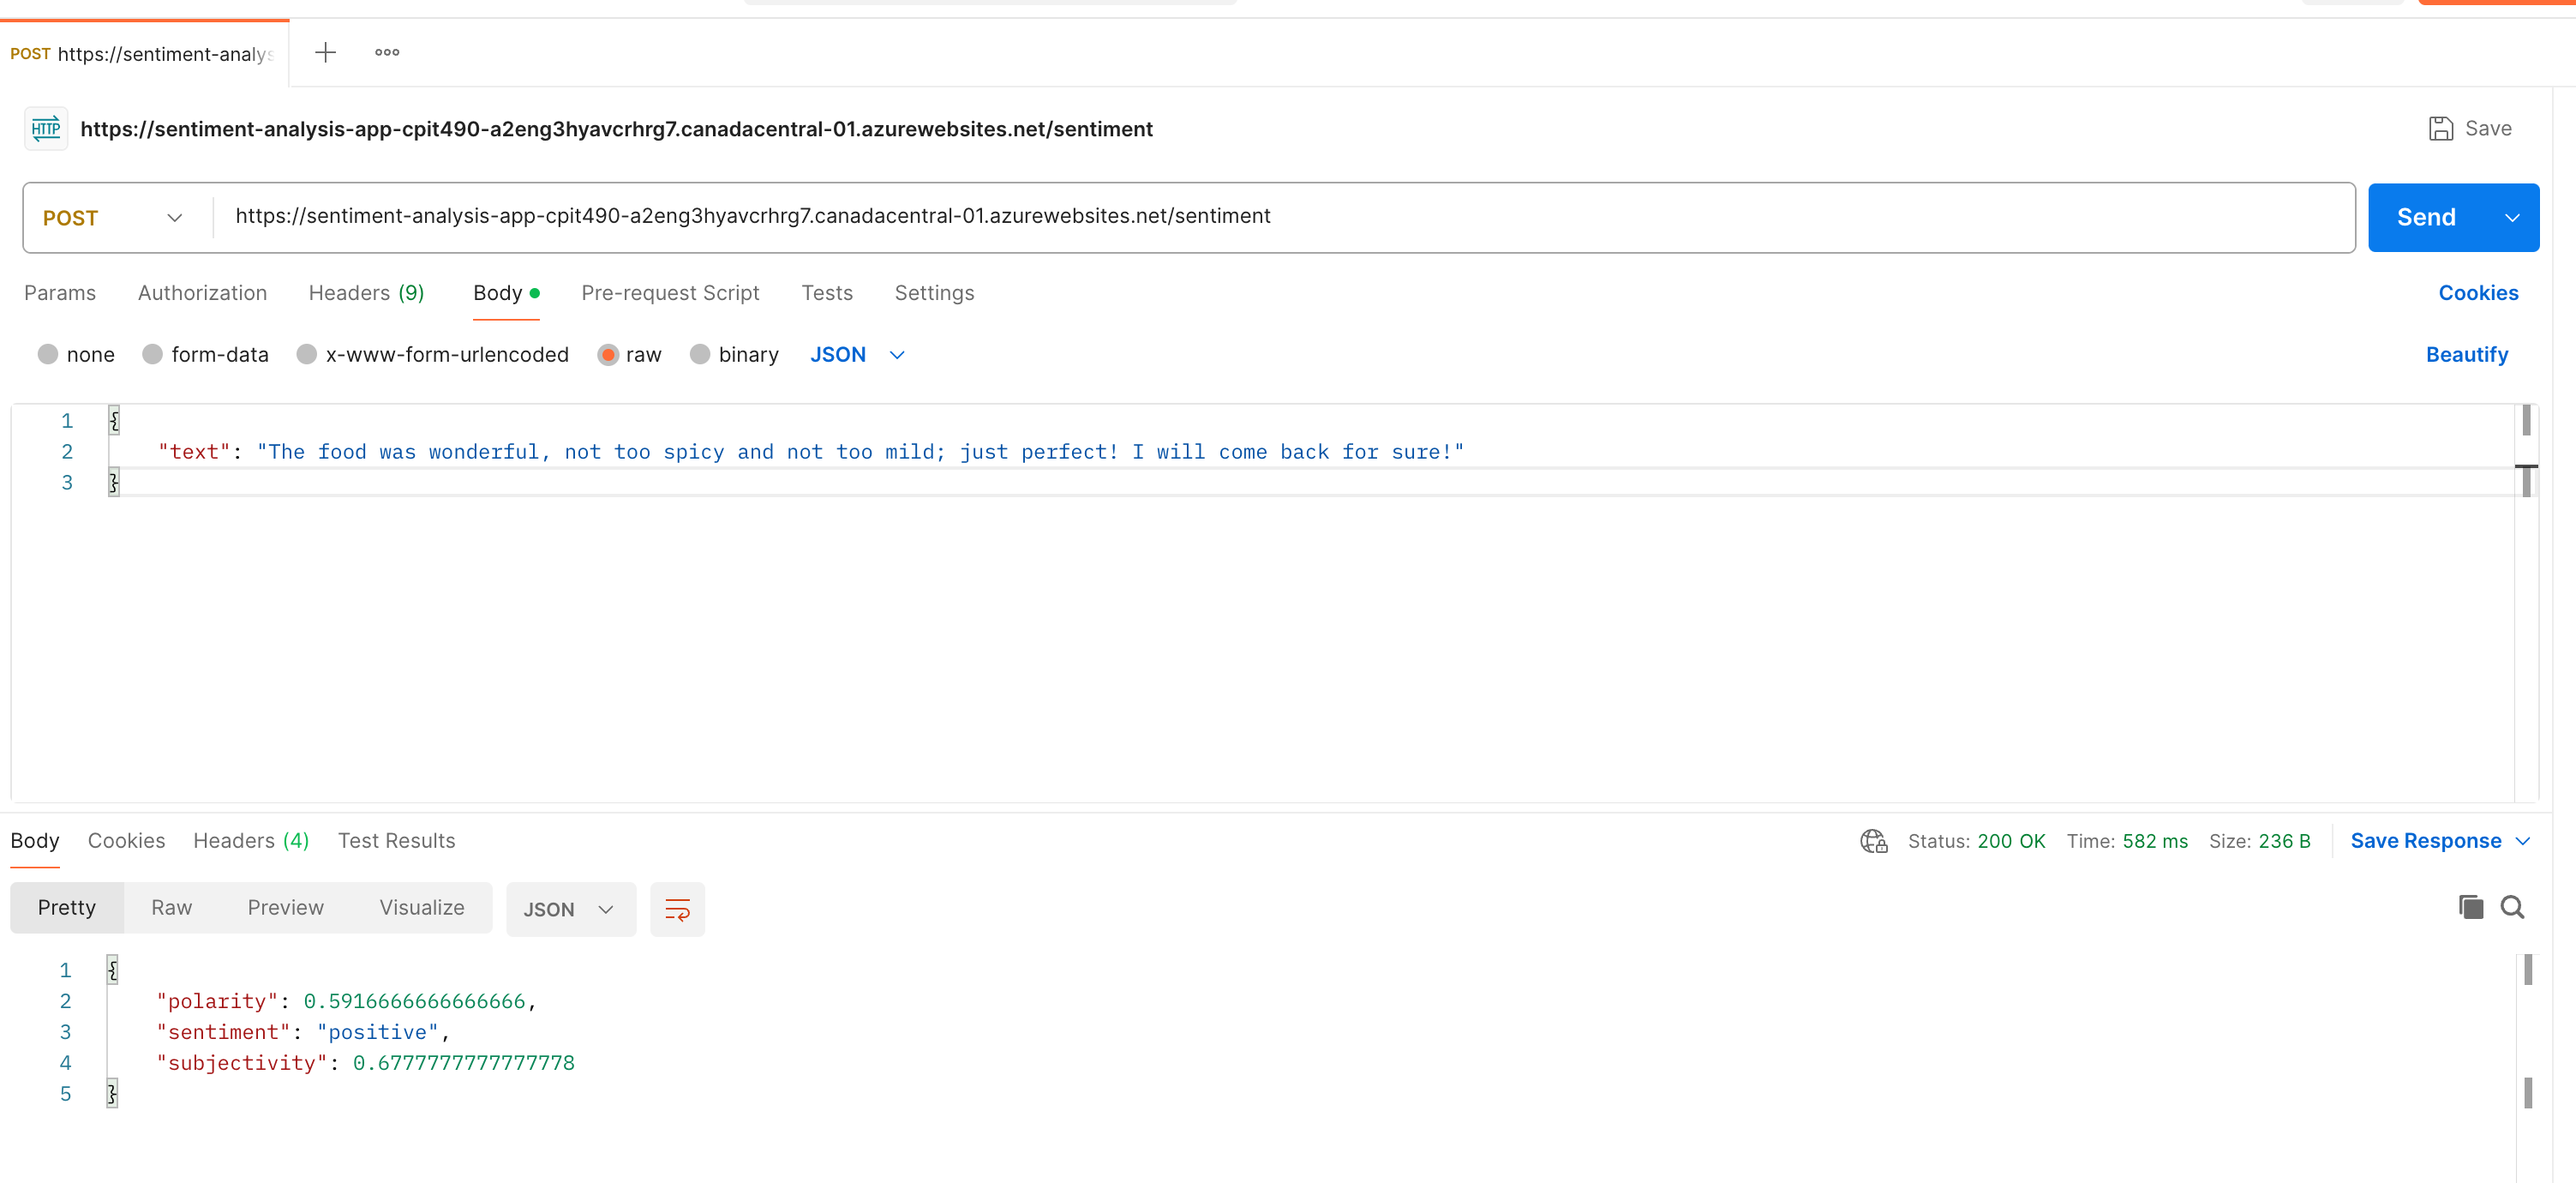
https://myapp-00000.canadacentral.azurewebsites.netand the developed API uses/sentiment, then send an HTTP POST request tohttps://myapp-00000.canadacentral.azurewebsites.net/sentiment. - Test with curl. Please replace the URL in the following with your default domain concatenated with
/sentiment):
curl https://sentiment-analysis-app-cpit490-a2eng3hyavcrhrg7.canadacentral-01.azurewebsites.net/sentiment \ -X POST \ -d '{"text":"This is amazing!"}' -H "Content-Type: application/json"- It should return a response such as
{"polarity":0.7500000000000001,"sentiment":"positive","subjectivity":0.9}
Optional: Test with GUI HTTP Client (Postman)
- Download and install Postman or Similar
- Create a new POST request to the https://Default_Domain/sentiment. For example:
https://myapp-00000.canadacentral.azurewebsites.net/sentiment - Click Headers. Add the HTTP header:
Content-Type: application/json - Click Body, select raw and JSON. Add the following JSON body:
{"text":"The food was wonderful, not too spicy and not too mild; just perfect! I will come back for sure!"} - Click Send
3. FaaS: Deploying to Azure Functions
FaaS is often referred to as serverless computing. It allows you to write small, single-purpose functions that are triggered by events. Unlike IaaS, where you manage and configure the underlying servers or virtual machines, FaaS abstracts away all infrastructure management. Unlike PaaS, which typically involves deploying and managing entire applications or services, FaaS runs individual functions on demand and scaling up automatically and costing you only for the exact execution time of those functions.
We are going to convert the sentiment analysis API code into an HTTP triggered function that defines an HTTP endpoint and deploy it as an Azure Function App. This will allow us to handle incoming HTTP requests, process the text data for sentiment analysis, and return the results immediately without managing the infrastructure and incurring the cost of running and maintaining compute resources.
If you run into an issue, please refer to the official documentation as this lecture note is not kept up to date with changes made to Azure Functions.
Prerequisites
- Visual Studio Code
- The Azure Functions extension for Visual Studio Code.
- Python 3.11 or any Python version that is supported by Azure Functions.
- The Python extension for Visual Studio Code.
- If you are on macOS, you should install Homebrew.
Install Azure CLI, Azure Functions Core Tools, and VS Code extensions
Install the Azure CLI.
- Windows: Download and run the Azure CLI from here
- macOS: Use Homebrew to install the Core Tools on macOS using
brew update && brew install azure-cli
Linux: use your package manager (e.g., APT) to install it as described here
Sign in into Azure CLI. Close and reopen any active terminal window:
az loginWhen you sign in, Azure CLI generates and stores an authentication refresh token, which is used to obtain a new access token when the current one expires:
az account get-access-tokenInstall the Azure Functions Core Tools
- Windows: Download and run the Core Tools installer from here
- macOS: Use Homebrew to install the Core Tools on macOS using
brew tap azure/functionsandbrew install azure-functions-core-tools@4 - Linux: use your package manager (e.g., APT) to install it as described here
Open Visual Studio Code, go to Extensions, and install the following three Microsoft extensions:
In Visual Studio Code, press
F1on Windows orCommand+SHIFT+Pon macOS to open the command palette, and then search for and run the commandAzure Functions: Install or Update Azure Functions Core Tools.- Open the Output Window in VS Code. In VS Code, go to the “View” menu > “Output”. Make sure that there is no error after installing or updating Azure Functions Core Tools. If ypu ran into an error, then you must fix the problem before proceeding into the following steps.
Run the command
func --versionto make sure you have successfully installed it.
Sign in to Azure
- In Visual Studio Code, in the Activity bar, select the Azure icon. Then under Resources, select Sign in to Azure.

- In Visual Studio Code, in the Activity bar, select the Azure icon. Then under Resources, select Sign in to Azure.
Create an Azure Function App
- In the Azure Portal, search for Function App and click on it
- Click + Create
- From the hosting options, select Flex Consumption plan and click Select.
- Under Basics:
- Subscription: Select your subscription and Resource Group
- Function App name: Choose a globally unique name (e.g.,
sentiment-function-YOURNAME) - Region: Select any region (e.g.,
Qatar Central) - Runtime stack:
Python - Version:
3.11 - Instance Size: Select
512 MBor similar for the amount of memory needs to be allocated to each instance of the function app. - Zone redundancy: select
Disabled
- Under Networking: Make sure that Enable public access is turned On, and virtual network integration is Off.
- Under Monitoring: you may disable Application Insights.
- Click Review + create then Create
- Once the Function App is created, click on Go to resource.
- Under Overview, select the Functions tab.
Create the Function
- Open a new Visual Studio Code window, press
F1on Windows orCommand+SHIFT+Pon macOS and search for and run the commandAzure Functions: Create New Project....- Select the current directory location for your project workspace
- Select Python for the language, 3.11 for the version,
- Select HTTP trigger for the template
- Enter a name the function (e.g.,
http_trigger_sentiment_analysis) - Select Function for the authorization level.
- Open a new Visual Studio Code window, press
Write the Function Code
- Open
requirements.txtand add the following dependencies:nltk==3.8.1 textblob==0.17.1 - Click on the already open Terminal window, run
pip install -r requirements.txtNote: If you try to run this from a different terminal window (e.g., PowerShell, VS Code Terminal, or Apple Terminal), then you must activate the local virtual environment as follows. Windows:
.venv\Scripts\activate, macOS:source .venv/bin/activate, Linux:source .venv/bin/activate. This is because the dependencies are installed locally in the virtual environment and need to be activated to be accessible.
- Open
function_app.pyand replace the code with our sentiment analysis function code.
- Open
import azure.functions as func
import logging
import json
from textblob import TextBlob

app = func.FunctionApp(http_auth_level=func.AuthLevel.FUNCTION)

def analyze(text):
    tb = TextBlob(text)
    d = dict()
    d['sentiment'] = 'positive' if tb.sentiment.polarity > 0 else 'negative'
    d['polarity'] = tb.sentiment.polarity
    d['subjectivity'] = tb.sentiment.subjectivity
    return d

@app.route(route="http_trigger_sentiment_analysis")
def http_trigger_sentiment_analysis(req: func.HttpRequest) -> func.HttpResponse:
    logging.info('Python HTTP trigger function processed a request.')

    text = req.params.get('text')
    if not text:
        try:
            req_body = req.get_json()
        except ValueError:
            return func.HttpResponse(
                "Invalid JSON in request body",
                status_code=400
            )
        else:
            text = req_body.get('text')

    if text:
        try:
            result = analyze(text)
            return func.HttpResponse(
                json.dumps(result),
                status_code=200,
                mimetype="application/json"
            )
        except Exception as e:
            logging.error(f"Error during sentiment analysis: {str(e)}")
            return func.HttpResponse(
                json.dumps({"error": "Failed to analyze sentiment"}),
                status_code=500,
                mimetype="application/json"
            )
    else:
        return func.HttpResponse(
            json.dumps({"error": "Please provide text parameter in query string or request body"}),
            status_code=400,
            mimetype="application/json"
        )
- Run the function locally
- Run the function using:
func start
- The function should start successfully and display the HTTP trigger URL. The output will look similar to:
Worker process started and initialized.

Functions:

        http_trigger_sentiment_analysis:  http://localhost:7071/api/http_trigger_sentiment_analysis
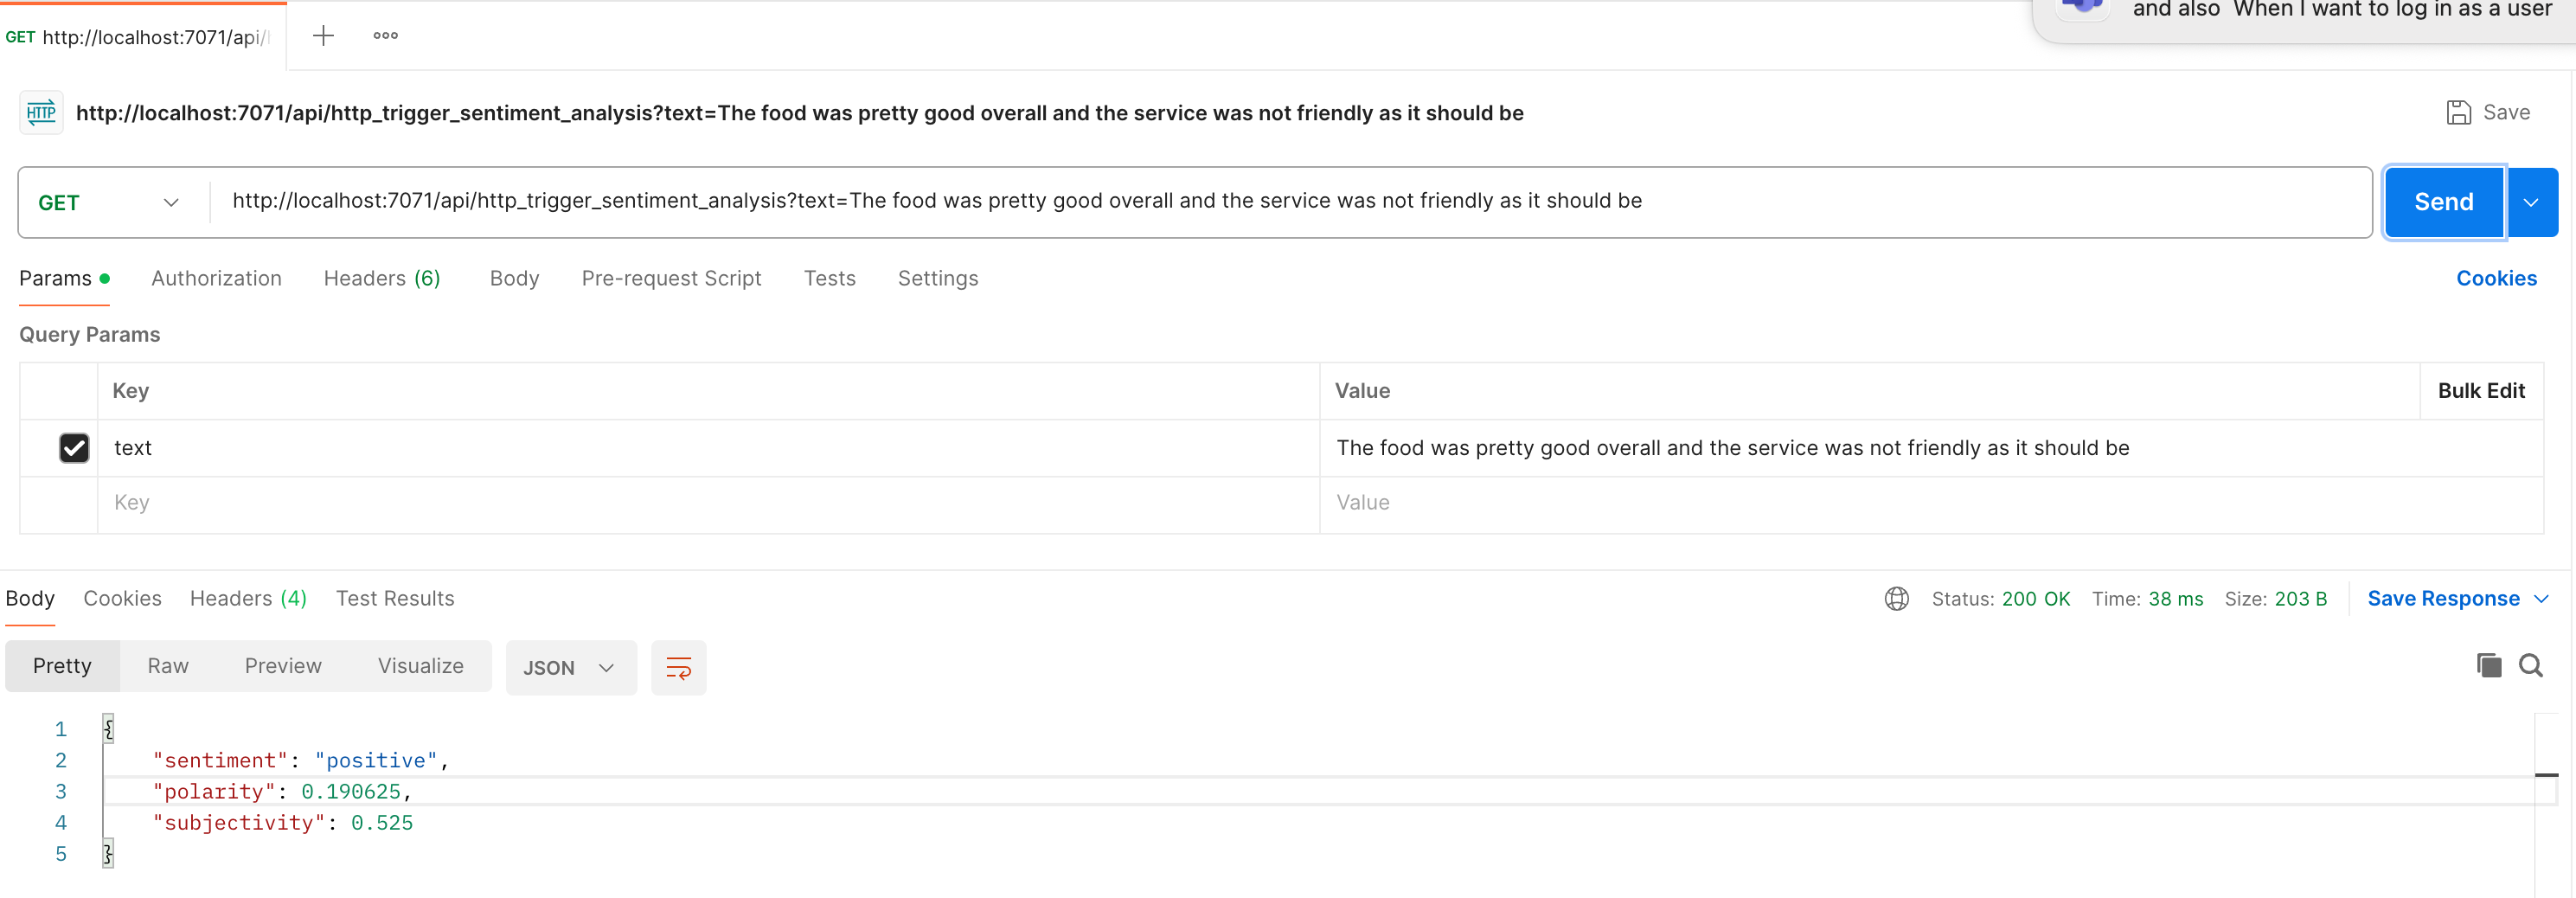
Test the function locally
- From the terminal window that has the Python virtual environment activated and the working directory is the project directory, the run
func start- If you run into port already being used then find the process that uses this port using
lsof -ti:<port_number>then kill it usingkill -9 <port_number.
- If you run into port already being used then find the process that uses this port using
- Test the service using:
curl -X POST "http://localhost:7071/api/http_trigger_sentiment_analysis" \
 -H "Content-Type: application/json" \
 -d '{"text": "I love this product! It is amazing!"}'
{"sentiment": "positive", "polarity": 0.6875, "subjectivity": 0.75}- You may also test the function using Postman:
- From the terminal window that has the Python virtual environment activated and the working directory is the project directory, the run
Publish the Function to Azure We will deploy the function project files directly to our Azure function app using zip deployment.
- Stop the function that you ran locally using
CTRL-C. - Deploy the project files from the current directory to the
<FunctionAppName>as a .zip deployment package. Replace<FunctionAppName>with the name you chose on Azure in step 3 (e.g., sentiment-function-cpit490).
func azure functionapp publish <FunctionAppName>
- Test the function from the same Terminal Window you used to publish it:
curl -X POST "https://sentiment-function-cpit490-hqebaxexbcead9bs.canadacentral-01.azurewebsites.net/api/http_trigger_sentiment_analysis" \
-H "Content-Type: application/json" \
-d '{"text"
: "I love this product! It is amazing!"}'
- Testing the function With Auth Keys
- Testing the function from any location where the Azure session token has expired requires authentication keys. Azure Function requires authentication by default. Azure Functions are created with
AuthLevel.FUNCTION, which means you need to include a function key in your request.- Get the function key using this command after replacing the function app name and resource group name with yours:
az functionapp keys list --name sentiment-function-cpit490 --resource-group cpit490
{
  "functionKeys": {
    "default": "JEpnsadfsdfsdfwlbsWjnp8i5cSWYhF9CDUAXaxk97isI8CAzFupfw_lQ==a"
  },
  "masterKey": "abcdefghijklmnopqrswvn7hb4Y4jT65zXJ99DAzFuun8tWA==",
  "systemKeys": {}
}
- Copy the auth key (functionKeys.default) and include it as a query parameter as follows:
curl -X POST "<AZURE_FUNCTION_DEFAULT_DOMAIN>?code=<FUNCTION_AUTH_KEY>" \
-H "Content-Type: application/json" \
-d '{"text": "I love this product! It is amazing!"}'
- For example:
curl -X POST "https://sentiment-function-cpit490-hqebaxexbcead9bs.canadacentral-01.azurewebsites.net/api/http_trigger_sentiment_analysis?code=JEpnsadfsdfsdfwlbsWjnp8i5cSWYhF9CDUAXaxk97isI8CAzFupfw_lQ==a" \
-H "Content-Type: application/json" \
-d '{"text": "I love this product! It is amazing!"}'
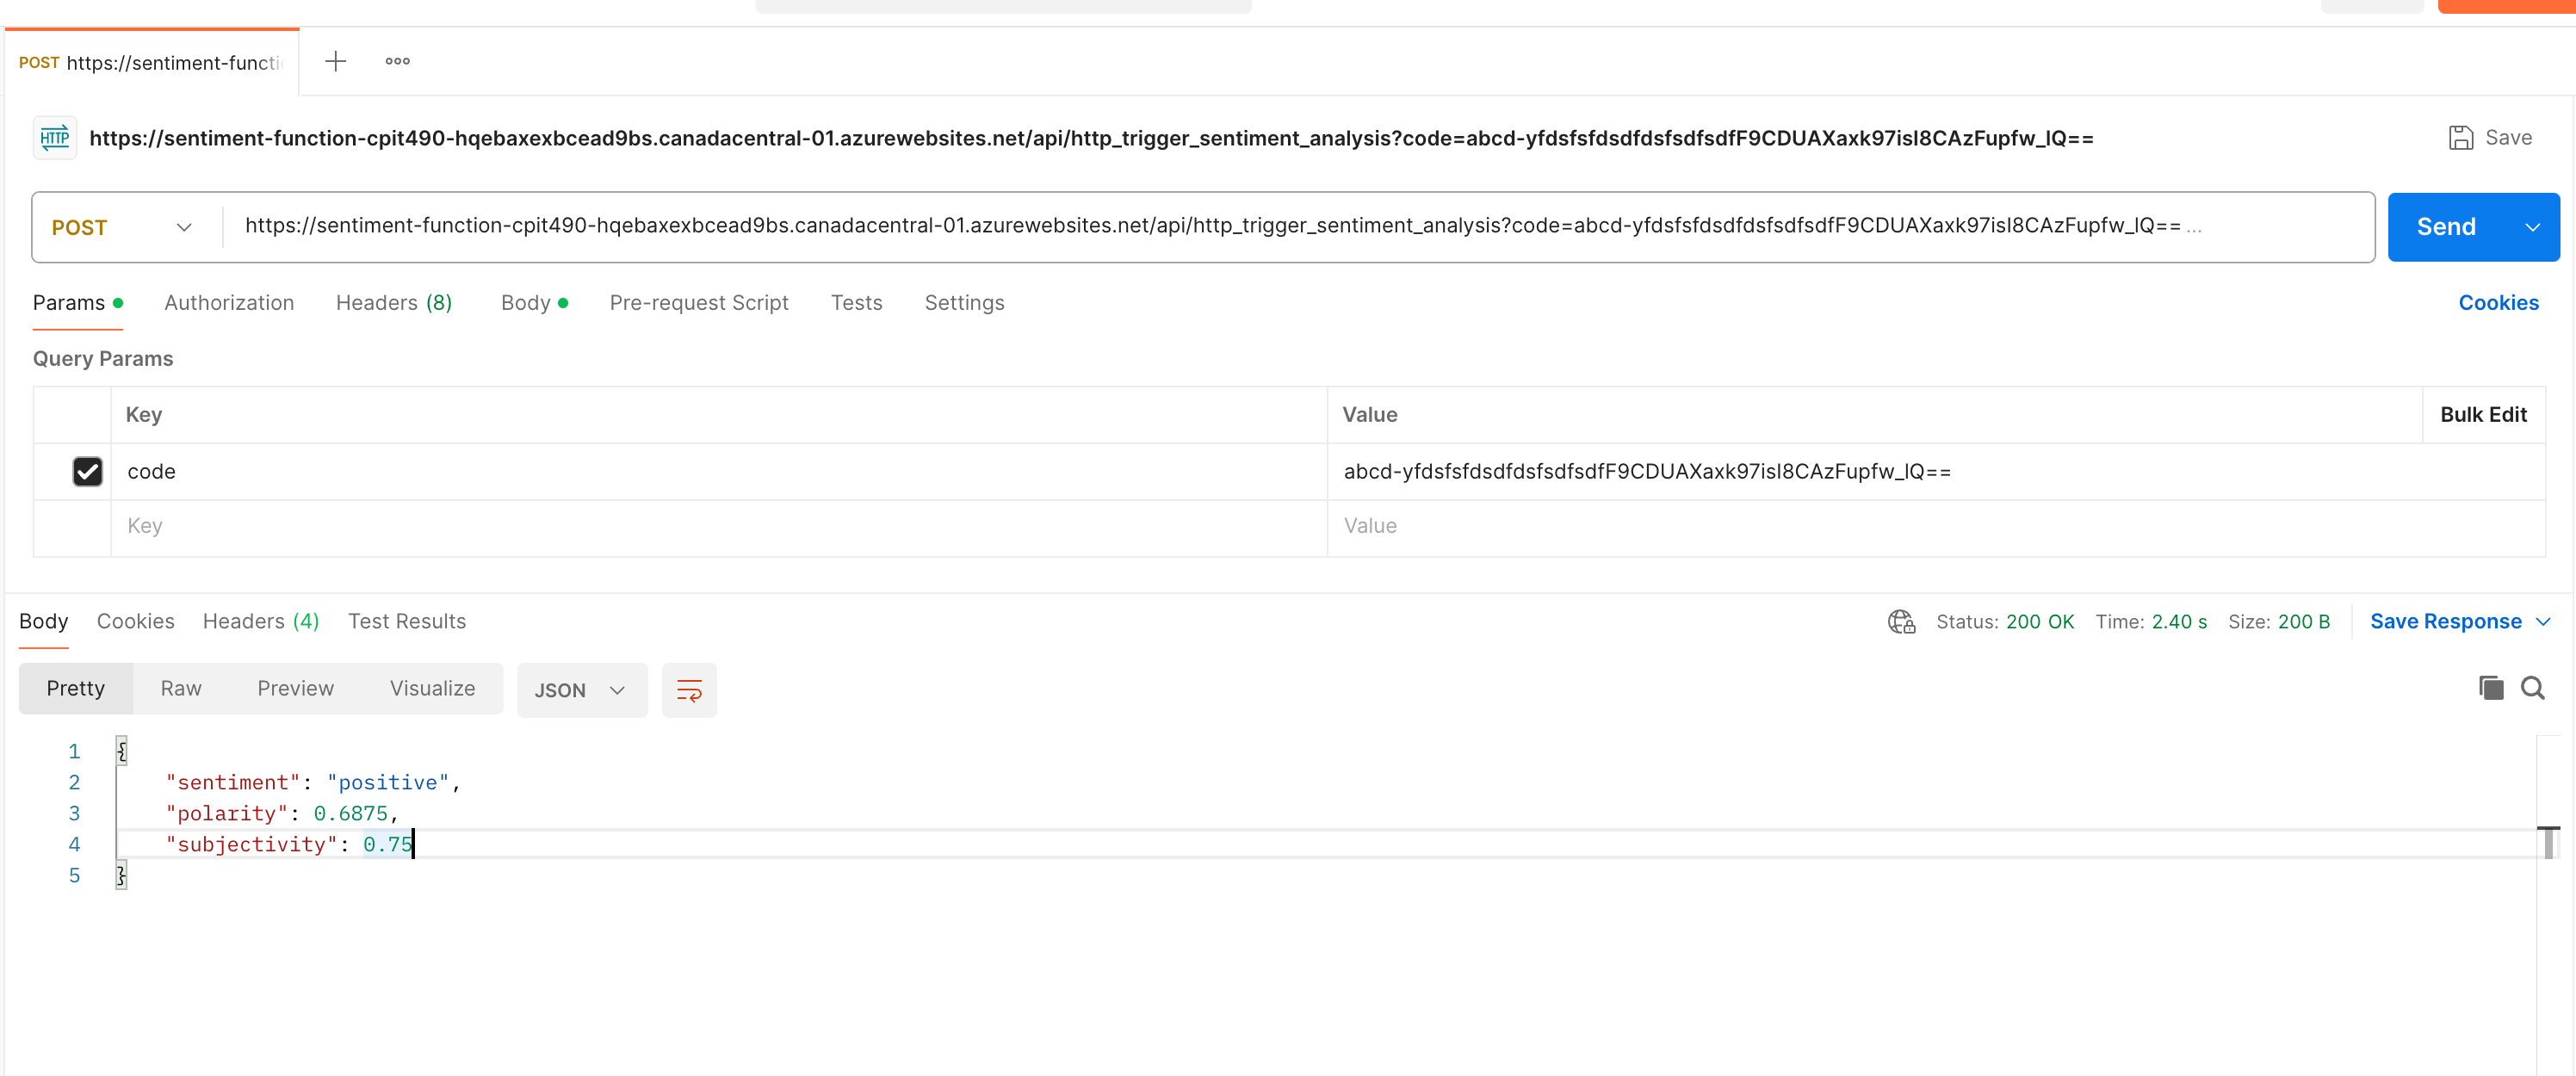
- Testing with Postman
- Open Postman and create a new POST request
- Set the URL to your Azure Function endpoint with the auth key as a query parameter:
https://sentiment-function-cpit490-hqebaxexbcead9bs.canadacentral-01.azurewebsites.net/api/http_trigger_sentiment_analysis - Under Query Params, add
- Key:
code - Value: The auth key (functionKeys.default) you obtained from running
az functionapp keys list --name sentiment-function-cpit490 --resource-group cpit490:
- Key:
- Under Headers tab, add:
- Key:
Content-Type - Value:
application/json
- Key:
- Under Body tab:
- Select raw
- Choose JSON from the dropdown menu
- Enter the following JSON:
{"text": "I love this product! It is amazing!"}
- Click Send to test the function.
- You should receive a JSON response similar to:
{"sentiment": "positive", "polarity": 0.6875, "subjectivity": 0.75} - Example Postman configuration:
Azure CLI Tokens Expiration Issue
If you try to publish the Azure function and get an error message that says: Unable to connect to Azure. Make sure you have the
azCLI orAz.AccountsPowerShell module installed and logged in and try again. Then this is often caused by an expired Azure CLI refresh token. To fix this, re-authenticate with Azure CLI using:az login --scope https://management.core.windows.net//.default. This should open a web browser for you to complete the authentication, and once done, the deployment should work successfully. If you run into any other issues, then please read the official documentation on create an Azure Functions project.