In this lecture note, we will see how to set up a domain name and link it to a VM instance.
What is a domain name?
A domain name is used to identify one or more IP addresses. It consists of a name and a top-level domain (TLD), which is at the highest level in the hierarchical Domain Name System of the Internet after the root domain. In addition to TLD, a domain also contains a second-level domain For example, the domain name www.example.com, the top-level domain is ".com", while the the second-level domain of the .com TLD is “example”.
Since Microsoft Azure provides a generous credit of $100 to students, we will see how to link a domain name to a virtual machine (VM) instance on Azure.
Associate a domain to a VM instance
Step 1: Launch an instance on Azure and create a public/static IP address using the Azure portal
- Log into the Azure portal.
- Click on Virtual MAchines.
- Click on create a virtual machine -> Azure virtual machine.
- Select a region and Ubuntu as the operating system.
- Select Next: Disks, then Next: Networking.
- In the Networking tab, select or enter the following:
- Select Select default virtual network and subnet.
- For the Public IP Create new.

- Click “Review + create”.
Step 2: Obtain a domain name through a domain registrar
You may purchase a domain name and register it with any domain registrar. (e.g., namecheap, Google domains. Some cloud providers feature a domain registration service (e.g., Amazon Route 53, Google cloud. As a student, you should take advantage of free services and utilize GitHub’s education pack which at the time of writing this lecture note, it comes with a free domain registration via Namecheap (.me tld), Name.com (.live tld), and .TECH (.tech tld).
Getting a free student .me domain with Namecheap via the GitHub Student Developer Pack.
- Sign up for the GitHub StudentDeveloper Pack.
- Sign up on NameCheap with your personal Gmail account.
- Go to https://education.github.com/pack and click on “Your benefits”.
- Claim the free .me domain name offer from NameCheap by going to https://nc.me/
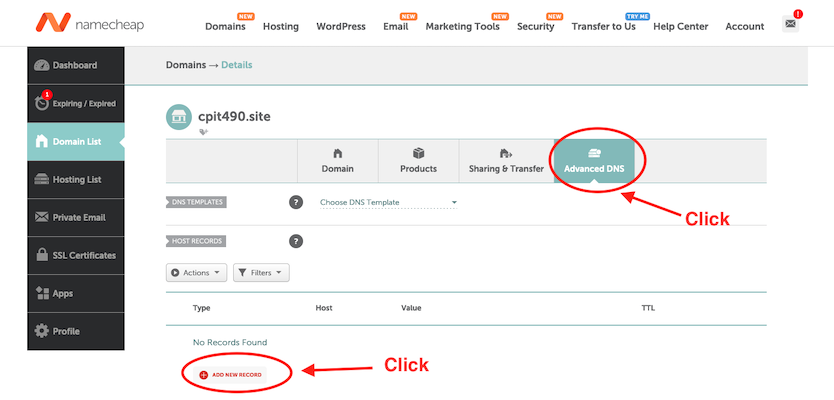
- Go to the Dashboard on NameCheap and click on “Manage” then “Advanced DNS”
- Add an A record that points to the static/public IP of your VM instance: Type: “A”, Host: “@”, Value: “The static public IP Address of your VM”
Step 3: Link the domain to the VM instance
- Go to your domain provider (NameCheap, Google domains, GoDaddy, etc.) and navigate to DNS settings.
- For example, the procedure for the NameCheap domain registrar is as follows:
- Sign in to your Namecheap account.
- Find Domain List from the left sidebar and click on the Manage button next to your domain name.
- Click on the Advanced DNS tab and find the Host records section.
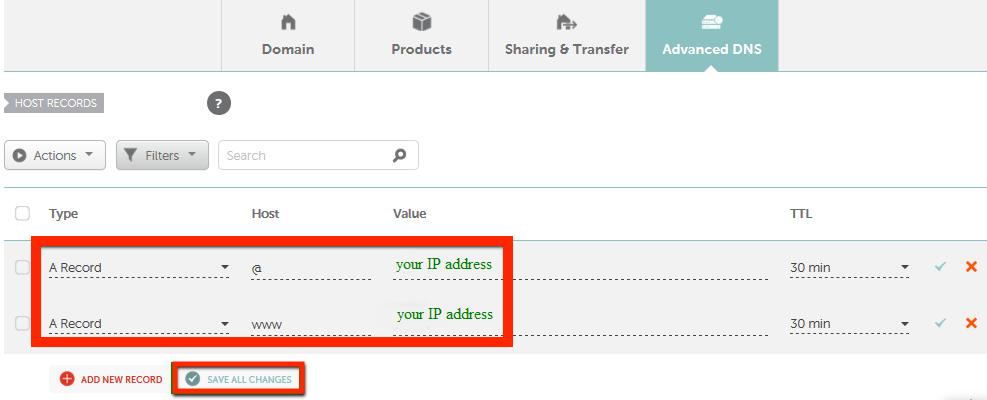
- set up two A records:
- An A Record for the @ host mapped to the IP address of your VM instance.
- An A Record for www mapped to the same public IP address of your VM instance.
- You may need to wait several hours for DNS propagation to take effect.
Clean up resources
If you’re not going to continue to use your application, delete the public IP address and the VM.